How To Make A Wall Clock From An Embroidery Hoop And Linen Fabric

Wall clocks gradually went from being a practical necessity in our home to becoming decorative and retro. We don’t really need a physical wall clock anymore these days when we have the convenience of checking our phones, wristwatches, or having the time displayed on the kitchen appliances.

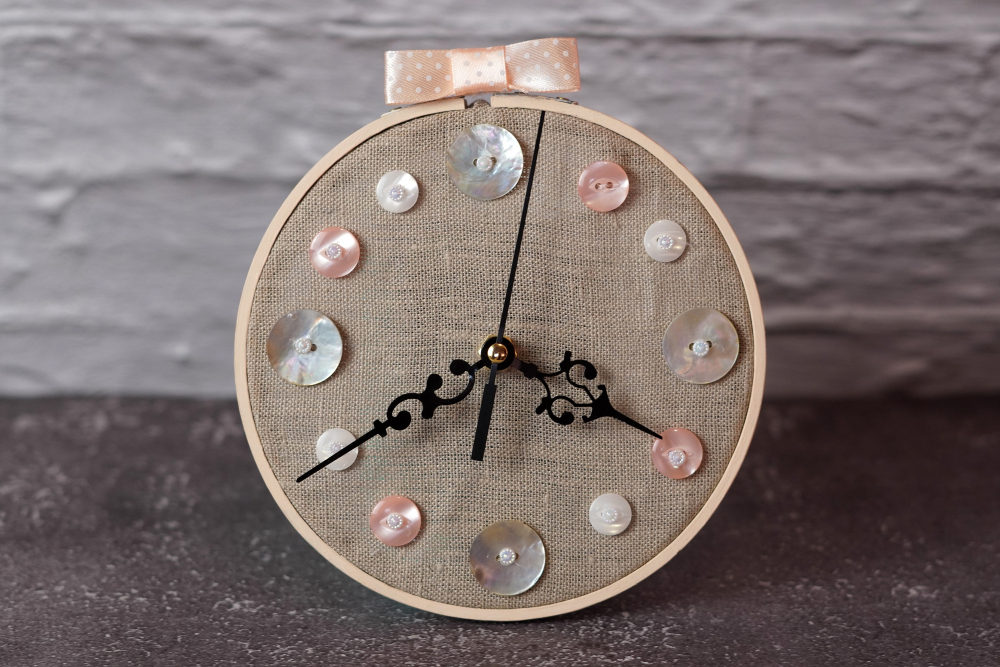
But rather than considering it outdated and useless, we can focus more on the aesthetics and we can work on beautiful projects like making a DIY wall clock using an embroidery hoop and a few buttons. This simple project won’t take you long to put together and uses only a few basic household supplies. However, you’ll find it creates a stunning clock that can be placed anywhere in your home. The buttons still make it easy to tell the time quickly, but it’s a more fun decorative item than a chunky, traditional wall clock. Here’s what you need to know about this project.
Create a Unique Wall Clock to Display Anywhere in Your Home

Materials you’ll need for the embroidery hoop wall clock:
- Embroidery hoop
- linen fabric
- clock structure
- buttons
- needle
- thread
- scissors
- creme coloured acrylic paint
- paint brush
- silk ribbon
- hot glue
How to craft the embroidery hoop wall clock:
Step 1: Gather all the supplies
Get all the supplies that you’re going to need ready and place them on your work surface. It’s nice to have them close at hand and organized so you don’t have to constantly look for them around the house. Pick a clock mechanism that you like, with a design that suits your style. Perhaps you can find an old clock that you can take apart and reuse the mechanism from that. It would be a nice way to recycle a few of the components. Remember, you don’t have to follow the color scheme we are using if it doesn’t match your home. Choose any color buttons and frames to fit the room you are going to place your new wall clock in.

Step 2: Paint the embroidery hoop
Take the hoop apart and paint the outer one using a cream-colored acrylic paint. It’s not necessary to paint the other one as well since it won’t be visible. We’ve gone with a classic cream color, but choose something bolder if you are feeling more daring with your DIY project.


Make sure you paint the exterior and the edges too. These surfaces will be visible once the clock is put together so you want them to look nice and clean all around.

Step 3: Secure the fabric between the two hoops
Once the paint is dry, take the piece of linen fabric that you’ve prepared in advance and center it over the smaller hoop. Then place the other one over it so that the fabric is secured between the two hoops. Make sure it’s nice and tight.

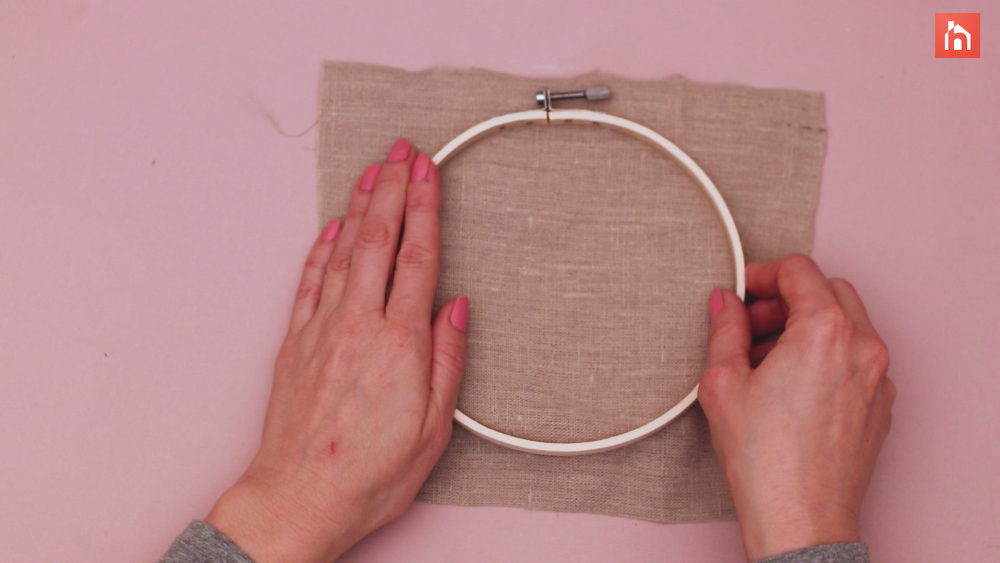
You only need a small piece of fabric for this project. A square would do, one that’s slightly bigger than the embroidery hoop. We think this neutral-colored fabric is the perfect base for our project today. While you could go for something brighter, you want to make sure it’s easy to tell the time from a distance. If you use a color that’s too close to your clock hands, you’ll find that you are always squinting to see the time, defeating the object of this project.
Related: Modern and Cool Wall Clocks That Favor Looks Without Neglecting Function

Make sure the fabric is tightly stretched between the hoops without any wrinkles. The placement at this point will be permanent.
Step 4: Cut the excess fabric
If you’re happy with how the fabric is centered and stretched you can proceed to cut the excess around the hoop. Make sure to leave a little bit of fabric around the outside, cutting in a circle and getting rid of the corners and anything that’s too much. Don’t leave too much of a trim. 1 cm or so is enough.


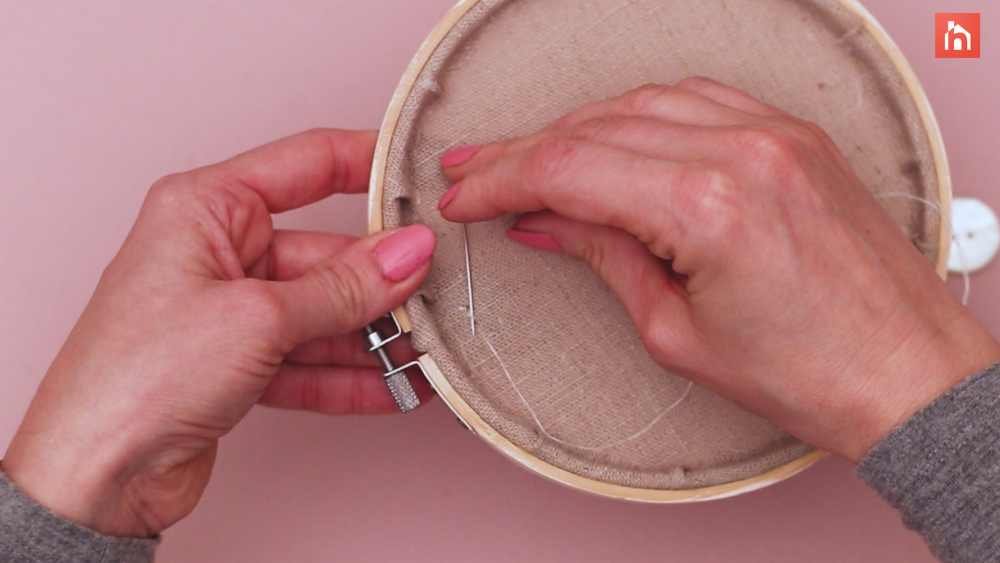
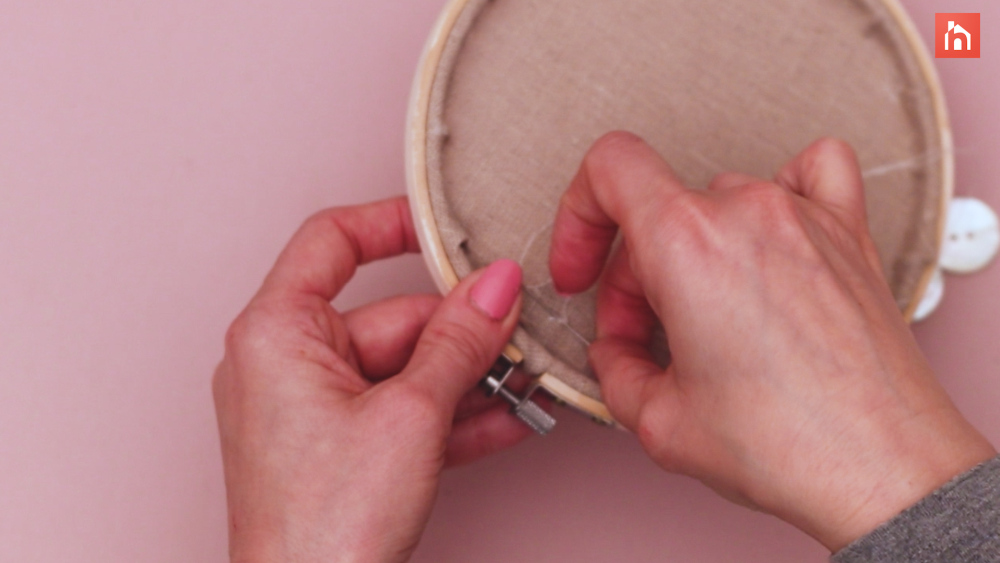
Step 5: Glue the fabric trim to the hoop
The reason why you shouldn’t leave a lot of fabric around the outside is because you’ll now have to fold it and glue it to the interior of the hoop. That will give the clock a clean and chic look without any messy parts. This stage is essential to create a professional-looking clock that you’ll enjoy hanging in your home. It helps to give your clock the smooth and rounded edges that we would expect from this type of product.


Start from the top and fold the linen fabric a little bit at a time, adding a little dot of hot glue each time and making sure it holds. Press the fabric in place for a few seconds each time.


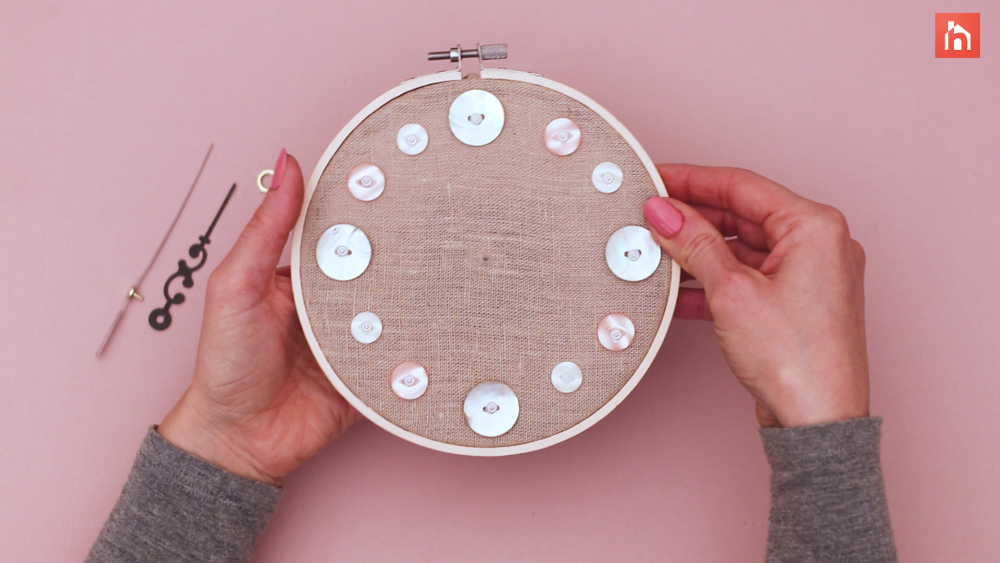
Step 6: Sew on the large buttons
As you may have noticed, not all the buttons are the same size or color. They could be, of course, but using different types gives the clock a bit more character. You can use four large buttons for the 12, 3, 6, and 9 o’clock placing them at the four cardinal points on the surface of the clock. To make it easier for you and your family to tell the time, try to keep the buttons in sets of four, so you quickly learn what each color and size of the button means. While an abstract look may seem fun to some individuals, it will make telling the time impossible if your buttons are mismatched.


Sew each button onto the canvas using a needle and some white or cream-colored thread. Make sure the placement is right before you go ahead and secure them in place.

Be sure to do a double knot at the back so the buttons don’t fall off.


Step 7: Add the next four buttons
It’s then time to sew on the next four buttons. These should be smaller than the first four ones and it could be nice for them to also have a slightly different color as well. Place these to the right of the existing buttons, where 1, 4, 7, and 10 o’clock would be.


Like before, make sure they’re tight and secure and they stay in place. Don’t worry, the back side won’t be visible and doesn’t need to be perfect.


Step 8: Add the final four buttons
The last four buttons can be even slightly smaller than the previous ones and again in a slightly different color. They’ll fill the remaining four spaces on the surface of the clock, completing the circle. Make sure they’re all evenly spaced apart.


Sewing the small buttons is no different than what you did before. Position them in place, run some thread through the two holes a few times and then turn the hoop and secure them in the back as well.


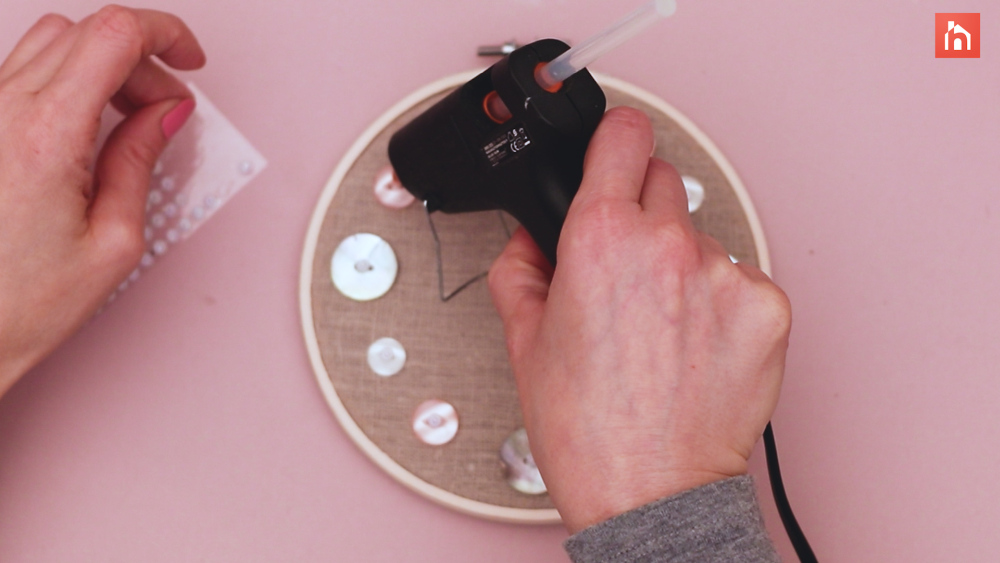
Step 9: Add a tiny decoration on top of each button
When you’re done sewing all the buttons and you’re happy with how they’re arranged, take your hot glue gun and put a tiny dab of glue to the center of each button. Then press a little decoration on top of it and press gently. These decorations can be tiny buttons, beads, rhinestones, and various other things. They’ll create a nice layer and will give your clock a bit more style and character.


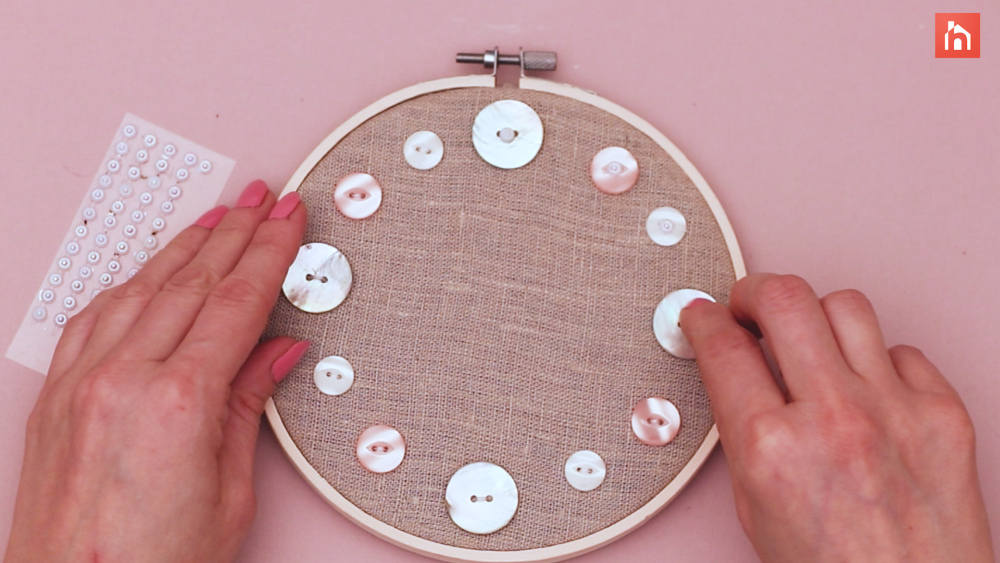
Start with the button at 12 o clock and go around until you’ve decorated all the buttons. Place these little ornaments at the center of each one to hide the thread.

Step 10: Install the clock mechanism
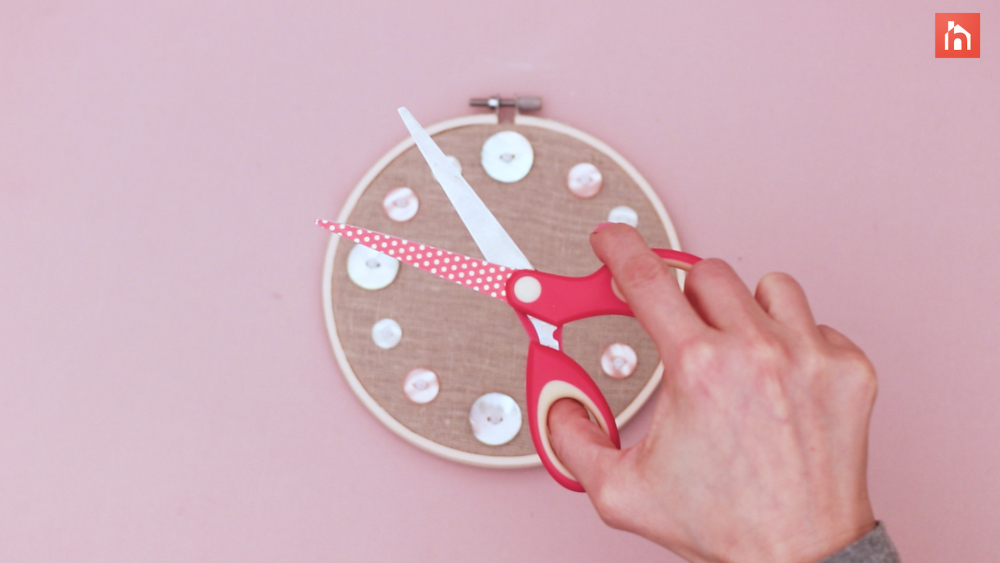
This is the final step of crafting a DIY wall clock and the one which involves installing the actual clock mechanism. First, you will make a tiny hole at the center of the clock for the mechanism to fit through. You can do that with your scissors. Then take the back piece which holds the batteries and push it through, securing it in place. Then add the hands and you’re done!
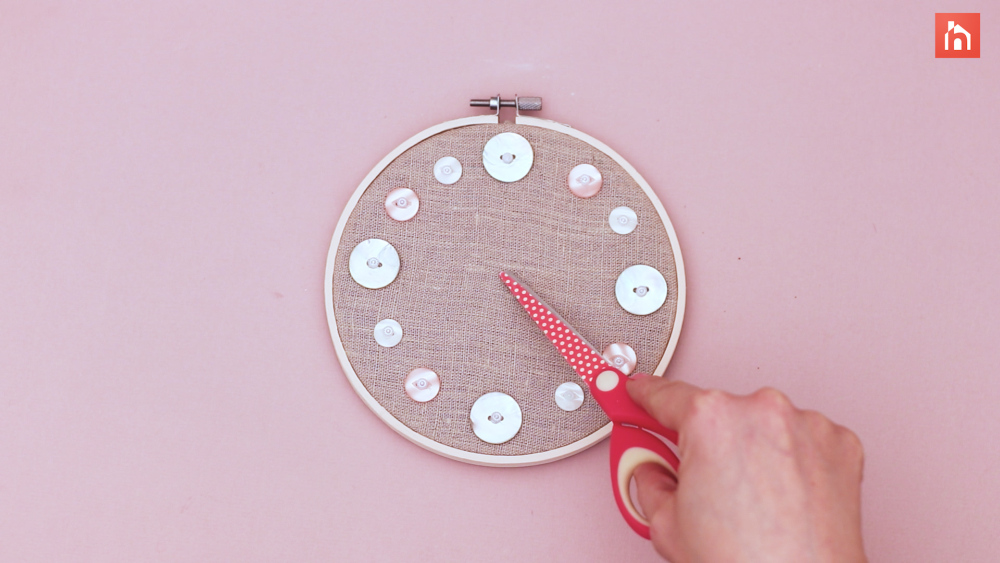
The hole at the center doesn’t need to be big. It just needs to let the central rod of the mechanism to fit through so the front and back sections can be secured together.


The clock hands are added at the very end and once they’re in place this project is basically complete. After that you can add the little ribbon bow at the top to hide the hoop screw if you want. Just take a piece of silk ribbon and make a small loop, then run another piece across and glue it onto the clock at the top, just above 12 o’clock.


If you’ve made it this far, you should now have a brand new wall clock ready to display in your home. This DIY wall clock would look great in almost any room in your house, including your kitchen, living room, guest bedroom, or home office. It adds a unique decoration to any space and offers a fun and modern twist on a traditional wall clock. Of course, you can decorate the clock to fit your needs by adding different colored buttons and clock handles to match your home décor.
We hope you’ve enjoyed creating this wall clock with us today. The next time you need a new home decoration, you should consider using a DIY pattern first instead of relying on store-bought items. You’ll find this adds a much more personal touch to your home, and your friends and family members will always admire your handiwork when they visit. Make sure you join us back here again soon for more easy DIY projects to spruce up your home this year.