DIY Felt Ball Coasters – A Simple and Sweet Holiday Gift Idea

There are fewer gifts better than the handmade, thoughtfully customized gift given during the holidays. If you’re looking for just such a gift, you’re going to love this tutorial on DIY wool felt ball coasters. The colors and size are completely personalize-able. Plus, it comes at the time of year when steaming mugs of this and that are taken throughout the house and enjoyed.

So make this gift for a friend, or keep them for yourself, but don’t hesitate to make these coasters. They’re an automatic gifting win.

DIY Level: Beginner

Materials Needed:
- 2 cm wool felt balls in the color(s) of your choice, 19 balls per coaster
- Heavy duty thread
- Large needle

Note: There are a variety of ways you could sew these coasters. In fact, no two coasters were sewn exactly the same way in this set. However, I’ll share the basics and the methods that worked best for me.

Cut about 3m of thread, then thread your needle and knot the ends together securely. Choose your center ball, and slide the needle directly through on its center axis. Choose another ball, and do the same, sliding the balls close together.
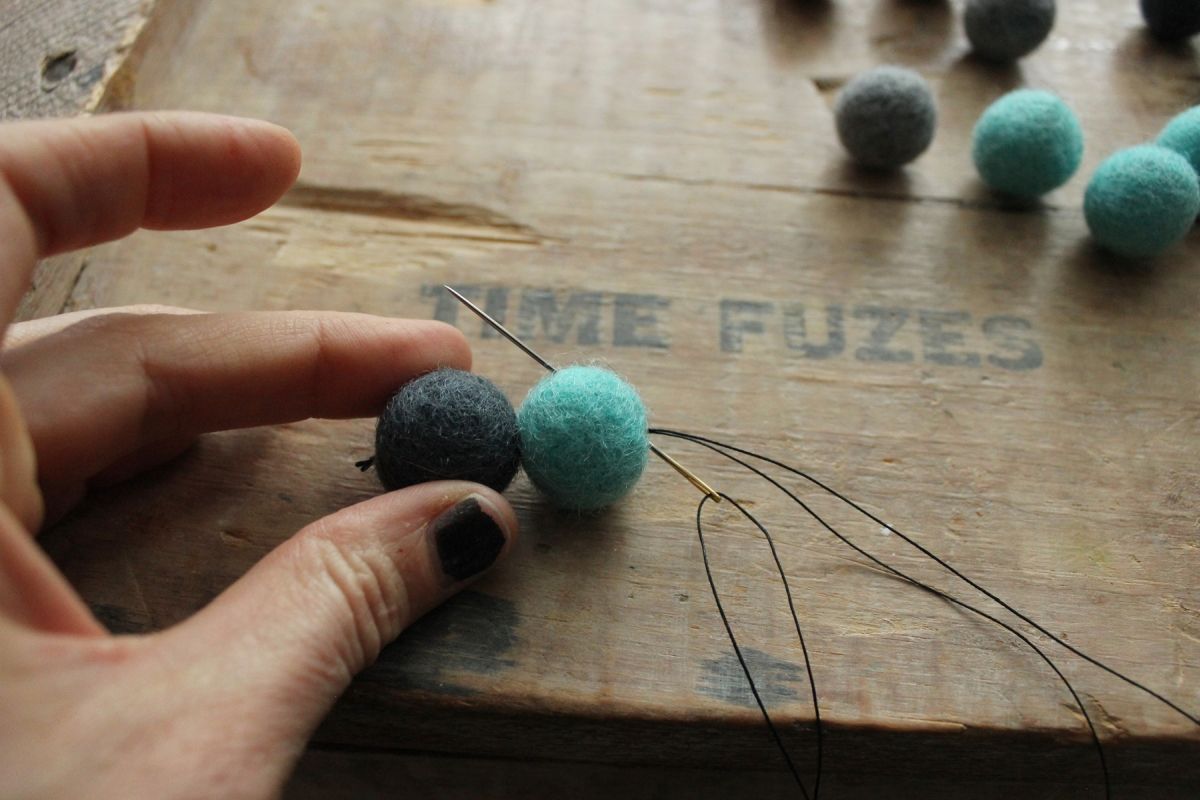
Insert your needle close to the original thread exit spot, and pull the needle out about 90 degrees over (as opposed to the 180 degrees/polar axis holes originally). This positions the needle to easily and invisibly attach to the next felt ball.

Thread on the next felt ball through the polar axes.

At this point, you can add two more felt balls onto your thread. However, as you get closer to the perimeter of your coaster, you’ll want to position the felt balls individually rather than stringing them on in multiples.

Pull the strung balls around to surround the center ball, then insert the needle through the center ball toward the first unconnected ball. (That is, the first ball that’s not already directly connected to the center ball, which in this case is the third overall ball you’ve strung.)

Pull the needle and thread all the way through.

Work your needle into a position that will allow you to connect each ball to the center ball. Ultimately, your goal with this coaster is to connect with a thread link each ball to every other ball it’s touching.

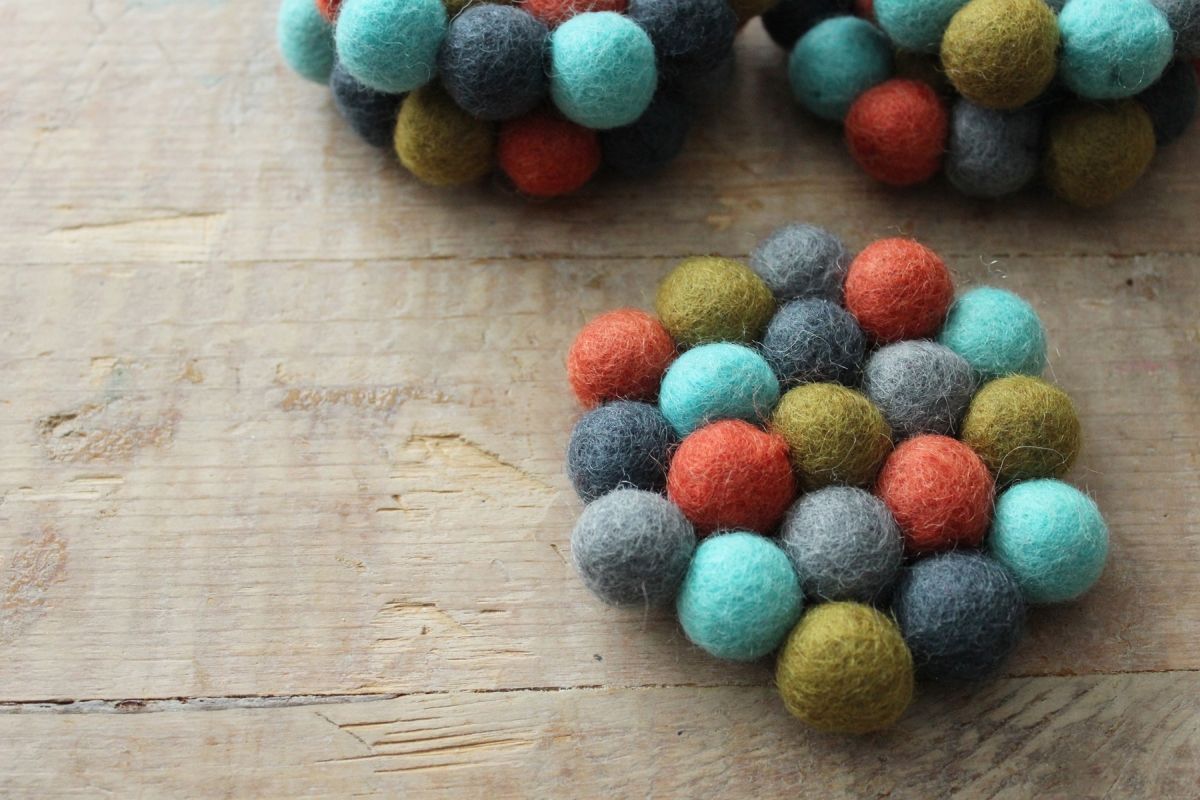
Remember which ball is your center/starting point, because it makes a difference how the rest of the felt balls are arranged. The center ball is surrounded by six balls, which will be surrounded by twelve more.

String and connect the final two wool felt balls in your first six-ball perimeter around the center ball.

Continue in this way as you move to the outer 12-ball perimeter. Think of it in terms of an outer hexagon with three balls per side. Some tips I can offer are: (1) You don’t have to go through multiple balls in one needle poke. You can simply go through one ball, pull out, then re-align the needle through the next felt ball to get where you want to be. (2) Don’t worry about connecting every felt ball to all the surrounding ones at the first pass; you’ll have opportunities as you go to do this. Focus on fewer needle pokes overall, rather than a completely systematic order as you’re sewing them on. (3) Pull tightly on the thread, but not so tight that it deforms the wool felt balls. (4) Enjoy the creative process!

When you’ve connected each wool felt ball to all its surrounding balls, it’s time to wrap this coaster up. Tie a double knot in your thread somewhere in the center of the coaster, right up against the side of one of the felt balls.

Then thread the needle through, from the point of the knot, two or three other felt balls until the needle exits at the perimeter of the coaster.

Pull the needle tightly.

Use sharp scissors to cut the thread (but not the felt ball!) right next to the side of the ball.

When the tension on the thread is released after cutting, it will recede into the felt ball just enough to disappear.

Continue working on your coaster set(s) until you’ve made as many as you need for your gifts. Then make four more for yourself.

Congrats! You’ve just created a gorgeous, personalized coaster set out of wool felt balls, and they are every bit as functional and beautiful as you could hope for.
Whoever the special someone is in your life who’s lucky enough to receive this, well, they’re going to be thrilled.

Happy DIYing! (By the way, the felt ball colors used in this coaster gift set are: battleship grey, coral orange, turquoise blue, charcoal grey, and olive green.)