How to Sew by Hand: Seven Basic Stitches


Hand sewing is a useful skill that many people lack, but it’s also easy to learn. Learning how to sew by hand will empower you to make basic clothing alterations, fix torn fabric, and tackle your own hand-sewn craft projects.
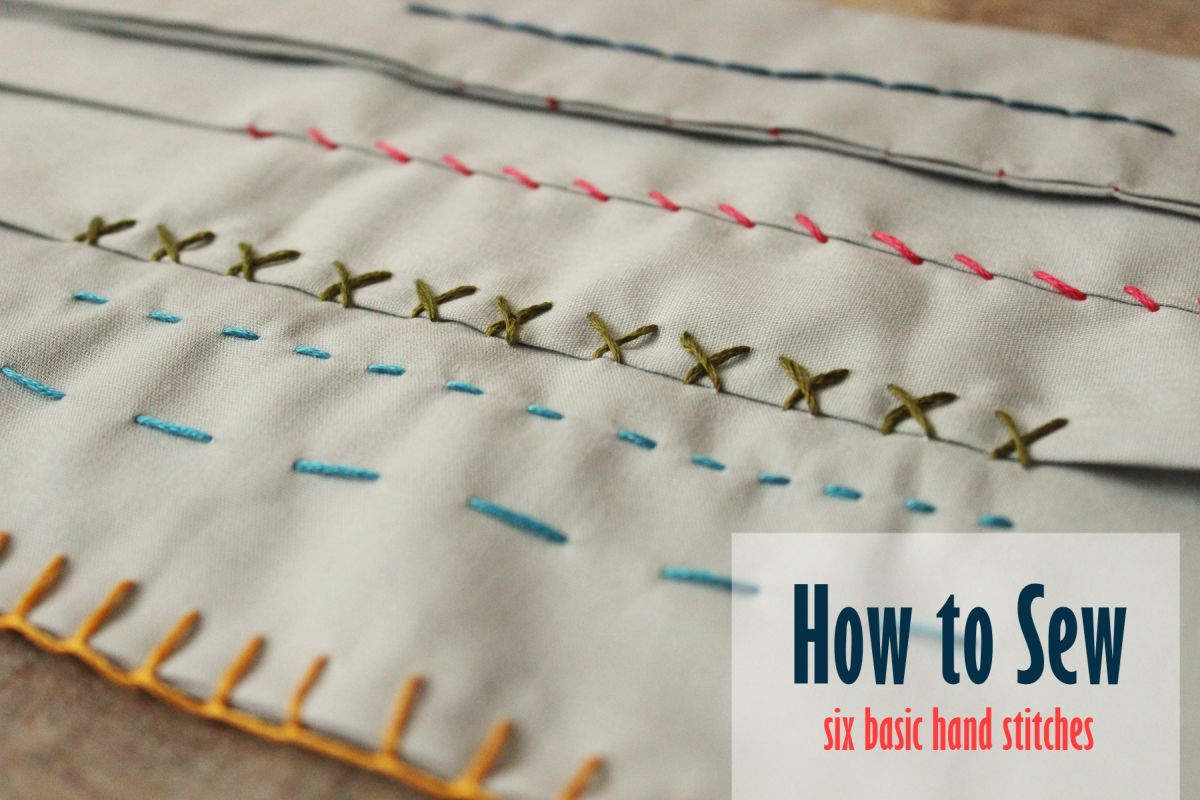
Our tutorial provides the photographic step-by-step process to implement the seven most common basic hand stitches. You’ll also learn when and where to use them.

Note: To demonstrate the stitches, this tutorial uses six-strand embroidery floss for each stitch. If you are using regular thread, I recommend doubling up the thread in most instances for maximum strength.
How to Sew: Tools Needed
- Hand-sewing thread or embroidery floss in the appropriate color/type
- Hand sewing needle
- Fabric
- Sharp scissors
- Needle threader (if you require one)

The seven common stitches we’ll be learning today are: running baste stitch and running stitch, catch stitch, blanket stitch, whip stitch, slip/ladder stitch, and back stitch.
The Most Common Basic Hand Stitches
- Running Baste Stitch
- Running Stitch
- Catch Stitch
- Blanket Stitch
- Whip Stitch
- Slip Stitch/Ladder Stitch
- Back Stitch
How to Sew: Running Baste Stitch

STITCH USE: The running baste stitch is useful to temporarily hold two pieces of fabric together. You can also use running baste stitches or basting stitches for hemming clothes, hand-gathering pleats, or sewing basic seams. The running stitch creates a much stronger seam than the running baste stitch, but the latter is much faster to sew.

First, thread your needle through the loop, and tie a knot at the end of your thread.

Place the tip of your needle on the wrong side of your fabric, and press it upward through the fabric at your starting point. Pull the thread until the knot hits the back side of the fabric.

About 1/2″ to 3/4″ away, press the tip of your needle straight down through the right side of the fabric. Don’t pull the needle all the way through.

Keeping the needle in the fabric, push the needle forward until the tip reaches the same 1/2″ to 3/4″ distance. Press the tip upward through the fabric at that point.

Then, pull the needle and thread through the fabric.

Pull the thread all the way through and taut.

Next, press the tip of the needle down through the fabric another 1/2″ to 3/4” away from the exit point of your last stitch, and repeat the basting stitch.

Continue working in this wide, even, and straight-basting stitch.

How to Sew: Running Stitch

STITCH USE: The straight running stitch is the most fundamental of seams. You can adjust the length of each stitch to match your project’s needs. Keep in mind that the shorter each stitch is, the stronger your overall seam will be.

First, place the end of the thread through the eye of the needle and knot your thread at the end. Next, press the tip of your needle on the wrong side of your fabric, and bring the needle up through to the top until the knot touches the back of the fabric.
Then, in the same method as your running baste stitch, maneuver the tip of your needle above and below the fabric to create the stitches.
Because the running stitch is small, you can probably weave two or three stitches onto the needle before pulling the needle and threading through the fabric.

Working in two- or three-stitch needle lengths like this is an efficient way to sew this straight line.

Pull the needle and thread through the fabric, and pull it taut before moving on to the next set of stitches.

How to Sew: Catch Stitch

STITCH USE: The catch stitch is a great stitch choice for a blind hem or invisible seam. The “X” nature of this stitch provides a little give to the hem. Another useful place for this stitch is to attach heavier lining fabrics to the hemline, such as sewing on curtain linings.

First, thread the needle and knot the thread at the end. Press the tip of your needle on the opposite fold of your fabric hem, and bring the needle up through to the top of the fabric until the knot touches the back of the fabric. Your needle and thread should be on the left side of your fabric.

Place the tip of your needle about 1/2″ to 3/4″ above your exit thread (on the other piece of fabric), then move it to the right about 1/8”. Press the needle tip down through your fabric. Aim the tip of the needle about 1/8” to the left.

Pull the needle and thread up to the top of your fabric, and pull the thread taut.

To create the “X” over the previous stitch that is the signature of the catch stitch, press the tip of your needle about 1/2″ to the right of your very first thread exit. Press the tip of the needle down to the underside of your fabric, then bring it back to the top of your fabric about 1/8” to the right.

Next, pull the whole needle and thread through, and pull the thread taut.

It’s helpful for this stitch to remember that the “top” of the stitch is a right-to-left stitch, and the “bottom” of the stitch is left-to-right.

Continue on until you’ve completed the length of your catch stitch seam.

How to Sew: Blanket Stitch

STITCH USE: Uses of this stitch are finishing the edges of blankets, felt projects or toys, and sewing appliqué. Where other stitches tend to blend in, this one is best served when visible.

First, thread your needle and knot the thread at the end. Begin sewing by pressing the tip of the needle into the underside of your fabric about 1/2″ away from the folded edge, and bring the needle up to the top of the fabric.

Next, pull the entire needle and thread through the top of the fabric until the hidden knot touches the underside of the fabric.

For this first stitch, loop the thread around the hemline and press the tip of your needle onto the underside of your fabric at the same spot you just came through. Pull the needle and thread through this same hole.

Then, pull the thread but don’t pull it all the way taut. Instead, keep a small loop of thread out.

Take your needle and run it through the loop, going left to right.

Pull the thread taut. Your free thread should meet up with your stitch at the hemline (shown by a red dot on the photo).

Press the tip of your needle on the underside of your fabric about 1/2″ to the left of your original thread exit and also 1/2″ away from the hemline.

Pull the entire needle through to the top of your fabric, and pull your thread until a small loop remains.

Next, thread your needle through this loop, running left to right.

Pull the thread taut until it creates what looks like a square without a top.

In the blanket stitch, each stitch holds the previous one in position and in place.
How to Sew: Whip Stitch

STITCH USE: The whip stitch is a simple and satisfying stitch because it’s fast and easy. The short, diagonal stitches are used for hemming things like window treatments because they’re almost invisible when done on a hem.

First, thread your needle and knot the thread at the end. Bring the needle up to the top of the fabric from the underside so the knot is hidden. This stitch is most easily sewn vertically.

Then, press the tip of your needle into the fabric’s two edges about 1/2″ diagonally above-right your original exit point. Then aim your needle, from the underside of the fabric, about 1/2” above-left (back to the original fabric hem).

Next, pull the whole needle and thread through to the top of the original fabric, and pull the thread taut.

Continue this method (diagonal-right, diagonal-left) to create a barbershop pole-looking seam.

Due to the diagonal nature of these stitches, it’s easy for your stitches to become more and more uneven in length and spacing. However, do your best to keep them consistent, referring back to your original stitches as needed to make sure they stay the same further up the seam.

How to Sew: Slip Stitch/Ladder Stitch

STITCH USE: The slip stitch (or “ladder stitch”) is used for closing up homemade pillows. When you choose a thread that matches your fabric, the stitch becomes invisible.

First, thread your needle and knot the end of your thread.

Take your threaded needle and press the tip onto the underside of your fabric up in one of the folds. Next, pull the needle and thread all the way through so the knot is invisible.

Then, press the tip of your needle on the opposite hem directly across from the original exit point. Push the tip of the needle into the fabric so that the tip of the needle follows the hem inside the fold.

Exit the needle tip from the hem fold about 1/2″ to 3/4″ away from the insertion point.

Pull the whole needle and thread out from the folded hem, and pull the thread taut. This will close up the first “rung” of your ladder stitch.

Now, press the tip of your needle onto the opposite hem (the one with your original exit point) directly across from this most recent exit point.

Thread the tip of the needle through the folded hem about 1/2″ to 3/4″ away from the insertion point, then exit the needle.

Pull the whole needle and thread out, and pull it taut. It’s looking a little like a ladder, with each stitch serving as a rung between the two vertical hems.

Continue in this way until you’ve completed your slip-stitch seam.

You can see here that I haven’t pulled the thread tight yet. This is to illustrate what the stitch is meant to look like.

When I give it a quick tug, though, you can see here that the thread all but disappears.

How to Sew: Back Stitch

STITCH USE: The back stitch is not only pretty, but it’s also strong. Its primary purpose is for sewing seams that require heavy-duty strength. The back stitch is also used for basic embroidery and forming letters in stitching.

First, thread your needle and knot the thread at the end. Press the tip of your needle onto the underside of your fabric about 1/2″ in front of your actual seam starting point (designated by a red dot in this photo). Pull the whole needle and thread through to the top of your fabric, and pull the thread so the knot touches the underside of the fabric.

Next, press the tip of your needle onto the top of your fabric at the location of your actual seam start, which will be about 1/2″ down from your original exit point.

Pull the whole needle and thread through to the underside of your fabric, and pull the thread taut.

Press the tip of your needle onto the underside of your fabric about 1/2″ in front of the original exit point.

Then, pull the whole needle and thread through to the top of your fabric, and pull the thread taut.

Press the tip of your needle onto the top of your fabric at or very near the original exit point.

Next, pull the whole needle and thread through to the underside of your fabric. Pull the thread taut to create your second backstitch.

Continue in this “two steps forward, one step back” method until you’ve completed your back stitch seam.

The straight, solid line of the back stitch is a striking stitch for any DIY project or even fashion design.

There you have it. How to sew seven basic hand stitches.

Frequently Asked Questions (FAQ)FAQ
How to sew a button on?
With your index finger and thumb, thread the needle through the loop and tie a knot at the end of the thread. Place the button where it should go. From the bottom side of the fabric, bring your needle up through the hole of the button and pull the thread tight. Bring the needle down through the opposite hole of the button and continue this pattern until the button is tight. When you pull the needle through the bottom for the last time. Tie the thread off in a knot.
Can you sew everything by hand?
You can sew many things by hand but not everything. For example, some materials are too thick like leather to sew by hand. However, you can sew many things, including clothes and DIY projects, by hand.
Is hand stitching strong?
Machine sewing is stronger than hand sewing, but you can make very strong stitches by hand.
What is the disadvantage of hand sewing?
Hand sewing can be inconsistent as the stitches are different lengths. Further, hand sewing is not as strong and is much slower than machine sewing.
Which sewing stitch is the strongest?
The backstitch is the most durable and strongest hand stitch.
How do you end a stitch?
Pull the threaded needle through the wrong side of the fabric and slide the needle under the back of the nearest stitch. Tie several knots with the thread and then cut the thread off as close as you can to the back of the stitch.
If you take the time to learn how to hand sew and understand these seven basic stitches, you will be doing yourself a favor for years to come.
Gather a sewing kit so that you can be ready when the occasion calls.
Once you have learned the basics, you can graduate to sewing machines, following patterns, and acting as your own fashion designer. There is no end to all you can accomplish.