How To Make Your Own Coasters – 40 DIY Wonderful Designs

We use coasters to protect our furniture against moisture and stains. However, there’s no reason why we can’t make the coasters look good as well. In fact, they can be beautiful accessories on a table if you’re willing to spend some time making them look beautiful. Here are 40 great DIY projects for you to choose from.
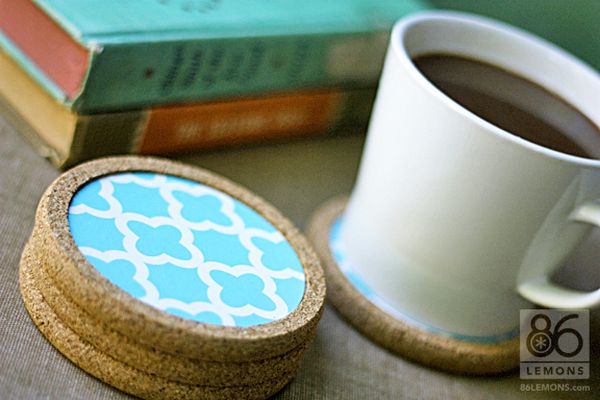
To make these lovely coasters you need a piece of self-adhesive shelf liner or contact paper, a set of 4 cork coasters, a circle cutter, a ruler and a self-healing mat. Measure the area you want to cover with shelf liner and then place the circle cutter on it, insert the cutting tool, hold it in place and push the cutting tool down and in a circle shape. Peel off the paper backing and press the shelf liner onto the coaster.{found on 86lemons}.
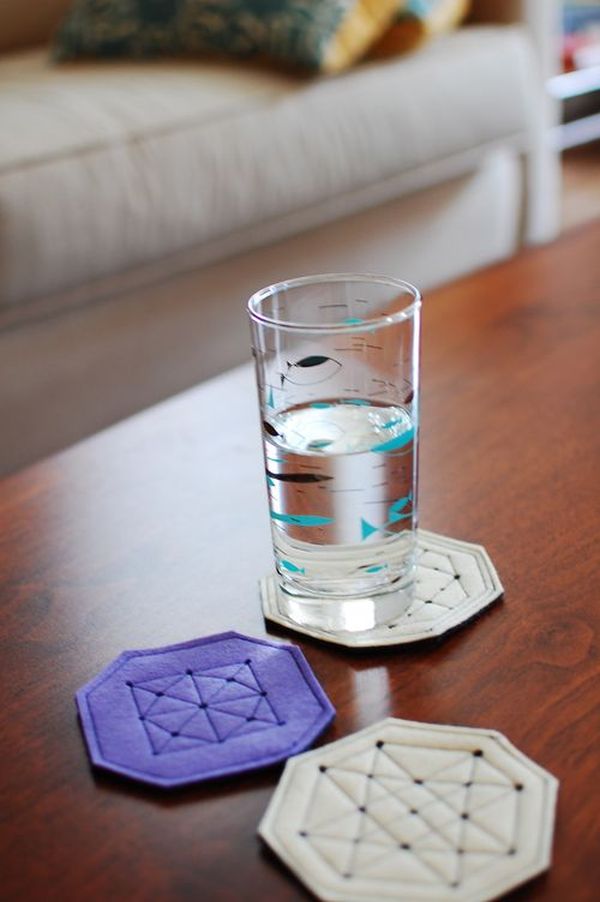
For these ones you’ll need a screw punch, wool felt, a rotary cutter, a mat, thread, scrap paper and a disappearing ink marking pen. Cut two 4’’ squares of wool felt and trim the corners. Then cut out a 4’’ square of scrap paper and made a half-inch grid. Punch out holes using 2 different sizes. Use this as your template. Then put 2 pieces of felt together and connect the dots with thread.{found on abbytrysagain}.

The materials needed for this particular design are corkboard, an image printed on cardstock, acrylic paint, modpodge, scissors, an X-acto knife and double sided tape. Decide what size and shape you want for the coasters and cut it out of a piece of paper. Then trace the template onto the cork and cut it out. Choose a background color to paint the coaster. Then make a stencil of the image if you want. Paint the design onto the coaster. Let the paint dry and add a layer of varnish or sealer.{found on angela}.

These hex symbol coasters are quite interesting as well. Here’s what you need to make them: a wood log, different paint colors, clear waterproof sealant, brushes, carbon paper or tracing paper, a pencil, a pen, tape and sandpaper. First, print out the templates to the size of the wood. Cut out paper design circles and a carbon paper circle the same size. Tape both layers on top of the wood and you a pen to trace the design. Paint the shapes and then add a coat of sealant.{found on designsponge}.

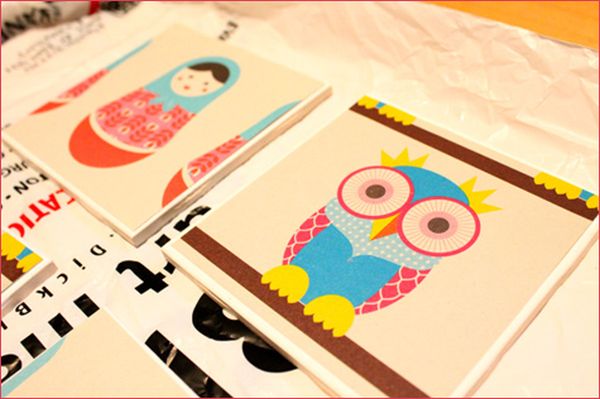
Making these coasters is very simple. Just trace around the ceramic tile on the paper and cut out. Then add a coat of mod podge to the tile and place the paper on top. Add another coat on top of the paper and let it dry. Repeat 2 or 3 more times. You can add felt to the bottom of the coaster to prevent scratches on the table.{found on designimprovised}
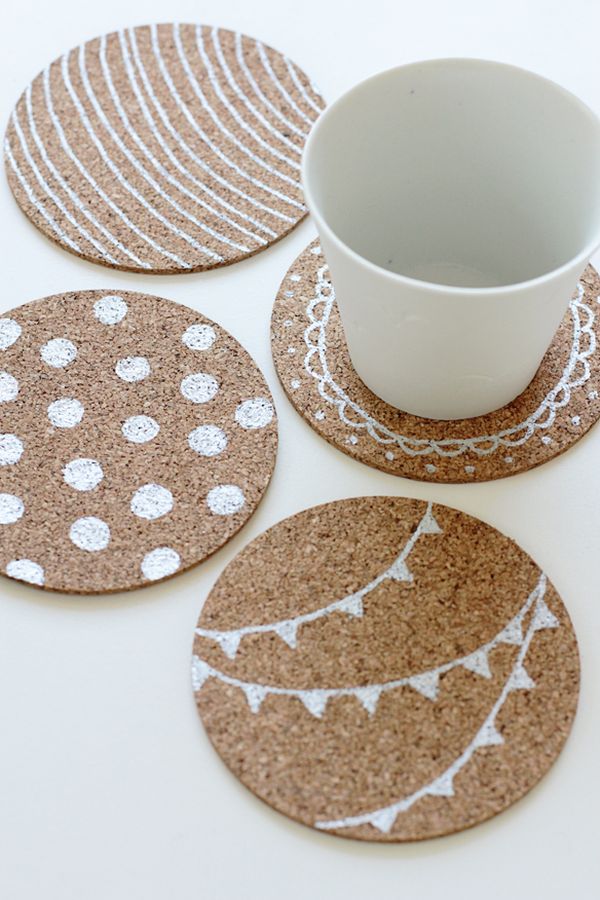
All you need for this project is cork coasters and a paint pen. All you have to do is take the coasters and draw on them with your paint pen. You can make custom designs and personalize the coasters. This way you’ll all have your own. It’s a nice custom project and you can do it in just a few minutes.{found on fellowfellow}.

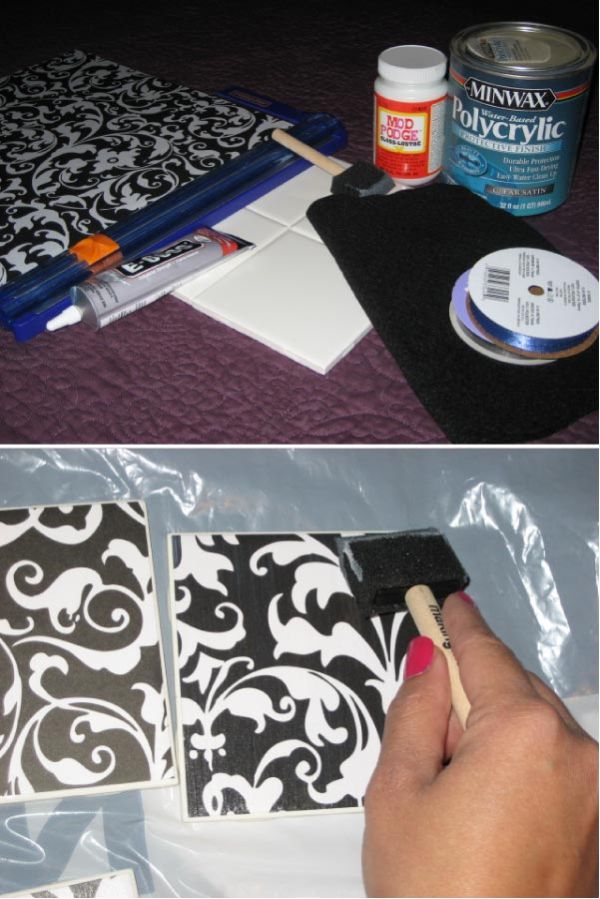
For these colorful coasters, the supplies needed are: scrapbook paper, mod podge, fabric glue, clear acrylic glaze, felt, a sponge brush and ceramic tiles. Glue the paper to the tile and let it dry completely. Then paint over the paper and tile with mod podge. Let it dry and repeat 2 or 3 times. Then spray the glaze over the tiles 2 times to make them waterproof. Glue a piece of felt to the bottom of the tile with fabric glue and you’re done.{found on site}.

These custom coasters are also easy to make. You need ceramic tiles, mod podge, acrylic sealer, a sponge brush, paper and cork backing or felt. Coat the top of each tile with a thin layer of mod podge. Then place the paper on top. Add another coat of mod podge and repeat 2 more times. Then spray 2 or 3 coats of acrylic sealer on top. Cut a piece of cork board or felt and glue it to the bottom of the coaster.{found on 65andout}.

A great idea would be to use scrabble tiles to make custom coasters. You’ll need scrabble letters, a thin cork board, super glue, a hot glue gun and sealer. First take 16 letters and make 4 words that you want to use on the coaster. Then glue the letters together. Cut the cork and attach it to the letters with the a glue gun. Spray a thin layer of sealer and enjoy.{found on blog}.

For these coasters, the supplies needed are tiles, mod podge, a brush, card stock, an exacto knife, felt pads and clear spray paint. First, cut the card stock to the desired size. Then apply mod podge to the tile and place the card stock on it. Let it dry and apply a coat of mod podge on top of the card stock. Apply two more coats and then add a layer of clear spray paint. Let it dry and repeat. At the end, place a felt pad in each corner.{found on kgkphotos}.

These chalkboard coasters are also very nice and easy to make. You need ceramic tiles, chalkboard spray paint, black felt, scissors, glue and a hot glue gun. Spray paint the tiles with 3 light coats. Cut out felt squares the same size as the tiles. Attach them to the tiles with a hot glue gun. Then you personalize the coasters by drawing or writing on them.{found on westermanfam}.

A similar project would be this one: dry erase coasters. Here are the steps you need to follow in order to make them. First, tape two opposite sides of the tile leaving a small line exposed. Then paint both the side and the small top line with two coats. Remove the tape from the painted sides and then tape the remaining two sides. Repeat the painting process and let it dry. Attach the felt pads on the bottom corners of each tile.{found on jentertaining}.

Here’s how you can make coasters from recycled magazines. You’ll have to tear out 6 magazine pages. Cut off the ragged edges and cut each page in half lengthwise. Fold each strip in half lengthwise and fold that piece in thirds. Fold the strip in half at the center and do the same thing with each sheet. Then start weaving. Some strips will wrap around the outside of the coaster when you start them. Add one strip at a time and make sure you push them tightly together. Then cut off the excess and seal the coasters.{found on howaboutorange}.

These felt coasters are very nice because they’re soft and they don’t scratch the table. to make them you’ll need a template. Printout the pattern and pin it to a piece of felt. Cut the diagonal slot in each pattern piece with an X-acto knife. Then cut apart the pieces. Then out the pieces together and you should get a coaster that looks like the ones in the picture.{found on howaboutorange}.

For a more natural and organic approach, try this project. The materials needed are an old tree limb, a saw, sandpaper, natural stain, sealer, felt or cork, glue and ribbon. Slice up 5 or 6 pieces of a tree limb and sand one side. Stain it and then add a coat of sealer or waterproof finish. Cut out felt or cork and attach it to the bottom of the coaster. Wrap your set of coaters with a ribbon and you have a great gift.{found on curbly}.

To make these stitched coasters you’ll need cork coasters, thread, a sewing machine with decorative stitches and water-soluble fabric marker. First choose a decorative stitch. To stitch a circular pattern, draw a circle about 1/2 inch in from the edge of your coaster using a water-soluble fabric marker. Start stitching. You can use different colors of thread and different patterns or models.{found on craftingagreenworld}.

These coasters are a little different. They are made from leather, cork and old coasters. Instead of leather you can also use fabric. Trace a circle on the leather and cut the shape out. Then place it on cork and leave some room around the edges. Apply glue to the back of the leather circle and to the cork circle and put them together. Press and roll out any bubbles. Cut off the excess cork.{found on freshlygiven}.

Here’s another simple project. You can use fabric or leather. You’ll have to cut two pieces of the same size and sew them together. Use a nice color of thread that will create a nice pattern. You can also use some glue to make sure the pieces don’t slip and slide.{found on createliveblog}.

These leather coaters are fun to make because you get to paint them. You’ll need vegetable tanned tooling leather, acrylic leather dye and some paper. First, prepare the dye bottles by adding water. Cut a piece of leather and practice your technique by spraying an edge. Then move it, spray another color and so on. Then apply a coat of sealant to the leather and cut out coasters.{found on desigsponge}.

These colorful citrus coasters are a little more complex. The materials needed are a spring felt bundle, a citrus coaster template and embroidery thread. Cut the felt according to the template. Place the white circle inside one of the colored circle and then arrange segments on top of the pitch circle. Pin all the layers together. Then use thread that matches the colored felt to sew them together.{found on purlbee}.

For this project you’ll need juice lids, nautical rope and a hot glue gun. Clean the lids and put a bead of hot glue in the center. Wind the rope around the lid and glue as you go in a circular motion. Glue down the end of the rope and cut off the excess. You can also use other types of rope.{found on site}.

Here’s a great idea for a gift: personalized coasters with photos on them. To make them you’ll need white tiles, square pictures, mod podge, felt, a hot glue gun and ribbon. Cut the pictures and round the edges. Coat the front of the tile with a thin coat of mod podge and press the picture to the tile. Let it fry and add another coat. Cut small squares of felt and glue them to the corners of the tile, on the other side. Decorate the set with a ribbon.{found on savvysugar}.
These coasters look very elegant and they’re not that difficult to make. You’ll need square ceramic tiles, glue, paper, felt, acrylic sealer and ribbon. Clean the tiles and cut the paper into squares. Brush the tile with glue and adhere the paper. Apply another coat of glue to the top of the paper. Repeat until you’re satisfied with the look. Then cut the felt and glue it to the bottom of the tile. Don’t forget to apply sealant to the casters as well. Stack them and add the ribbon.{found on stylemepretty}.

Here’s another very interesting project: stone coasters. To make these you’ll need stone border tiles, stick-on surface savers and clear varnish. All you have to do is apply four savers to the underside of each tile and then coat each tile with varnish.{found o taradennis}.

If you want, you could make some lovely knitted coasters. It’s a project you can do while watching TV or relaxing on the sofa. You can make them any color you want or any shape you want and you can even use patterns or models. You could also make them as a gift for someone you love.{found on pantonejane}.

Chalkboard coasters are fun and practical and they’re also easy to make. For example, to make these all you need is some chalkboard paint, cork coasters and a paint brush. Just apply chalkboard paint to one side of the coasters and make sure you add at least two coats. Let them dry and then enjoy personalizing them.{found on hellolidy}.

These are also chalkboard coasters. They have cork on the bottom to prevent scratches but you can also use felt. For the project you’ll also need square tiles and chalkboard paint. The process is very simple and similar to the one we’ve already presented. You have to apply a few coats of chalkboard paint to the tile and then to glue the cork or felt to the bottom.{found on christyrobbins}.

Color can really transform anything. For this project you’ll need some paint that’s dishwasher safe and some square tiles. First, clean all the tiles. Then attach little pieces of cork to the bottom of each tile. Next, the fun part: use tape to create patterns and designs and start painting the tiles. Let the paint dry and enjoy your creation.{found on 7thhouseontheleft}.
To make these fun and cheerful coasters you’ll first have to find some tiles. Trace their shape onto paper. You can use wrapping paper or any other type. Cut out the squares and make sure they’re a little smaller than the tile. Apply a thin coat of mod podge to each tile and center the paper on top. Cut out small squares of felt and glue them to the bottom of the coasters. Apply another light coat of mod podge to each tile before that.{found on hwtm}.

A little bit of white rope and some hot glue is all you need to make these beautiful nautical-themed coasters. There’s also easy to customize if you want to add a bit of colors to their design. Use stencils and fabric paint to make each one unique and extra pretty. These rope coasters would be lovely for a summer party.

These patterned coasters are really cool because you can customize them in tons of different ways. They’re also super easy to make and the supplies needed include a circle silicone mold, resin, mod podge and some patterned scrapbook paper of your choosing. Mix and match as many different patterns and colors as you want to and make your own unique set of coasters.

Speaking of resin coasters, check out these lovely ones. These snowflake coasters would be perfect for a winter wonderland themed décor and they’re just as easy to make as the ones we mentioned earlier. All you need is paper snowflakes, a silicone circle mold and resin. You can also replace the snowflake with something else in case you have a different theme in mind.

If you’re going for a cozy and colorful look, you might also find these felt ball coasters interesting. They’re really cute and they’re very easy to make as well. All you need is a bunch of 2 cm wool felt balls in different colors, some strong thread and a large needle. Each coaster requires 19 felt balls so plan your supplies accordingly.

Of course, you can also decorate a bunch of existing coasters and make them look more interesting. For example, if you have some concrete coasters you could use some tape and assorted spray paints to create some lovely geometric patterns on each one. It’s very easy and it only takes a few minutes to complete the entire project.

Most store-bought coasters are typically circular or square with rounded edges so if you’re looking for something different or very specific you’re better off making everything from scratch. On that note, these pizza slice coasters are really cool and really fun to make too. They’re made of air dry clay and they-shaped like triangles and then painted to look like pizza slices.

These are quite similar to the felt ball coasters we mentioned earlier and the main difference here is the fact that wooden beads were used instead of the felt balls. The beads have holes running through them which means you can run some string through multiple ones and create concentric circles, then add another bead at the center and tie the pieces together to make a modern beads coaster.

If minimalism is your style then you’ll probably love this x-shaped coaster set. The design is as simple as it can be. These cool-looking coasters are made from balsa wood and they’re painted black which is in tone with their minimalistic design. If you make these for yourself, it would be easy to customize them using colored spray paint. You can also make them in different sizes.

Since concrete coasters aren’t exactly very common, it would be nice to make your own set from scratch. While you’re at it, you could give the coasters an interesting shape. For example, they could be hexagon-shaped coasters and you can make the mold for them out of cardboard and tape. If you’re using white concrete you can just leave them nice and simple with no need to decorate the surface with paint or anything else.

There are many different ways to decorate and to customize the coasters and one option involves using contact paper. You can cover up the entire surface of the coaster with marble contact paper to it an elegant and at the same time simple look. For the actual coasters themselves you can use some balsa wood pieces. Check out the complete tutorial for this on diys.

Air-dry clay is very versatile and can be used to make all sorts of beautiful decorations and accessories, including some cool-looking coasters. These ones have laser-cut inspired designs which were made using clay cutters. Check out the details on diys and come up with your own unique design by combining different patterns and colors.