DIY Vintage Lumbar Cushion Tutorial
This restored mid-century modern recliner was like macaroni without the cheese: the dish wasn’t complete without a complementary cushion. Here’s how I made this (zippered!) lumbar cushion that provides support and adds a splash of color without going overboard. Think vintage flair with a modern sensibility.


If you have vintage furniture, and you’re looking for era-appropriate fabric for cushions or upholstery, you have a few resources to turn to:
- Etsy. This is where you’ll find the best hand-picked vintage fabrics. Great for one-of-a-kind projects where you’re not worried about needing more of the same fabric later on.
- Ebay. Similar to Etsy, but less curated. You’ll find a surprising variety of fabric that can be shipped from anywhere in the world.
- Online designer fabric retailers. Learn about some common patterns and colors used in the era that you’re interested in, narrow your searches by material/weight and dive in.
- Thrift stores. It sounds sketchy, but it’s true: sometimes unused fabric gets donated that’s in perfectly good condition. I’ve found some decent wool knits and linen remnants.
- Your local big-box fabric store. You never know!
My home decor leans mid-century modern, so I stuck it lucky when I found this magnificent gold boucle fabric from the 1970s at my local Salvation Army. Look at how bright it is! It’s like staring into the sun. That nubbly yellow polyester would feel very in-your-face if it covered an entire couch, but in small doses it’ll add the perfect retro vibe.

Materials you’ll need to craft the Lumbar Cushion:
- Two pieces of fabric, cut to 13″ x 19″ inches (1/2″ seam allowance)
- 20 inch (51cm) dress zipper, in a matching color
- Sharp scissors
- Basting tape (this can be found at a sewing supply store)
- 12″ x 18″ lumbar cushion insert
- Sewing machine and thread
DIY Lumbar Cushion: Step by Step Guide

Step 1: zig-zag stitch
Run a zig-zag stitch along one of the long edges, on both pieces of fabric. This is to prevent fraying in the next step.

Step 2: Folding
With your fabric wrong-side-up, fold both of those edges into flaps, 5/8″ wide. Pin them into place and sew along the inner edge with a straight stitch. These will be the hemmed edges that hug the zipper.
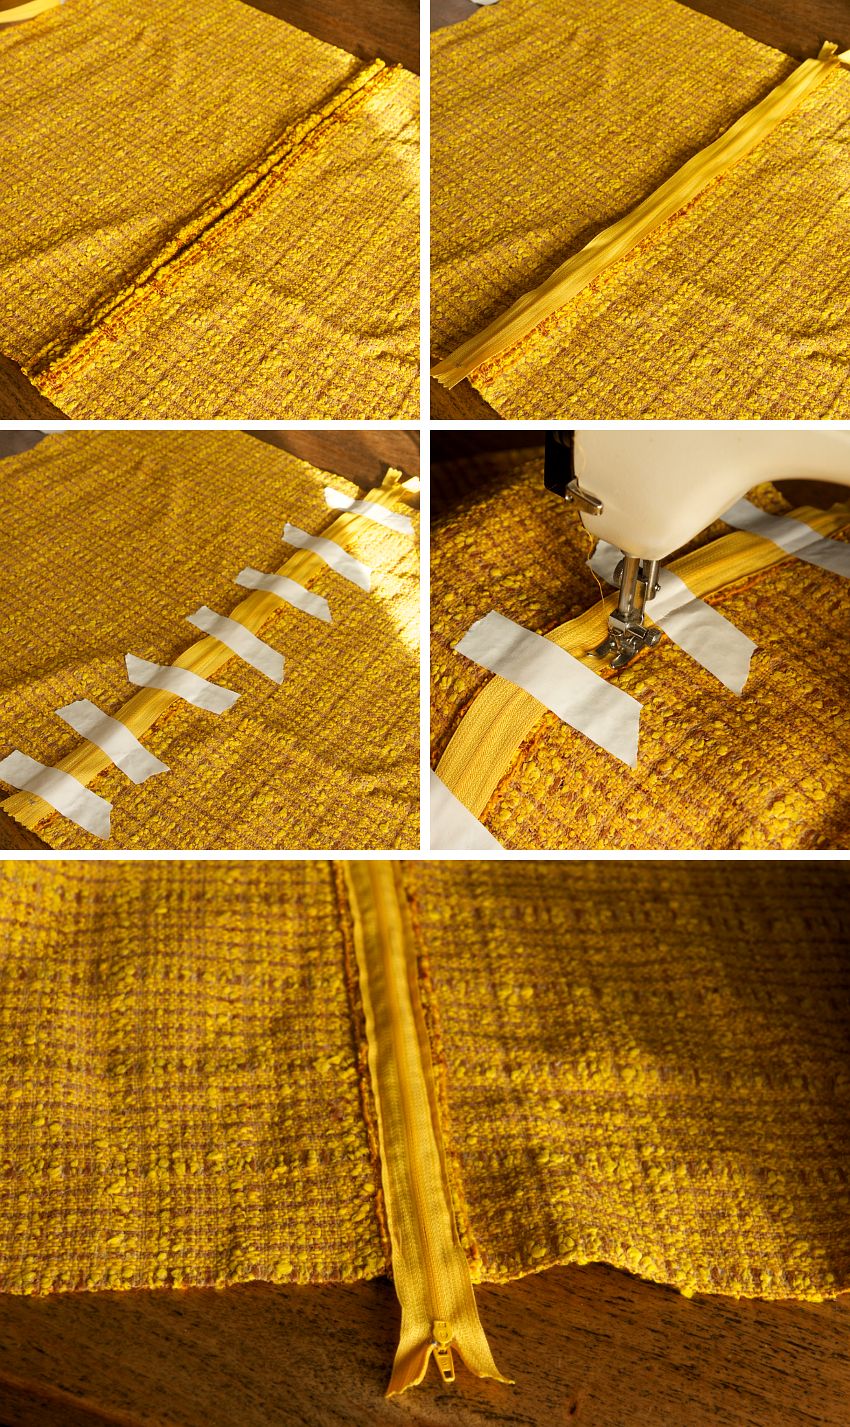
Step 3: Placing the zipper.
- Set the two pieces of fabric wrong-side-up and side-by-side, with the two hems that you just made butting up against each other.
- Lay the zipper over the join, also wrong-side-up.
- Use basting tape to attach the zipper to the fabric. Make sure the hems underneath keep touching while you’re taping down the zipper.
- Sew the zipper in place with a straight stitch, over the basting tape and all. Remove the tape when the zipper is fully sewn on.

That’s what the zipper looks like in place, on the reverse side. Pretty easy, right? When it comes to sewing zippers, basting tape is a million times easier to deal with than pins.
Related: How To Make An Oversized Lumbar Pillow And Other Comfy Accessories From Scratch
(Tip: Unzip the zipper to 3 inches before the edge of the fabric, after sewing the zipper in place and before sewing the outer seams. This will prevent the zipper from being stuck later on.)

Step 4: Finishing off the cushion.
Fold the two pieces of fabric on top of each other (with the wrong sides out), pin into place and sew together with a straight stitch, 1/2″ allowance. Run a zig-zag stitch around the joined edges to prevent fraying – or use a serger/overlocker if you have one – and then clip the corners (as shown above) to prevent the extra fabric bunching up. That’s it!

Moment of truth: turning my cushion right-side-out. Looks good! All I need to do is poke the corners from the inside out and press the seams with an iron.

Conclusion: Extra lumbar support cushion

This chair is looking more dressed up with a cushion to match, and having that extra lumbar support cushion in place helps a lot. The texture, color and print on the cushion feel very retro, don’t they? The nearby cone planter and snake plant (aka: sansevieria, mother-in-law’s tongue) also give the whole ensemble that waiting-room-at-Sterling-Cooper feel. (I can’t be the only one who misses Mad Men.)
Hopefully, this DIY tutorial will help with your own period furnishings!