DIY Bat Hanging Branch – A Super Simple Halloween Decoration

Halloween is approaching! Are you ready? This tutorial is for a very simple, kid-friendly DIY Halloween decoration called a bat branch. You may have heard of bat trees, where branches are decorated with hanging bats a la Christmas tree ornament style? This is similar but just different enough to make your décor unique. It will take about 20 minutes to make, which sometimes is just what the DIY doctor ordered. Let’s do it.


DIY Level: Beginner/Kids

Materials Needed:
- Two (2) pieces of black cardstock
- Scissors
- Fishing line
- A branch/stick/wooden dowel
- Two (2) small screw hooks

Begin by drawing or printing out some bat silhouettes. You can just google “bat outline” or something similar to find the silhouette you like best.

Cut out the bat.

Make sure it’s the silhouette you like. If it is, cut out the rest of them. This example got four bats per page of cardstock.

Cut out as many bats as you want or have space for. This example uses eight bat cut-outs.

Use the very tip of your scissors to create a tiny hole, just large enough for the fishing line to thread through, in the center of your bat head. (Note: Alternatively, you could use a hole punch for this, but the bat will have a large hole in its head if you do.)

Thread the fishing line through, then tie the end off in a loop. Take care to not pull the fishing line tight against the cardstock to keep it from ripping or tearing.

Cut your fishing line to be about 18”-24” long from where you tied it to the bat. You can trim this later, depending on your space.
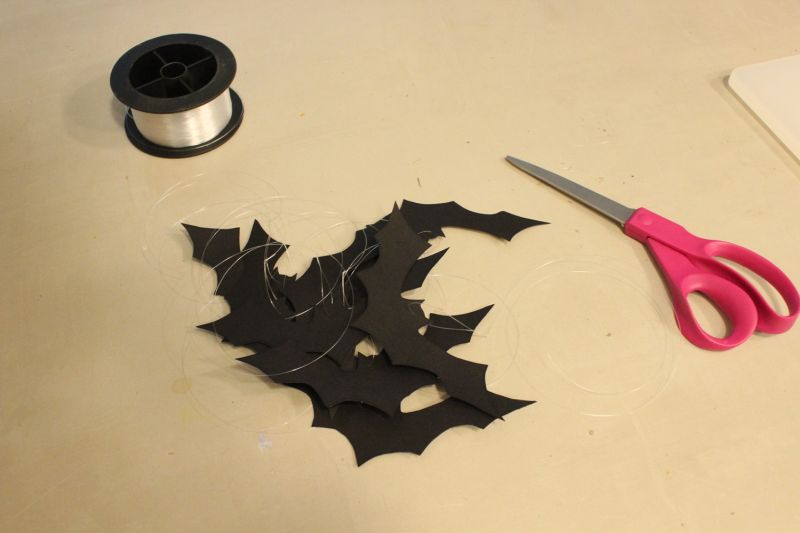
Repeat the fishing line attachments for the rest of the bats.

Grab two screw hooks.

Determine where you want to hang the bats. This example will be hanging them from a cutout section of wall near the front door.

Screw in your hooks into the ceiling where you want your bat branch to hang. (Note: Alternatively, you can screw the hooks into a wall and hang the branch from there.)

Make sure your second screw hook placement creates a width that’s slightly narrower than your branch length.
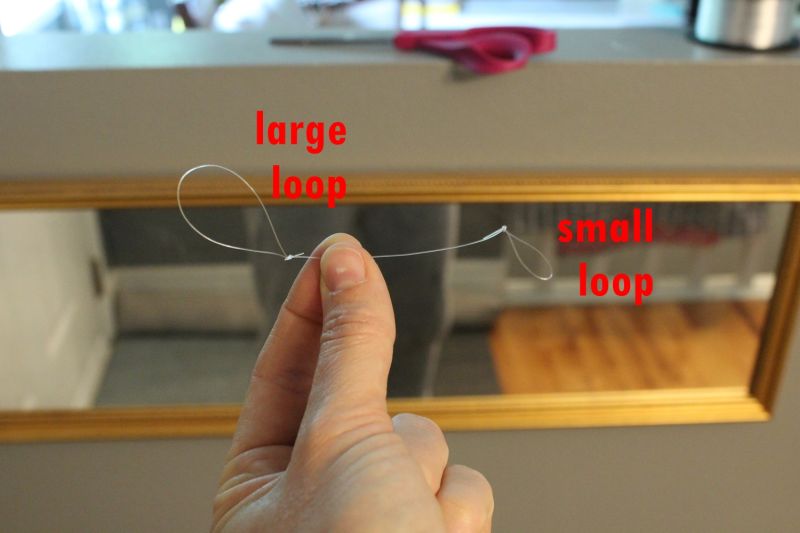
Cut two small (8”-10”) sections of fishing line and tie two loops, one small and one large, on the ends.

Place the small loops on your screw hooks.

At various lengths, tie off loops on your bat fishing lines that are big enough to slide easily over your branch. Trim the excess fishing line.

Slide these bat line loops onto your branch. Don’t worry about positioning the bats yet; you’ll do that after you hang the branch itself.

Once all your bats are hanging from the branch, it’s time to mount it onto your screw hook fishing line loops.

Slide each end of the branch into the larger loops hanging from your screw hooks.

Spread the bats apart from each other however you want.

Center the stick in its place. Viola. Finis.

It looks festive, don’t you think?

This kind of project works well in an empty space, or on a rather blank wall.

I like the various angles of the bats “in flight,” and their varied heights.

You can paint or stain your branch/dowel if you want. I liked the lighter, more natural look for this vignette.

Happy (DIY) Halloween!