How to Sew a Fitted Sheet out of a Flat Sheet

I don’t know about the rest of the households across the world, but we seem to have acquired an abundance of flat sheets but are usually hunting for a fitted one. Perhaps because fitted sheets wear out faster than the flat ones, so we toss it out but keep the flat. Regardless of the reason, there’s a fast and easy way to repurpose your flat sheets into a perfectly usable, lovely fitted sheet. Here’s a step-by-step tutorial on how to turn a flat sheet into a fitted sheet. (Note: This tutorial is for a queen size mattress, but you can modify the measurements to fit whatever mattress you have.)


Begin by measuring your mattress, including the height. A standard queen size mattress is 60” x 80”. Mattress heights vary; this example is actually sewing a fitted sheet to cover an unsightly box spring, so it’s shorter than the average mattress at 8.5” tall.
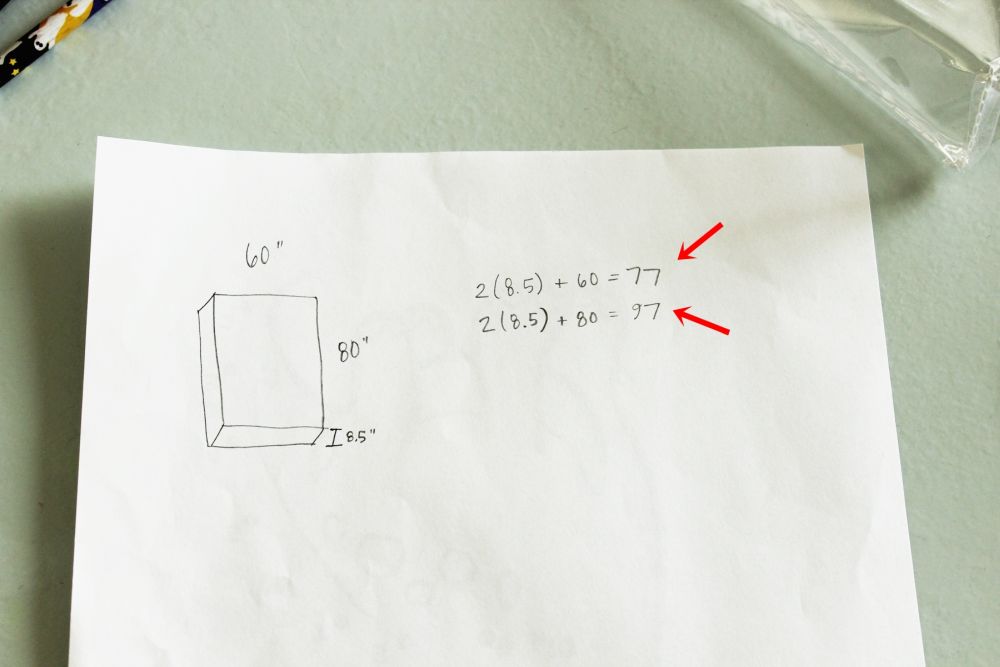
Add twice the height measurement to the width of your mattress. Do the same with the length. In this case, the new width is 77” (60 + (2 x 8.5)); the new length is 97” (80 + (2 x 8.5)).
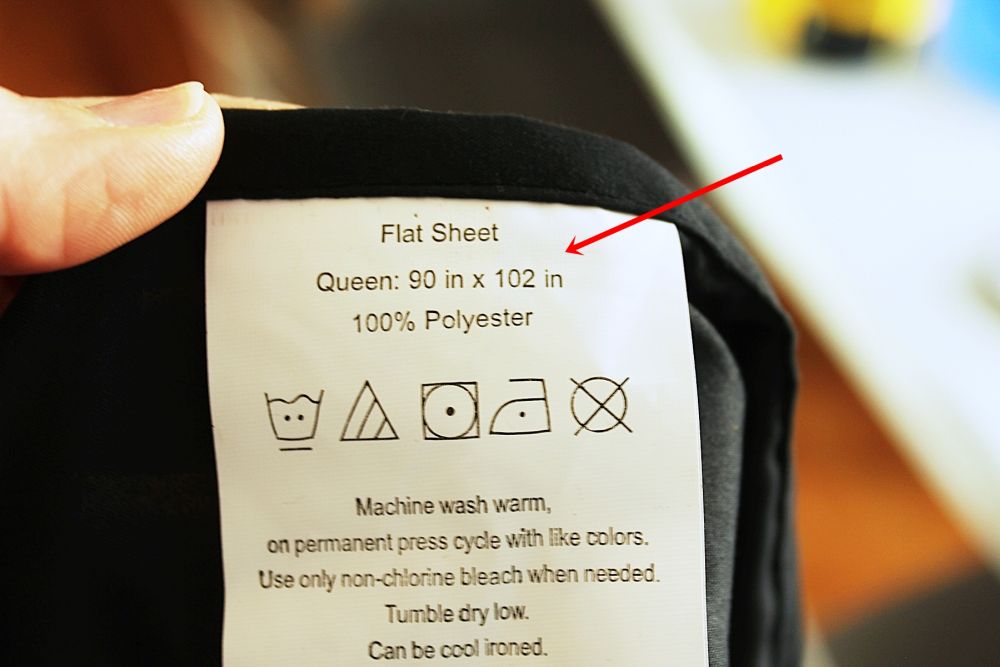
If you’re purchasing a sheet, you’ll want to make sure that your sheet is at least 16” larger on both of your new width and height measurements. In this case, the ideal sheet size would be 95” wide by 113” long. If you’re buying a new flat sheet to turn into a fitted one, consider buying one size larger than your mattress. If your flat sheet isn’t exactly the right size, though, not to fear. That’s where this tutorial will help you achieve your wildest fitted sheet dreams. Or at least your most domestic ones.
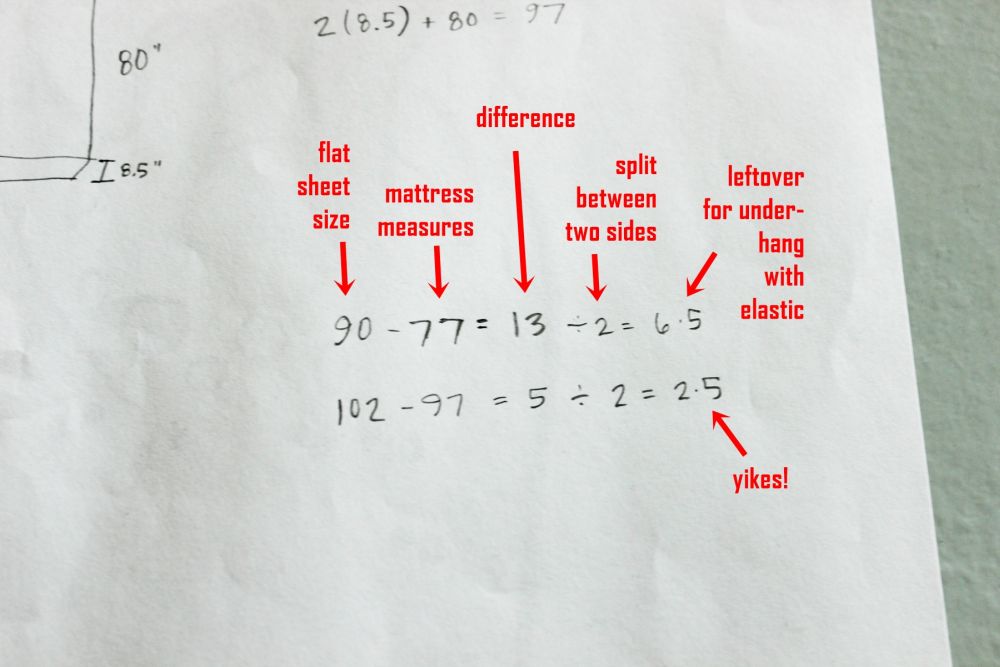
The reason you want a little extra (ideally 8” on all sides) is so that your fitted sheet tucks nicely underneath your mattress when it’s on. But as long as you at least have an inch or two, your sheet will still fit. Subtract your new width and length mattress measures from the actual flat sheet size to determine the difference. In this case, the difference is 13” on the length and 5” on the width. Which wouldn’t be so bad, but remember that each of these measurements has to be divided in two because you’re sharing the measurement among two sides (the right and left side of the mattress, for example on the width, and the top and bottom of the mattress on the length). So we actually only have 6.5” and 2.5” extra to hold the elastic and tuck under the mattress. It’s not a lot, but it’ll have to do.

You now need to determine how much to cut out of each corner of your flat sheet so that the corners align. To do this, add the amount of extra inches per side (not total) to the height of your mattress. In this case, I add 2.5” (extra on length) to 8.5” mattress height for a total of 11”, then subtract an inch for a true total of 10”. This means that, on each corner of my flat sheet, I need to cut 10” down from the length edge (aka, the top or bottom end of the sheet). Using this same math, I need to cut 14” in from the width edge (aka, the right or left side of the sheet). Ideally, you would be cutting perfect squares out of your corners, but I just couldn’t afford to cut everything down to 2.5” extra; I wanted that extra cushion (even if it was just on the sides) so my fitted sheet would lay nicely and stay under the mattress.

Lay out your flat sheet, and cut out all four corners according to your determined numbers.

When you’re done, your flat sheet will look like this (except double, because you’ll be able to see all four corners cut out in real life).

The next step is pretty straightforward, although it might sound complicated. On one corner, in the space you just cut out, fold the two freshly cut edges (in this case, the 10” and 14” cuts) together, with right sides facing in. Your sheet edges won’t match up if you cut out a rectangle, but that’s okay for now.

Sew those cut edges together in a straight line toward the actual sheet edges starting at the 45-degree fold in your sheet body.

While you’re here, you may as well do a zig-zag stitch along the cuts to minimize fraying when your sheets are washed. Repeat for the other three corners.

Lay your flat sheet down on a flat surface, with your new seam lying flat. You can see the difference here between the 10” and 14” cuts.

To deal with this discrepancy, cut a narrow triangle from the end of the 10” cut up along the 14” edge.

Your goal is to create a smooth transition from the 10” end to the 14”, while losing as little fabric as possible. Trim as much or as little as you like. This won’t be visible on your sheet when it’s placed on your bed, but the smoother your transition, the easier it will be to sew your elastic hem/casing. Repeat for other three corners.

Set your sheet aside for just a minute while you get your elastic ready to go. I recommend 3/8” to 1/2″ wide elastic for this job, and I recommend you go all the way around your fitted sheet. Some sheets only use bits of elastic, on the corners or certain ends, but that never gives the best fit.

You could try to calculate some sort of fancy formula to determine how much elastic you’ll need, but I simply folded a queen-sized fitted sheet into fourths, set it down so the elastic was relaxed, and measured four lengths of relaxed elastic against that. In total, I used about 4-1/2 yards of 3/8” braided elastic; this number might decrease for you, however, depending on your mattress size and also depending on how much fabric overhang you end up with. (Less fabric overhang requires slightly more elastic, and vice versa.)

It’s now time to sew your elastic hem. Since we don’t have much fabric to work with (we want to maximize every inch, because on one side we only have 2-1/2”, remember!), we only want our casing to be as wide as absolutely necessary to fit our elastic. Fold the hem over about as wide as you think you’ll need, keeping in mind you need to include a little extra fabric for the seam itself.

When you have hem fold in mind, compare it to the actual elastic. Also, determine where you’ll need to place the hem in order for the elastic to fit easily all the way around the sheet.

Set the elastic aside, and begin sewing your hem/casing. All the way around. The transitions from 10” to 14” (or whatever your measurements are) should be smooth, but they might require a little give-and-take in your sewing. Relax about these – they’ll be tucked under your bed, no one will see them. Just take care to never sew a narrower seam than your elastic’s width.

After you’ve sewn your hem/casing almost all the way around your mattress, stop at about 2” away from your starting point. Do a back-and-forth stitch to seal it off.
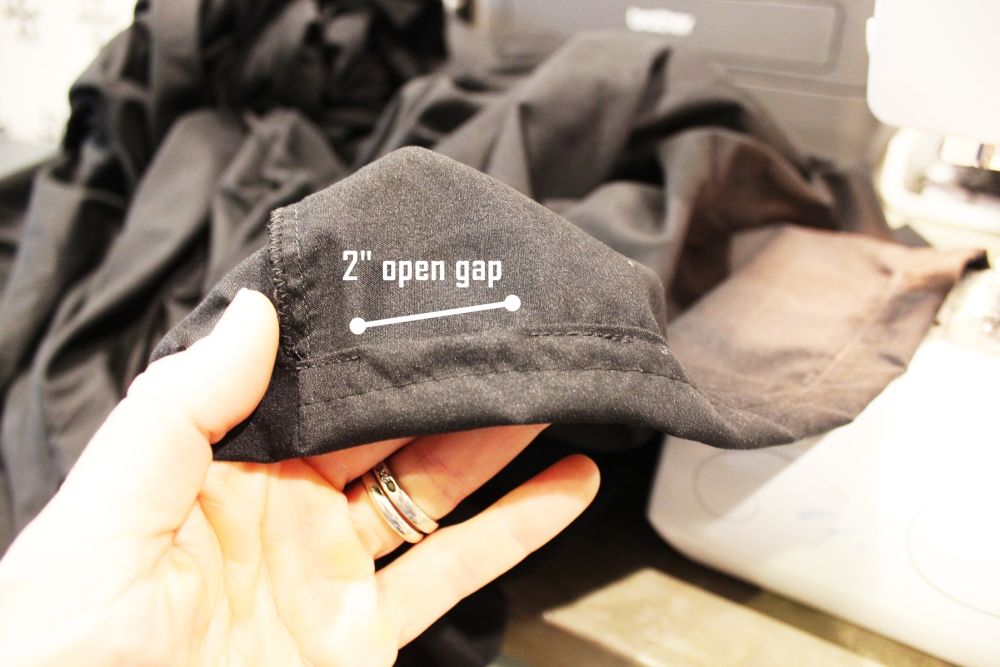
This gap is where you’ll start and stop your elastic.
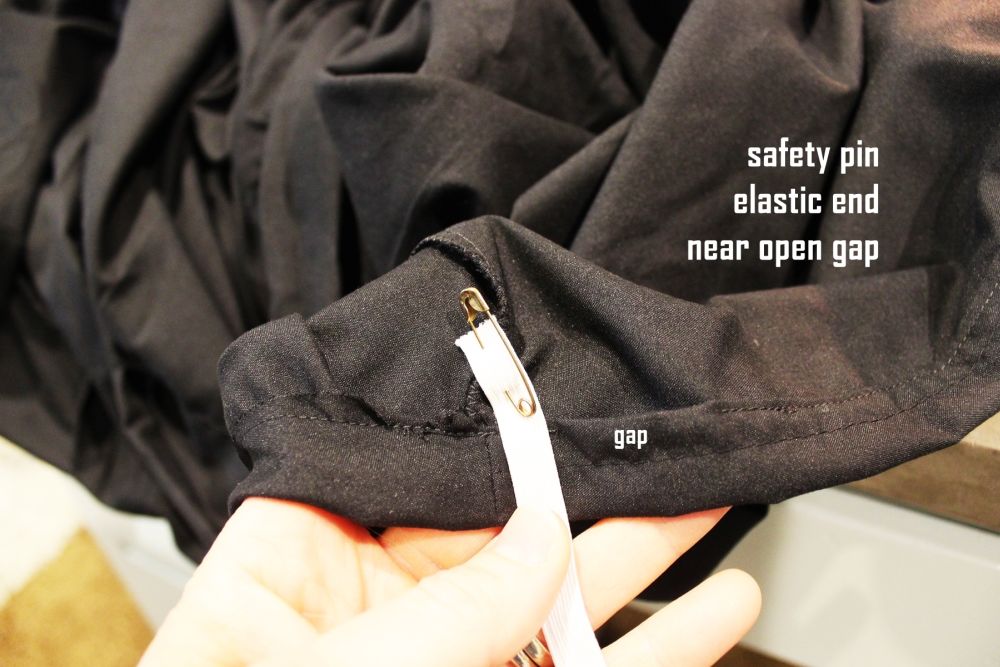
Use a safety pin to pin one end of your elastic to a seam or something near the open gap.

Use a second, larger safety pin to pin the other end of your elastic. The larger the safety pin, the faster it will be to “thread” your elastic through the hem/casing, although you can only use as big a pin as your hem itself allows for.

Thread your large safety pin into one side of the gap on your hem, then push it all the way around your sheet hem.

The best way to do this, if you’ve never done an elastic in casing before, is to scrunch up as much fabric as you can onto your safety pin.

Then, with one hand, pinch the front end of your safety pin to hold it there in that position in the casing. With your other hand, pull the bunched up fabric back, down away from the safety pin, along the trailing elastic line. Do this over and over. Sometimes, you’ll have to move bunched fabric down the elastic even further to make room for more fabric. No worries, as long as your lead safety pin keeps moving forward.

When you get to the end, thread your large safety pin back out through the open gap. Don’t worry if it seems like there’s way too much elastic hanging out; this will even out in a bit. For now, though, you want plenty of extra because you’ll be sewing the two ends of your elastic together in a flat joint.

Place one end on top of the other (pointing in opposite directions), then sew together with a stretch stitch. Now pull the rest of the elastic into your sheet hem/casing.

At this point, you’re welcome to sew up that 2” gap. I chose not to, because it’s not hurting anything and won’t be noticeable at all. I’m lazy like that.

You’re done! Go ahead and put your “new” fitted sheet onto your mattress. Or, in this case, onto your box spring.

It fits like a glove. But not an obnoxiously tight glove. Just a nice, comfortable glove.

There was even enough extra length to pull the fitted sheet down over the bed frame to sort of hide the ugly plastic corner guards. Hallelujah.

I hope you enjoy being able to DIY your own fitted sheets now and in the future. It’s a great way to repurpose old flat sheets and save money! Happy DIYing.