Resin Crafts – Cool Projects That You Can Do At Home


The idea of resin crafts can seem quite intimidating for someone who has never done it before. One little project is enough to offer a boost of confidence and to create a taste for more.

Today we’re having a look at a few really cool and interesting crafts and projects that can be done with resin and we hope they’ll inspire you to give this a try as well.
What is Resin Crafting?

Resin crafting is a unique type of craft that uses a material called resin, which is a liquid when first mixed and looks similar to glass when it dries.
Resin crafting is unique because of the wide variety of supplies you can use as well as the large number of different items you can make using resin. Just remember that resin crafts are permanent, and there is no way to change the look of it once it has dried.
What Can I Make With Resin?
Resin is a versatile material that can be used to make several different crafts. Below is a list of some of the most common items which are crafted using resin, but these certainly aren’t the only things you can make with this formidable material so don’t be afraid to explore.
Items That Can Be Made With Resin:
- Jewelry
- Coasters
- Coffee Tables
- Accent Decorations
- Ashtrays
- Ornaments
- Countertops
- Table Tops
- Bar Carts
- Trays
As you can see, the resin can be used to spice up almost anything you find around the house
What Materials Should You Use for Resin Crafts?
A major aspect of resin crafts is placing or gluing small objects which you will pour the resin over. These items then become encase or preserved in the resin, which hardens, and creates a beautiful surface.

Because resin can hold almost anything in place, there are a wide variety of items you can use to make resin crafts.
Items to Use for Resin Crafts:
- Paper Items
- Plastic Figures
- Fabric
- Metal Items
- Clay
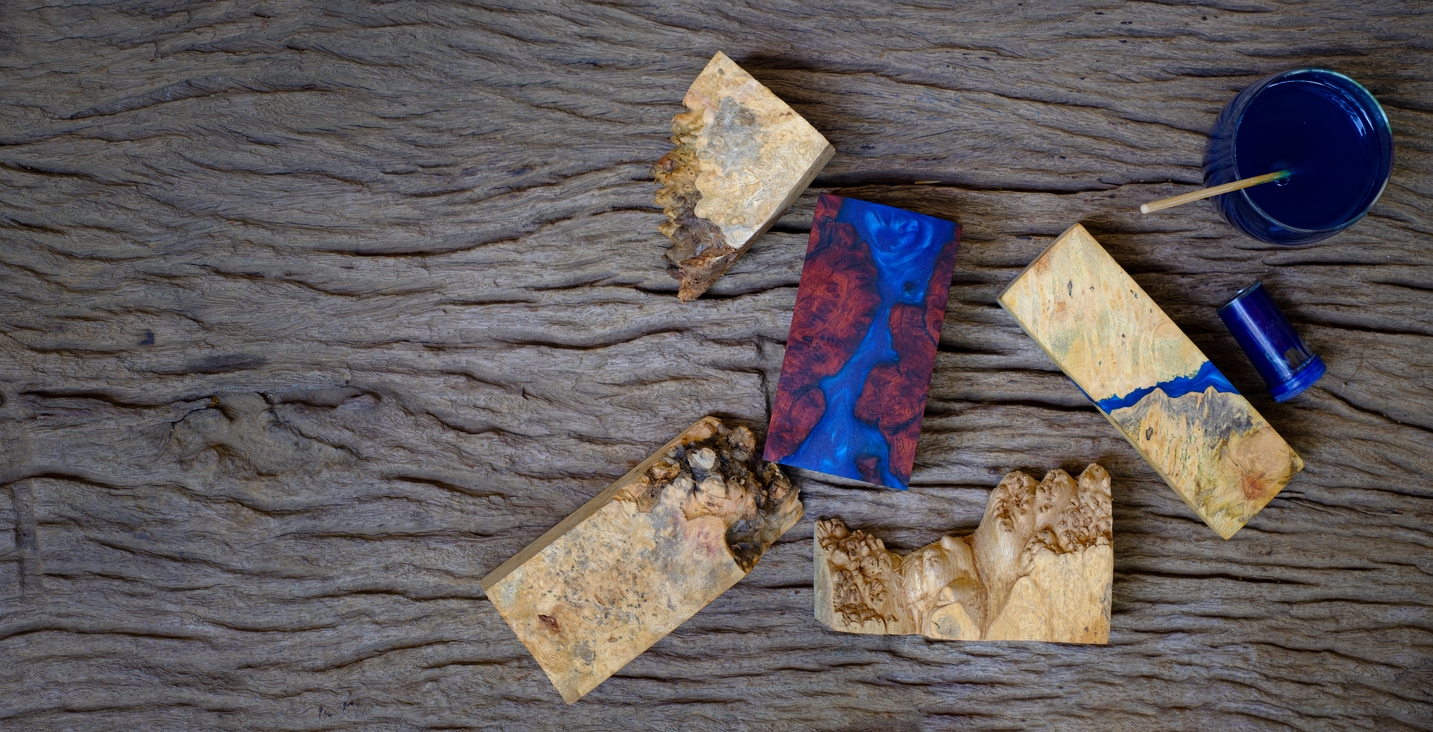
- Wood
- Stones
- Glitters
- Sticks
- Powders
- Butterflies
- Bugs
Do note that any animal, such as bugs or butterflies that you intend to put in resin needs to be dead before you begin.
What Items Should You Avoid in Resin Crafting?

Crafting with resin involves using a liquid-like solution, it’s important to note that there while there are many items you can use for resin crafting, there are also many which should be avoided.
Generally, any item which contains moisture should be avoided when making resin crafts. Water reacts with resin, turning brown as a result. Therefore any resin craft made with moisture-containing items will inevitably turn brown.
Items to Avoid When Making Resin Crafts:
- Fresh Flowers
- Leaves
- Fresh Fruit
- Fresh Vegetables
Dried fruits and vegetables can be added to a resin craft after they are properly prepared. More on this later.
What Other Resin Craft Supplies Do You Need?

Besides the trinkets or dried plants you want to encase in resin, you will need several other supplies to create beautiful resin art.
Most notably, you will need lots and lots of resin. No matter how small the project is, it’s a good idea to buy twice the amount of resin you think you will need. Otherwise, you may run out halfway through your project.
Other Supplies You Need for Resin Crafts:
- Gloves
- Apron
- Drop Sheet/Protective Covering
- Tape
- Plastic Container
- Water
- Level
- Measuring Cup
- Stir Stick
- Spreader
- Toothpicks
- Paper Towel
- Cleaning Alcohol
- Hand Cleaner
Most of the products on the list are to protect yourself, or your home, from resin. Resin can be very messy, and it is permanent, which is why you need all of this protective equipment before you begin.
What Are Some Beginner Resin Crafts?

Resin crafts, while fun, can be complicated as well, especially if you are new to resin crafting.
When you are first beginning to make resin crafts you will want to start small, with a project that you don’t mind messing up. Once you get the hang of it, you can attempt larger and more sentimental resin crafts.
Here are some easy beginner resin crafts:
- Keychains
- Notebook
- Thumbtacks
- Crystals
- Drawer Knobs
All of these projects are very small, so you can attempt them multiple times without spending lots of money or wasting all of your resin.
Where Can You Buy Resin for Crafts?

Most craft stores sell a variety of different types of Resin for crafting. When you are just beginning, it is a good idea to visit a craft store near you as they can help advise you which type of resin is best for your project.
More advanced resin crafters can find craft resin available for purchase online from sites like Amazon and Etsy.
Hardware stores occasionally carry resin as well, but it is best to check craft stores or order online first.
What to Do With Resin Crafts?

There are so many amazing products you can make with resin, and because of this, the things you can do with resin are endless.
The most popular use for resin crafts is to decorate your home. A resin coffee table or set of coasters would be a great addition to your living room. Resin art can add a unique pop of color to almost any room in your home.
But you can also give resin crafts as gifts for birthdays and holidays, or turn them into a business by selling them online.
Which Resin Crafts Are Easy to Sell?

Have you decided to sell your resin crafts? Before you begin, you need to know which resin crafts sell the best otherwise you may be stuck with a lot of unsold inventory on your hands.
The reason crafts which sell the best are those which are well made and pretty to look at. People also like to buy crafts which are useful in their homes or easy to give as gifts.
Here are the resin crafts that are easiest to sell:
- Coasters
- Jewelry
- Straw Toppers
- Keychains
- Bookmarks
- Cutting Boards/Serving Trays
- Home Décor
- Wall Art
If you truly want to turn your resin crafts into a business, it’s a good idea to start with some of the above items. But if none of these catch your fancy, keep reading to see 20 awesome resin craft ideas you can try.
20 Resin Crafts You Can Try Today
1. DIY Resin Coasters

Let’s start with something simple: resin coasters. This is a really cool way to use some of those beautiful seashells and pebbles that you’ve been collecting on the beach.
A jar lid is pretty much the perfect size for this so you can use it as a mold for the coasters plus you can leave it there permanently. It’s all quite simple, just put some shells and other bits into the lid and make sure they’re not taller than the edge, then pour the resin mixture in and let it sit.
Pop the air bubbles when they appear. Check out runningwithsisters for more details.
2. Give an Old Table a Makeover
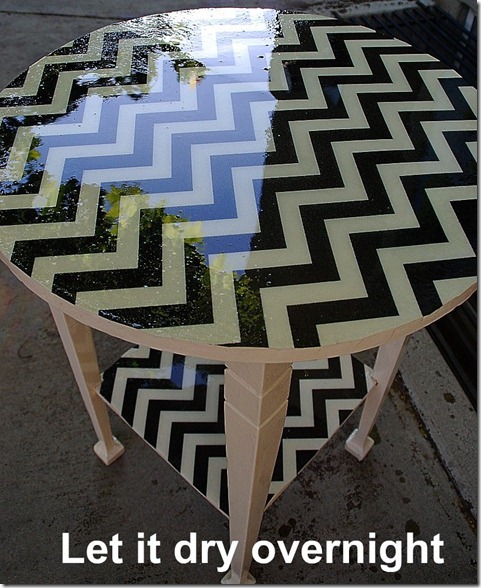
If you’re up for a bigger project, perhaps you’d like to use some resin to give an old table a makeover. The focus will be on the top of the table which you’ll have to clean, sand the old paint off, prime, and paint.
Then get a piece of fabric that you like and cut it to size so it fits over the top. Apply mod podge and glue it onto the top, then pour some resin on top and spread it evenly to create an even layer. This will make your table waterproof. Check out the details on tatertotsandjello.
3. A Coffee Table That’s Refinished with Resin

When using resin to update an old table, you can also add in some color. You can make colored resin to give a coffee table a really cool and shiny top and you can even add a second pigment in a contrasting color to create a really cool pattern similar to the marble veins.
You can also stick with a single uniform color if you prefer a simple look. Either way, make sure the resin is spread evenly across the surface of the table and that you get rid of the air bubbles. Head over to resincraftsblog if you want a complete tutorial.
4. A Mosaic Resin Tray

If you’re not sure you’re ready to take on a table makeover project, try something smaller first. For example, you could make a cool-looking mosaic resin tray. Take a bunch of DVDs and cut them into small pieces making sure to not leave fingerprints on them.
Then take the pieces and spread them across the bottom of the tray. Then pour resin over them and be sure to cover up all the pieces so they don’t stick out. You can find more details about this project on instructables.
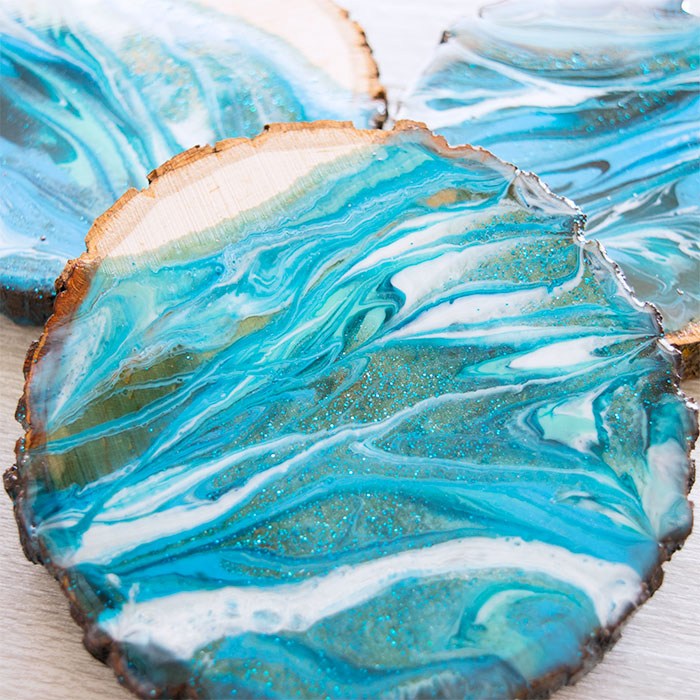
5. Marbled Resin Wood Coasters
Once you’re familiar with how resin works and what you can do with it you can confidently try various little ideas and projects. For example, you can mix resin with various colors and create different combinations to get marbled designs.
You can apply this to some wood coasters and make them colorful and pretty. It’s quite an easy thing to do. In case you want the details of this particular project, check out resincraftsblog.
6. Turquoise Resin Inlay Cheese Board
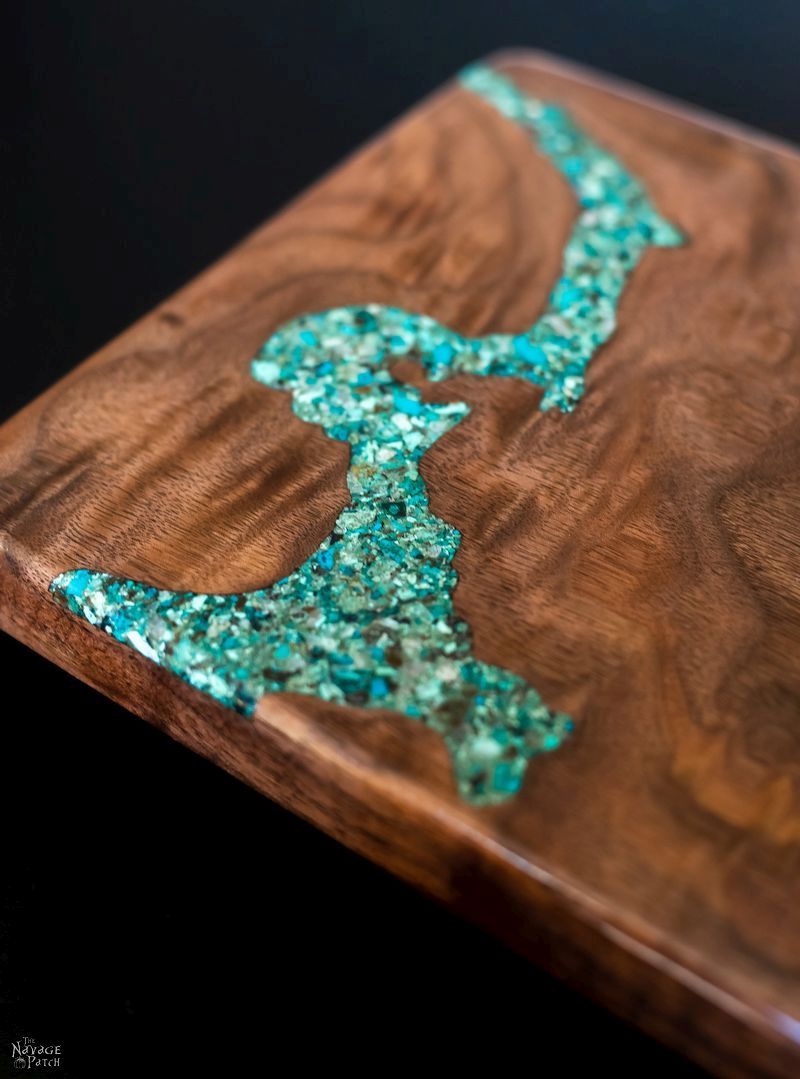
For this next project, you’ll need to use a plunge router with a 1/16 inch straight bit and the knowledge of how to use it. The goal is to make a one-of-a-kind cheese board with crushed turquoise inlay.
The project is reminiscent of those amazing-looking tables with rovers of resin flowing through them. It’s not a simple project but it’s definitely worth the time and effort if you have all the necessary tools and supplies for it. All the details can be found on thenavagepatch.
7. DIY Marbled Resin Coffee Table

Resin is a lot of fun to work with especially when you add color to it and you start to play around with various patterns and designs. There’s a lot of room for creativity in a lot of these projects. One other example in this sense comes from deliciousanddiy.
The tutorial shows how you can decorate a coffee table with resin and colored crystal slices. You can mix and match various other design ideas and customize this project however you prefer.
8. DIY Seashore Resin Art

For anyone interested to explore their creative and artistic side, we recommend making resin art. There’s a lovely and inspiring example of how such a project might look like on sustainmycrafthabit but, of course, you’re free to come up with your own unique design and strategy.
This is a lovely and relaxing seashore design that you can turn into unique artwork to display around your house. It works very well in this case because it’s quite abstract.
9. Resin and Wood Serving Tray

A simple wooden tray, some two-part resin, resin pigments in a few different colors, some craft paint, and a heat gun is the supplies that were used to create this gorgeous serving tray from bybrittanygoldwyn.
The design is abstract and really beautiful and the colors chosen in this case complement each other in a really nice way. Also, the black tray frames everything in a stylish and elegant manner. Have fun coming up with your own custom palette for this project.
10. Make a Color Block Resin Coaster

Resin coasters are some of the easiest things you can make. If you want a clean and simple design, use silicone coaster molds.
You’re also going to need a bunch of other supplies including epoxy resin and hardener, a mixing pot, a candle lighter (or a heat gun) plus the items needed to create this custom design which includes colored paper, white epoxy pigment paste, and some disposable skewers.
The design features on thecraftygentleman are nice and simple which gives the coasters a stylish and modern look.
11. DIY Agate Resin Crafts Cheese Boards

A lot of these projects are related to serving accessories so if you wanted to you could make a whole resin-based set. The project that we’re focusing on now is featured on lilyardor and involves making agate cheese boards.
The first thing you need to do is the molds. For that, you’ll be using plastic wrap and silicone. Give the mold an asymmetrical and organic shape and make it as big as you want.
Then add the resin in layers waiting a few hours in between. After that, it’s time to add the color and create the agate effect. Remove the mold and clean and trim the edges, then apply the gold effect and you’re done.
12. Large Blue Marble Table

The marble effect on this table is once again done using resin. It’s a blue-based palette with three different shades mixed together to create these wavy patterns and the overall marble-inspired look.
The frame of the table was also painted light blue to match the new resin top. You can find all about the technique used to make this unusual and eye-catching design on markmontano. If you’re not a fan of blue, try other colors that may suit your style more.
13. Unusually Shaped Wood and Resin Coasters
If you’re familiar with the Abyss table and other similar pieces of furniture, this project will probably remind you of them. These coasters are made from a combination of wood and resin.
The wood pieces have these unique and unusual shapes and they only partially make up the coasters. The rest of the surface is made of resin. It’s a really cool design and you can have tons of fun with it. Check out the tutorial on youtube to find out how to make them.
14. Resin Art Wooden Chopping Boards
Cutting boards are not typically something that you proudly display in your kitchen. They’re mainly practical without any aesthetic value. That can quite drastically change when resin comes into the mix.
These amazing resin and wood chopping boards features on bold colors and galaxy-inspired designs.
15. DIY Laptop Desk with Resin

You can also use resin to make your simple laptop desk look super cute and stylish. The resin can be used to decorate only one section of the desk and you can use tape to cover up the rest so it remains nice and clean throughout the whole process.
Multiple colors mixed in a pattern like the one suggested on anikasdiylife could look really nice. Of course, you can also go for a simpler look and use a single color to create a color-blocked design.
16. DIY Bar Cart Makeover with Resin

There’s one more inspiring project that we want to share with you today and it involves the rejuvenation and transformation of an old and dated bar cart. It has three shelves and each one was transformed using resin.
Different color combinations were used for each one and gold foil was used to add a little bit of sparkle to the design. A bunch of colored stones was also added in this case. Check out deliciousanddiy for more details about this project.
17. DIY Resin Fluid Art
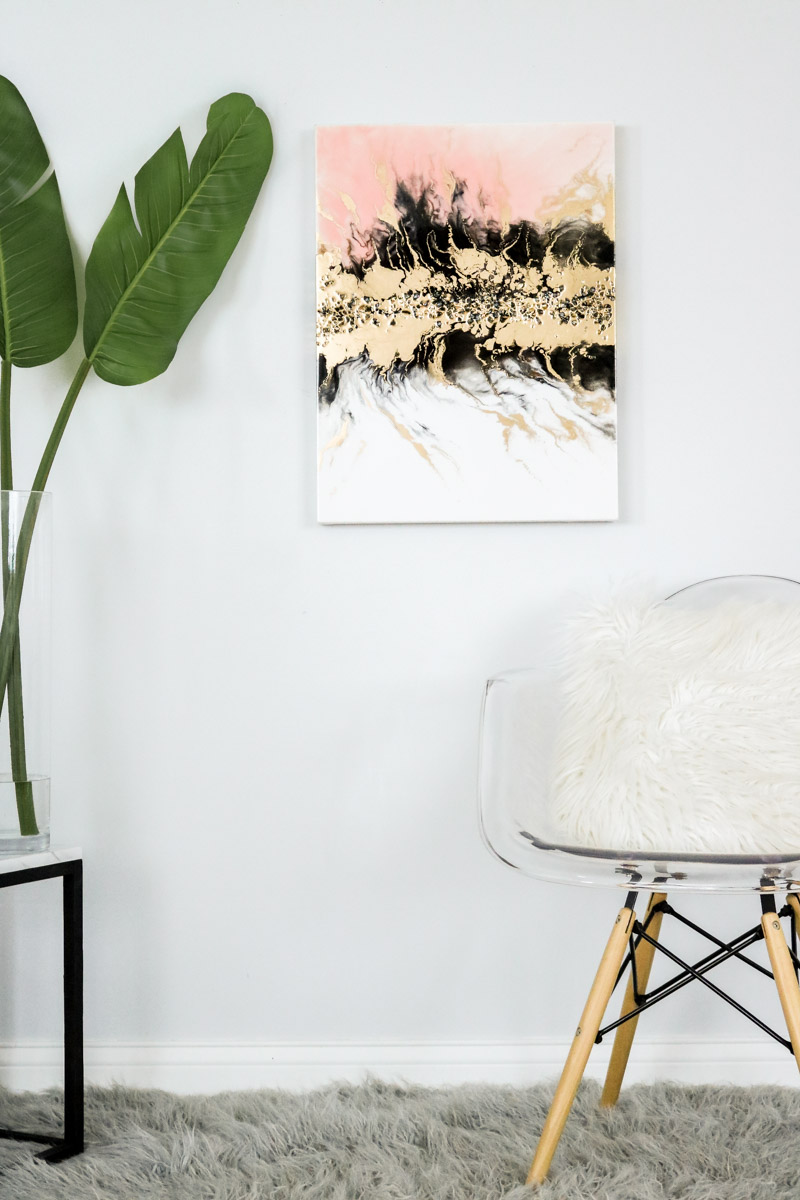
Brighten up any wall in your home with this DIY resin fluid art project from Lily Ardor. It’s a really fun project which is suitable for beginners. While resin can seem quite intimidating the first time you use it, you’ll find these instructions super easy to follow.
When you see the colors blend together, you’ll love how unique and bold this wall art looks. For best results, try to find a resin that has a forty-five-minute work time, which will make this project a little easier for beginners.
There’s a handy tutorial video here that will give you a great idea of the technique before getting started.
18. Decorative Mosaic Tray

Reality Daydream shows us how to make this stunning resin project which uses a simple tray for its base. You don’t need to purchase a fancy tray to get started with this project and can instead opt for an inexpensive one from a yard sale or budget-friendly store.
After laying out the pretty tiles for this tray, you’ll mix the two parts of the epoxy and pour it all over the pattern. For the tiled pattern, you can use glass, mirror, china, or tiles.
This project can be completely personalized to your taste, but we love the pretty pattern in this project.
19. DIY Alcohol Ink Resin Keychains

While most of these projects today have made larger resin items for your home, we love the idea of making something a little more portable. Resin Crafts Blog offers us these little keychains, which could also be placed on a pendant instead.
It uses the petri dish resin method and creates the perfect colorful gift for your family and friends. When it comes to adding the colors, be careful not to add in too much ink or combine colors that become muddy when mixed together.
20. Terrarium Waterfall Project Using Resin

Crafty Fingers shares this video tutorial showing how to create a terrarium using resin. We can’t believe how incredible the waterfall looks in this design, and you’ll love adding this to any surface in your home.
Of course, you can fully adjust the contents of the terrarium to create something unique to you, but you won’t want to miss the chance to add the waterfall to any design. This would be an amazing special gift for someone who appreciates arts and crafts.
How to Use Epoxy Resin for Crafts

Epoxy resin is a commonly used type of resin when it comes to crafting jewelry, bookmarks, and other small items. It’s very versatile, while also being highly customizable, which makes it a great choice for a beginning resin user.
Before you dive right into the world of resin, follow these steps to ensure you know the proper way to use epoxy resin for your crafts.
Step 1: Gather All Supplies for Resin Crafts
You will need to gather all the supplies you need to make a resin craft. It is also suggested that you do the craft in a well-ventilated area. If you are indoors, a respiration mask is also advised.
Step 2: Read the Instructions
Each brand and type of resin is different. Take a moment or two to familiarize yourself with the label of the product you have purchased.
Step 3: Prepare Your Area for Resin Crafts
Epoxy resin needs a slightly warm, low humidity area in order to harden properly. Thus those in a high humidity area may need to work inside.
Cover all work surfaces with a drop cloth or protective plastic tarp (resin can soak through cardboard and paper) and put on your protective equipment.
Also be sure your area is clear of dust and dirt, as this can get into the resin and will show in your final project. You will also want to wash the molds you intend to use for this reason. If you are pouring resin on a particular project, dust it off and put it in your workspace.
Step 4: Warm the Resin
Resin has the least amount of bubbles when it is warm, so take a few minutes to warm the bottles by placing them briefly in a pot or bowl of warm water. Dry the bottles before opening.
Step 5: Measure and Mix the Resin
Put on your gloves, open each bottle, and measure out the amount of material you need. Put the cap on each bottle as you finish before you move on to the next bottle. Exact measurements are essential, so take extra care with this step, because the improperly mixed resin will not cure properly.
The resin begins the curing process as soon as it is mixed, therefore you should not start this step until you have the project you are pouring the resin on ready to go.
Pour both measured ingredients into one cup and mix them together. You will probably need to mix for a few minutes. The bottle of the resin will tell you exactly how long to mix it. Don’t mix too vigorously, otherwise, you will put air bubbles into the resin.
Step 6: Let it Sit
After the resin is mixed, it will need to sit for 2-3 minutes, allowing the air bubbles to rise to the surface and pop. Set a timer, as you don’t want to let this step go on too long. After a minute or two is the time to add your coloring or glitter if you plan to use some in your project.
Step 7: Pour the Resin
Carefully pour your resin into molds, or onto your project. Be careful not to overfill a mold. Use a spoon for smaller and more delicate projects that are easy to overfill.
Scrape away any excess resin right away. Place any loose items you want in your project (such as shells or stones) at this time. Clean up any spills or drips right away.
Step 8: Pop Any Air Bubbles
No matter how good you are at pouring resin, you will have air bubbles in your project. Wait two or so minutes after pouring the resin then use a toothpick to pop those near the surface and on the sides of your mold.
You can also use a lighter and run the flame lightly over the surface of the resin to get any air bubble just below the surface. If you planned to add any plants to the surface of your resin, such as dried leaves or flowers, now is the time to do that as well.
Step 9: Let the Resin Dry
Read your resin bottle to find out how long your project will need to dry. Depending on its size, the drying phase will likely take between 12 and 36 hours. Leave your project in a well-ventilated area to allow the drying process to go smoothly.
Step 10: Sand Your Resin Crafts Project
Sometimes as it dries, the resin forms sharp corners and edges. You can get rid of these with some light sanding using fine sandpaper. Apply some resin polish to the top to make your project look shiny.
What is the Best Epoxy Resin for Crafts?
There are many different types of resin, and the type you will need will depend on the craft you are making.
For smaller crafts, such as keychains and jewelry you will want to use a casting resin. It is easy to work with and the bubbles can be released easily, which is ideal for beginners.
When starting a larger project, like a table, or maybe a tray, you will need deep pour epoxy resin which comes in larger quantities. Deep pour resin is specifically designed to fill the cracks in wood and be poured into thin layers.
For those who want a thicker layer of resin, you’ll want to do two pouring sessions for the best results with this resin.
Resin Crafts FAQ:
Is Selling Resin Art Profitable?
There is a huge market for resin crafts. If you are able to make beautiful resin crafts that are in demand, it is definitely profitable to sell resin crafts.
Can You Put Toys in Resin?
It is very easy to put plastic toys in resin, and many people choose to do this to preserve a favorite figurine.
Resin can often seem intimidating to those who haven’t used it before in craft projects. However, once you’ve tried one of these projects, you’ll soon be hooked on using it. As you can see, it can be used on projects of all shapes and sizes.
Can LED Lights Be Put in Resin Crafts?
There are several methods you can use to put LED lights in resin. The most popular is by putting a tube through the resin that the lights can be strung through.
It is never advised to just pour resin on LED lights, as it could cause damage to the lights.
How Long Does Casting Craft Resin Take to Harden?
Resin takes longer to dry depending on how much you use. A small layer of resin can take as little as 1 hour to dry, while deep resin can take up to 24 hours. For best results, let all resin crafts sit for 24 hours before using or moving them.
What Happens When You Put Food in Resin?
Resin looks like clear syrup when poured on food. When it hardens, the food may or may not look appetizing depending on what food you are using. You should never attempt to eat any food you have put resin on.
Ready to Make Some Resin Crafts?
Resin can often seem intimidating to those who haven’t used it before in craft projects. However, once you’ve tried one of these projects, you’ll soon be hooked on using it. As you can see, it can be used on projects of all shapes and sizes.
Whether you decide to make a keyring, a piece of artwork, or an item of furniture, with crafts and projects using resin, you’ll create unique patterns and bold designs that will wow any visitor to your home this year.