The Best Paint For Wood Crafts


Hobbyists and woodworking professionals use the best paint for wood crafts. If you’re serious about your DIY skills, you should know about the best paint for wood crafts.

When painting wood crafts, there are many paint options. Acrylic paint is the most popular, and for a variety of reasons. Here, we’ll show you why certain paints are ideal for wood crafts. We’ll also explore the different paints available that can turn your wooden furniture or any wood surface into a work of art.
You don’t need to be a trained professional to create vivid and vibrant paintings. However, the more knowledgeable you are, the better your woodwork will be. Painting on wooden crafts is a popular DIY activity, so we thought we’d show you a few tips and tricks to help you achieve your goals.
We’ve also compiled a list of paint for wood crafts, including our top three picks for the best value, best budget, and customer’s choice. We’ve even thrown in links to a few DIY projects we think you’d enjoy. Keep reading to discover if painted wood crafts could be your next go-to hobby.

Types of Paint for Wood Crafts
When it comes to paints suitable for wood surfaces, there are a number of different options available. Each paint has unique characteristics that help determine which wood projects they’re best for.
Best Paint for Wood Crafts
Here are the best paints for wood crafts:
Crafts 4 All Acrylic Paint

The Crafts 4 All Acrylic 12-pack Paint Set is ideal for wood and other porous and non-porous materials. The paint is non-toxic, and water-based, making it safe to use and easy to clean up.
This set includes twelve popular colors made from the most vibrant pigments available and each color has a consistency ideal for mixing – letting you create endless color possibilities.
These acrylic paints are suitable for beginners and professionals and the kit comes with three brushes to get you started.
Apple Barrel Matte Finish Acrylic Paint

The Apple Barrel Promoabii 18-piece Acrylic Paint Set is ideal for all surfaces including wood. These non-toxic paints clean up easily with mild soap and water and can be applied with brushes, stamps, rollers, and more.
The eighteen colors include vibrant primary shades as well as a choice of neutrals to complement any project. Each color has a consistency ideal for mixing and can be applied with a smooth finish.
Perfect for every skill level, the Apple Barrel Promoabii acrylic paints dry quickly letting you enjoy your work of art sooner.
Castle Art Supplies Acrylic Paint Tubes

The Castle Art Supplies 12-Piece Acrylic Paint Set is ideal for wood and many other porous and non-porous mediums. The paints are non-toxic and easy to clean up.
The set includes 12 essential colors that are easy to work with and to mix, letting you create vibrant custom colors while maintaining the paint’s smooth texture. The acrylic paints dry quickly enabling you to paint in layers without negatively impacting surrounding colors.
Castle Art Supplies 12-piece set is suitable for all skill levels.
Rust Oleum Ultra Matte Interior Chalk Paint

Rust-Oleum 285140 Ultra Matte Interior Chalked Paint is suitable for a variety of indoor surfaces including canvas, ceramic, metal, and wood. This water-based latex paint is low-odor and cleans up easily with soap and water.
Available in a variety of colors, Rust-Oleum Chalked Paint is perfect for projects with a vintage look and can be easily distressed to add an aged appearance. Drying to an ultra-matte finish in just thirty minutes, you can easily add layered effects in no time at all.
This paint requires little preparation of the piece it is being applied to and comes in brush-on or spray versions. One can of brush-on paint covers approximately 150 square feet of surface area.
Delta Creative Ceramcoat Chalk Paint

Delta Paint is a non-toxic, water-based acrylic paint suitable for a variety of surfaces including metal and wood.
Available in 20 pigmented colors, this paint dries quickly to a chalk finish. Apply in layers and sand in between to create an aged distress look in no time.
Ceramcoat chalk paint has superior adhesion quality and requires no stripping or priming of the material to be painted. This paint is a fantastic option for restoring and repurposing furniture pieces.
Home Decor Chalk Paint For Wood Crafts

FolkArt produces a durable matte finish on all types of materials including wood, metal, and canvas.
This chalk paint comes in a variety of highly pigmented colors and a consistency that lends itself well to blending and shading. Along with the array of colors, FolkArt paint also comes in several finishes including enamel, multi-surface, glitter, neon, and outdoor.
FolkArt’s Chalk Furniture and Craft Paint requires no stripping or priming and is a great choice for furniture and projects that require a layered appearance.
Magicfly Outdoor Acrylic Paint

Magicfly Outdoor Acrylic Paint is a multi-surface acrylic that is non-toxic and eco-friendly. Formulated for outdoor use, it is weather and scuff-resistant, self-sealing, and has superior UV protection.
For children, this might be the best acrylic paint. The set comes with 30 pigmented colors and are easy to mix and blend. You can create an endless number of vibrant colors that glide on smoothly and dry quickly to a beautiful finish.
This acrylic paint is suitable for all skill levels.
Krylon K03805A00 Glitter Blast Glitter Spray Paint for Craft Projects

Krylon is acid-free and ideal for craft projects on multiple surfaces including wood, metal, wicker, and more.
A mix of black and silver with added sparkle gives this paint finish dimension and adds character to any project. It dries to the touch in twenty minutes and can be handled and worked with within twenty-four hours.
Rust-Oleum Specialty Metallic Spray Paint

Rust-Oleum can be used on wood, metal, plaster, ceramic, and more. It is a metallic leafing paint ideal for indoor décor and finishing.
Available in gold, silver, copper, and brass, this paint contains actual metal flakes that give it its sparkle and metallic appearance. It is a great option for decorative projects such as candle holders, picture frames, holiday decorations, etc.
Drying time is about fifteen minutes to the touch and one hour to apply a second coat. One bottle covers approximately twelve square feet.
Types of Paint for Wood Crafts

When it comes to paints suitable for wood surfaces, there are a number of different options available.
Each having its own characteristics that help determine which wood projects they’re best for.
Acrylic Paints
Acrylic paints are the most widely used for crafts of various kinds and are one of the best for use on wood projects. These water-based paints have little odor and generally clean up easily while wet. Often referred to as craft paint, Acrylics are versatile in their use. They can be used as they come, diluted with water to achieve a washed-out effect, or mixed to achieve unique color options. Relatively inexpensive, acrylic paints dry quickly and come in matte or glossy finishes.
Latex Paints
Latex paints are an excellent option for wood projects that have large surface areas. Known for their spreadability, these paints lend themselves well to being rolled as opposed to brushed. They have very little odor and clean up easily with soap and water. For larger projects, latex paints, which are sold in gallons, are often less expensive than acrylics paints that are sold in smaller, one-to-two-ounce bottles. Exterior latex paints add an extra layer of durability as well as weather resistance, making them great options for your outdoor wood projects.
Enamel Paints
You can apply enamel paint with a brush or spray it on surfaces. Enamel paints are designed specifically for crafting. These easy-to-clean-up paints come in water or oil-based varieties and take 24 hours hours to dry. Once dried, enamel paints create a harder surface than acrylics and are more difficult to chip.
The paints also provide a glossier finish. Although many enamel paints work well on wood, some do not. There are some enamels intended for non-porous surfaces, so be sure to read the label before choosing the enamel paint for your project.
Chalk Finish Paints
Chalk paints are used on a variety of surfaces an add a worn, distressed look to wood projects. Providing an ultra-matte finish, these paints can be distressed and sanded to give dimension and unique detail to the material they are on. Chalk paints are non-toxic and clean up easily with soap and water.
Milk Paints
Milk paints are ideal for giving wood surfaces a rustic, worn look. They brush on easily and dry to an ultra-matte finish. Non-toxic and durable, these water-based paints are easy to clean up with mild soap and water.
Stains
Stains are another great option for finishing woodcraft projects. They are semi-opaque and tend to deepen the natural color of wood while letting the grain show through. Although stains are typically similar in color to the wood they are being used on, there are color options available that give your project a unique flare.
Tips for Craft Painting Wood
There are a few things you can do from the start of your wood crafting project that will ensure the results meet your expectations.

Wood Sanding
Preparing the wood with a good sanding. This is especially true if the wood piece has been painted before. Sanding removes bumps, splinters, imperfections, and old paint/finish and leaves the wood’s surface smooth and flat. It also makes the wood more receptive to the paint finish.
Use fine-grit (140 to 180) sandpaper to scuff the surface making sure to sand with the grain of the wood and never against it. Once your piece is sanded, wipe it down with a tack cloth or a damp rag to remove all the dust and debris from the surface. Because wood can collect dust and other fine particles as it sits, it is a good idea to wipe it down prior to painting even if you don’t sand the surface ahead of time.
Related: How To Choose The Best Paint Sprayer for Kitchen Cabinets
Apply Primer
Once sanding is complete, it is usually a good idea to apply a coat of primer to your project. Not only does primer make the paint finish more vibrant, but it also covers imperfections in the wood and stains left behind from previous finishes. Primer can be brushed or sprayed on and is a key step in helping the wood accept the paint or stain finish.
Apply the primer to every surface that will be receiving paint and allow it to dry completely before moving to the next step. To make your project’s surface even smoother, sand the first coat of primer once it is dry and apply a second coat on top.
Painting
Once you get to the painting step of your project it is important to make sure you have all your supplies on hand. You don’t want to be searching for the right tool only to find your paint already dry when you return.
Apply the first coat of paint to your project. Coat the front and sides first and allow them to dry before coating the back. Let the first coat dry on all faces before moving to the second coat if one is required. If you are painting details onto your project, make sure the main colors are completely dry first, then apply the details. Let everything dry completely before moving on.
Sealant
Finally, add one to two coats of sealer to your project to ensure the painted finish stays clean and vibrant. Apply one coat and let dry before applying a second coat if one is needed. Note, sealers come in different finishes including, matte, glossy, and satin so make sure to pick the one that best suits your project.
What Type of Brushes Should I Use for Craft Painting Wood?

When choosing your brushes, look for ones made of taklon, katakana, or sable. These will give your painted wood project the smoothest finish. Try to avoid brushes with stiff bristles such as camel hair as these tend to leave more noticeable brush lines.
Related: Extend The Life of The Furniture With The Best Wood Sealer
Never let paint dry on your brushes. Dry paint is difficult, and sometimes impossible, to remove from the brush and the bristles are often destroyed in the process. Always rinse your brushes immediately after each use.
Wood Crafts Paint Application
Here are the most common methods to apply paint to wood crafts:

Spray Paint
Spray paint is an ideal option when a smooth and perfectly even finish is desired. It is also great for fine details that brushers or other applications struggle with.
When spray painting your project, it is vital to sand the surface thoroughly and ensure that all imperfections are removed. If the wood has had previous finishes or has any type of debris, spray paint will not adhere until it is removed. Spray paint easily picks up dust and other particles, so it is essential that, once sanded, the surface is wiped clean of any debris and the area you work in is free from dust.
To achieve an ideal finish with spray paint, maintain a constant distance of about ten inches from the surface and never stop moving the can back and forth as you spray. This motion is what gives the spray paint its even appearance.
Paint Brush
Using a brush to paint wood gives your piece a clean look and traditional charm. Brushes also make painting in corners, or where two surfaces meet, easier since you have more control over where the paint is applied.
For the best results, never use “cheap” brushes that fall apart easily and end up leaving streaks and/or bristles in your work. Quality brushes stand-up to wear and with proper care will last for many projects – making the difference in initial price worth it.
When painting with a brush, always start at the top of your project and stroke down to the middle. Once the brush starts to drag, get more paint, and continue the next stroke from where the first stroke ended. Apply several brush strokes to the entire surface and then blend the strokes to remove any streaks or lines that are left.
To avoid getting paint on surfaces that join the one you are working on, use painters’ tape to mask the surface. Position the tape so that its edge lines up cleaning with the surface you want to paint and make sure to push the tape tightly against its surface. This will ensure no paint bleeds underneath the tape. Once painting is complete, remove the tape to reveal a clean, crisp joint line.
You will know if you need additional coats of paint if the first coat looks transparent or has streaks. If this occurs, lightly sand the first coat once it is dry and then apply a second.
Paint Roller
Rollers produce a smooth finish somewhere between spray paint and a brush. They are easy to use and are another great option when there is a large, flat surface to paint.
Using a paint tray, gently roll the roller through the paint and back and forth along the slope. Once the paint is distributed evenly on the roller, begin rolling it on your project with light, even pressure. Let each coat dry and repeat as necessary. For a really smooth finish, use a high-density foam roller.
One thing to keep in mind is that rollers cannot reach into corners so you will require a brush to finish the project at these points. Finishing the surface with a brush after the final roll also ensures any fine lines or drips are removed prior to the paint drying.
Sponging
Sponging is one of the easiest faux finishes to achieve and takes very little time. Once you have a base coat applied to your surface, dip a sponge in accent paints and dab it onto the base coat. Use various amounts of pressure and/or various colors to achieve a more textured look. Sponging gives a unique textured look that will be different on every surface.
Wadded Cloth
This technique is achieved in the same way as the sponge technique but leaves a more subtle textured appearance. Although it is called the wadded cloth technique, the application doesn’t have to be done with a cloth. You can use a paper towel, rags, or even trash bags to achieve a desired look. the final roll also ensures any fine lines or drips are removed prior to the paint drying.
Things To Consider Before Painting Wood Crafts

Before you start painting, there are a few things you should consider. Here are the most important items:
Wooden Surfaces
Most paints will not adhere to surfaces that are dirty, moist or contain old paints and other finishes. These surfaces will typically need to be cleaned and prepped to accept paint and will more than likely require a primer coat as well.
Another important consideration when it comes to the wood’s surface is how smooth it is. Typically, you’ll want a surface that is as smooth as possible so that the paint doesn’t seep completely into the wood. A good sanding should be completed prior to any primer or paint being applied.
DIY Skill Level
Painting can be trickier than it looks so your skill level should be considered when you’re choosing your project and the paint you’ll use. Beginner and some intermediate painters should choose colors and techniques that are simple and forgiving as well as paints that are slightly thick.
Thicker paints dry slower and allow more time to practice technique and fix errors. Advanced painters should have no problem with any type of paint and any medium.
Safety
Although most craft paints are safe for general use, there are some paints that contain harmful toxins as well as allergens and other chemicals. It is a good idea to wear gloves, aprons, and other protective gear when working with these paints and to have adequate ventilation when working with any paint.
Tools
There are endless quantities of tools available for painting projects, from brushes to materials and everything in between. Research which tools are appropriate for your project and the paint you’ll be working with. Gather all the required tools prior to beginning so that you won’t have to go looking while your paint dries.
Project Planning
Having a plan for how you will carry out and complete your woodcraft is key. It will ensure your project runs smoothly and that important steps are not missed along the way. Consider making a list of the materials you’ll need as well as each step-in sequence.
You’ll find that taking this step at the start will lead to a more successful, and sometimes less expensive, project in the long run.
The condition of the wood surface
Most paints will not adhere to surfaces that are dirty, moist or contain old paints and other finishes. These surfaces will typically need to be cleaned and prepped to accept paint and will more than likely require a primer coat as well.
Another important consideration when it comes to the wood’s surface is how smooth it is. Typically, you’ll want a surface that is as smooth as possible so that the paint doesn’t seep completely into the wood. A good sanding should be completed prior to any primer or paint being applied.
Skill Level
Painting can be trickier than it looks so your skill level should be considered when you’re choosing your project and the paint you’ll use. Beginner and some intermediate painters should choose colors and techniques that are simple and forgiving as well as paints that are slightly thick. Thicker paints dry slower and allow more time to practice technique and fix errors.
Advanced painters should have no problem with any type of paint and any medium.
Safety
Although most craft paints are safe for general use, there are some paints that contain harmful toxins as well as allergens and other chemicals. It is a good idea to wear gloves, aprons, and other protective gear when working with these paints and to have adequate ventilation when working with any paint.
Tools
There are endless quantities of tools available for painting projects, from brushes to materials and everything in between. Make sure to research which tools are appropriate for your project and the paint you’ll be working with. Gather all the required tools prior to beginning so that you won’t have to go looking while your paint dries.
Plan the Project
Having a plan for how you will carry out and complete your woodcraft is key. It will ensure your project runs smoothly and that important steps are not missed along the way. Consider making a list of the materials you’ll need as well as each step-in sequence. You’ll find that taking this step at the start will lead to a more successful, and sometimes less expensive, project in the long run.
What to Look for in Craft Paint for Wood

You want to use high quality paint for your wood craft projects. Here are a few things to consider when choosing a paint for a wooden surface or wooden furniture.
Durability
Choose coating paints accordingly and their environments. For example, if your project is a birdhouse and it will be placed outside once it’s complete, you’ll want to look for a paint that stands up to the elements. Or, if our project will be inside, but placed in a window, you’ll want a paint that resists yellowing over time.
Coverage
You’ll want to make sure you know how many coats will be required for the type and color of paint you’re using so that you can make sure you have enough from the start. Paints that come with a primer mixed in will sometimes only need one coat, while darker colors with no primer often need two or three.
Dry Time
Except for enamel, a decent quality paint should take approximately six hours to dry. Particularly those paints specifically designed for crafts. If the paint you’re looking at takes longer than six to eight hours to dry, it may not be the best quality available.
Thickness
The thickness or “weight” of the paint is another important consideration when working with wood. Paint that is too thick may not spread well enough on the wood’s surface, but paint that is too thin may seep too deeply into the pores. Paints that have a moderate consistency are usually best for wood surfaces.
Oil vs Latex
Latex paints dry faster and produce less odor than oil-based paints and stand up better against cracking. They also resist yellowing and provide the long-term flexibility that oil-based paints lack. They do, however, require more coats than oil based paints.
Oil-based paints are much better at hiding imperfections on surfaces and are superior for leveling. However, they take longer to dry and are harder to clean up than latex paints and they release strong odors while wet.
DIY Project Ideas Using Craft Paint
Whether painting wood furniture or outdoor wood crafts, choosing the right paint is just as important as anything else.
DIY Industrial Wood and Metal Rolling Kitchen Cart

Although “kitchen” is in the name, this rolling cart is so versatile and can be used just about anywhere and for just about anything. The mix of organic stained wood with metal supports gives this cart an industrial feel with just a bit of country charm.
To make this rolling cart yourself you’ll need pine or maple planks, aluminum angle irons, screws, casters, sandpaper, primer, stain, or paint of your choice, a Kreg jig, and an impact screwdriver or power drill.
Optional materials include pocket hole plugs and a Kreg right-angle clamp. The step-by-step instruction in the provided link will walk you through how and where to drill the necessary holes, and how to create and assemble the shelves. You’ll learn techniques for sanding and painting both the wood and metal elements and the best ways for drilling holes in metal.
Although “kitchen” is in the name, this rolling cart is so versatile and can be used just about anywhere and for just about anything. The mix of organic stained wood with metal supports gives this cart an industrial feel with just a bit of country charm.
“EAT” – Wooden DIY Wall Art

This fun and easy wall art is completely customizable and a great addition to any kitchen or dining room décor. Use metallic letters and wood backgrounds to create an industrial/rustic look like the one shown in this project or use vibrant colors to create a diner feel.
For this DIY craft you will need, one 1”x6”x6’ piece of wood; the capital letters E, A, and T in the material of your choice, wood screws, spray paint in the color of your choice, wood stain, super glue or mounting dots, and 3M command strips.
The above link will walk you through painting the letters; cutting, sanding, and staining the wood pieces; and assembling everything to create this one-of-a-kind showstopper piece.
Thanksgiving Sign: DIY Wooden Gobble Gobble
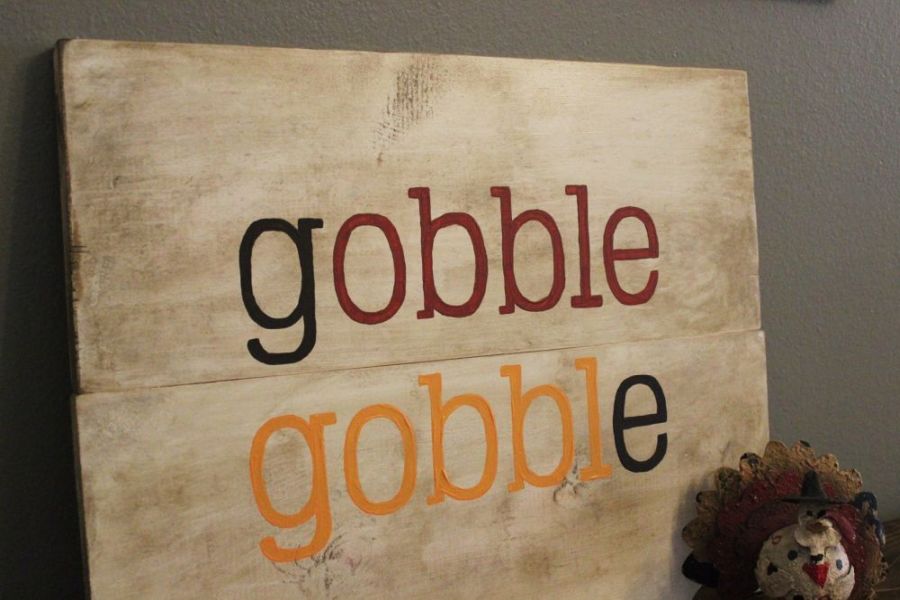
This easy and customizable wall hanging is a fun way to add a little whimsy to your holiday décor without devoting a lot of time to a project. Use whatever material and colors you enjoy to give this piece a personal touch that fits uniquely into your space or that of a loved one.
For this DIY craft you’ll need two 1”x8”x18” boards in a wood species of your choice; white paint (spray or brushable); wood stain in a color of your choice; graphite transfer paper, “Gobble” printed in a large font, three fall paint colors; a slim paintbrush; sandpaper; a Kreg jig, Kreg screws, and painters’ tape.
The instructions at the link above will guide you through the process of connecting, sanding, and staining the boards, as well as applying and painting the “Gobble Gobble” design.
DIY Modern Wood Toy Box
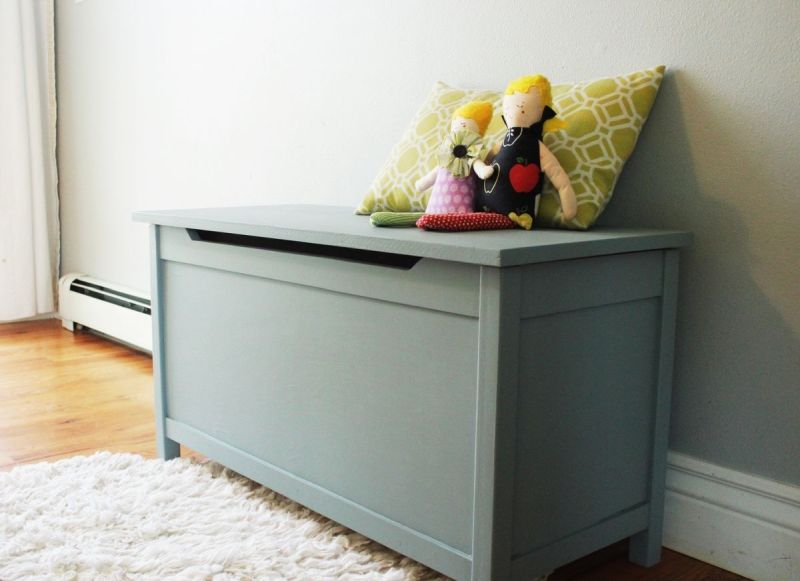
This DIY project takes a classic wooden toy box and gives it a modern twist and loads of appeal! Kids will love using this piece to store their favorite toys and mom may even want one for herself to store craft supplies, blankets, and much more.
Required Materials
- ½ inch plywood pieces measuring two at 12 x 12 inches
- 2 – 12 x 32 inch plywood pieces
- 1 13”x33” piece of plywood
- 1 x 3 lumber measuring two at 12”, two at 32”, and 3 at 13”; 1×2 lumber measuring two at 12” and two at 32”; 2×2 lumber measuring four at 18½”; one ¾”x16”x36” project panel (also known as craft pine)
- two torsion hinges or hinges
- pocket hole screws
- wood glue
- Kreg jig,
- 120 and 220-grit sandpaper
- drill, clamps, optional rubber pads, and paint of your choice.
The step-by-step instructions at the above link will walk you through how to cut, drill, and prep each piece, when and how to sand and apply primer, applying the paint and finish coats, and the best way to assemble the entire project.
Frequently Asked Questions (FAQ)FAQ
What Are The Best Outdoor Specialized Paints?
For outdoor projects, the best paint to use is acrylic. Acrylic paint is the most durable outdoor paint. The paint is light and weather resistant.
When Is It A Good Idea To Use Transparent Paints?
You should use transparent paints when you want to add depth to your project. Oil paint is the most popular transparent paint.
How Do You Remove Acrylic Paint From Skin?
If you get acrylic paint on your skin, you can wipe it off with a mixture of baby oil and rubbing alcohol. The first thing you’ll need to do is wash the affected area with soap and warm water. This will help loosen the paint. Next, dry the stained area. After, apply baby oil on the paint and rub it into the skin.
Is Acrylic Paint Flammable?
Acrylic is not flammable, which is one reason why it is popular for outdoor surfaces.
What Do You Do If Your Child Swallows Molecular Reinforced Ceramic Beads?
Ceramic beads are non-toxic and therefore not poisonous. If your child has swallowed a ceramic bead, it is not necessary to induce vomiting. The bead will not be contained in their intestinal tract, and instead should pass through easily.
Best Paint For Wood Crafts Conclusion
Painting wood crafts is a fun DIY hobby. Your skill level doesn’t matter. With painting, the only way to improve is with practice. With countless options of wood surfaces and shapes, you shouldn’t have a problem finding that ideal wood project to paint.
If you’re above the amateur level, you should consider using premium quality pigments rather than basic outdoor paint. Painting craft wood isn’t like regular canvas painting. Depending on the object and its intricacy, consider outdoor specialize paints.
As you’ve learned here, there are many paint types that are good for wood crafts. Acrylic paint works best on wooden surfaces and on wood crafts in general. Even if you’re painting tiny reinforced ceramic beads, you can use vibrant and vivid colors that will make your work stand out.