How To Make A Trinket Box from Polymer Clay

There’s been a shift in home design to emphasize minimal design and effortless style. It’s a really easy look to accomplish if you don’t have any belongings. Otherwise keeping everything you own either immaculately tidy or out of sight is a constant struggle. I think most of us would love to downsize our lives to some degree. Clearing physical clutter tends to have the same effect on any mental disorganization and can create not just a simple living space but also a clearer thought process each day. Not having to wade through, pick up and clean after gives us extra time to do the things that make us happy so cutting down on unnecessary baggage both physically and emotionally can have a profound effect on the way we live our lives and how happy we are.


For most of us, even if we were to minimize what we surround ourselves with, there would still be small messes of essential, everyday items. It’s unavoidable really. For these instances, we need small pockets of organization to help us stay on track. Places of complete chaos in a room of calm. Hidden from view to keep the illusion of serenity.

This polymer clay trinket box is the perfect way to bring all of these elements together. Out of sight is out of mind. Keep the loose change, jewelry or your keys hidden safely away from view with this minimal, marbled trinket box.

Materials you’ll need to make a Trinket Box from Polymer Clay
- Polymer Clay – Black and white
- Clay roller
- Craft knife
- Two cookie cutters – One 5mm smaller than the other
- Two 5mm thick lengths of wood or acrylic
How To Make A Trinket Box from Polymer Clay:
Step 1:
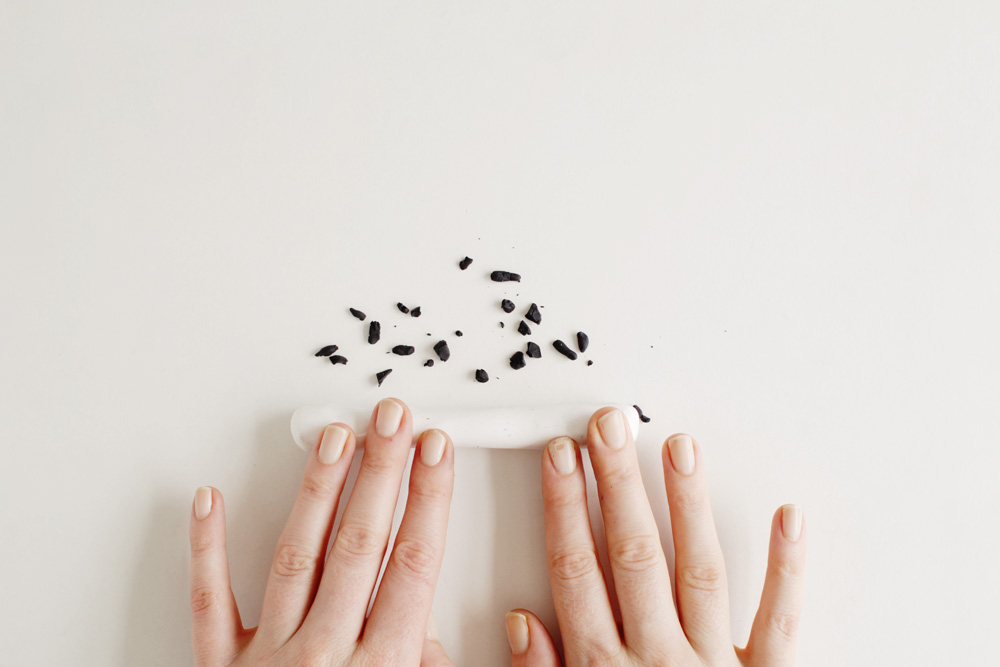
To make the marbled clay break off a ball of white clay and work until soft. Crumble a small, pea-sized ball of black clay into tiny flakes.

Roll the white clay into a sausage shape and roll over the black flakes of clay making sure they are spread out along the length of the white clay.

Roll the clay into a ball, then roll back out into a tube shape.


Twist the tube to distort the marble. Keep repeating this step until you have thin streaks of black clay running through the white. Be careful not to over mix the colours. You don’t want to create a lump of grey clay!


Step 2:
Once you have created the marbling you need to roll the clay out. To create an even surface and depth use the two lengths of wood as a guide. Roll out the clay in between the wood making sure the roller is moving along both of them.

Once the clay is flat and even cut out two circles using the cookie cutters. Cut one using the larger cutter and two using the smaller cutter. You might need to make more marbled clay.


Step 3:
Once you have all three circles roll out another piece of marbled clay and cut out a long rectangle. Make sure the length of this is long enough to go all the way around the edge of one of the smaller circles.

Step 4:
Wrap the rectangle around one of the smaller circles of clay trimming off any excess from the end. Slowly and carefully use you fingers to press and smooth the edges together until you cannot see the join and this part of the box is secure.

Step 5:
Press the remaining smaller circle onto the bottom of the larger circle firmly to secure. If you have it you can use a polymer clay glue to hold in place whilst baking but it’s not crucial to do so.

Step 6:
Bake you clay following the guidelines on your packet of polymer clay and leave to cool. Then cover with 3-4 layers of gloss varnish to give the clay an authentic marbled look.


