How Remove Concrete Slabs

If you have old, cracked, or non-level concrete slabs, you may need to remove them to upgrade your patio. While this might seem like a daunting task, we found it easier than anticipated.

With the proper tools and a little bit of manpower, you can remove your entire concrete slab patio in a day. We’ve done our research, and this is the easiest and fastest method to remove a concrete slab without a jackhammer.
(Note: If you’re considering renting a jackhammer, that’s fine. It may work best for your needs. But we discovered that a heavy-duty jackhammer weighs about 90 pounds, which takes quite a bit of effort to move and manipulate. A 20# sledgehammer, which is what we use here, is easier and highly effective. For a standard patio, we recommend this method first and foremost.)


Materials You’ll Need To Remove Concrete Slabs
- Pry bar
- Heavy duty sledge hammer
- High lift jack
- Safety gear
- Gloves
- Bucket
- Shovel
The three primary tools you’ll need include (a) a pry bar, (b) a heavy-duty sledge hammer (at least 20 lbs.), and (c) a high lift jack (like what’s used to raise a truck for tire changes or car repairs).
Other things you’ll need include safety glasses, work gloves, buckets, a shovel, and a truck/trailer to haul away the broken concrete bits.

Step 1: Clear the Area Before Removing the Concrete Slabs
Before you remove your concrete slabs, clear off the patio.

Here our patio is, cleared off and ready for removal.

Why Remove Concrete Slabs from Your Patio?
The primary reason for removing this patio is this corner. The corner collects water, flooding the adjacent window well into our basement. Not a good scenario during wet seasons.

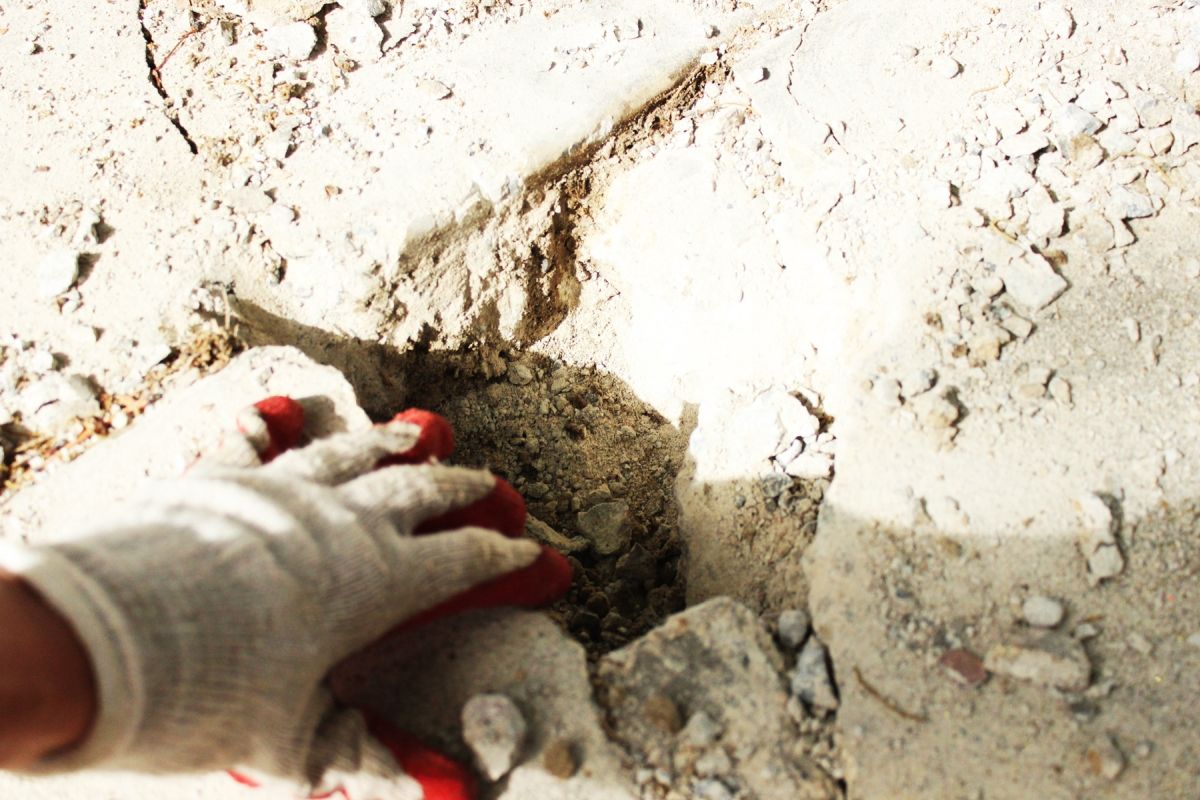
Step 2: Find Intersection in the Concrete Slab
If your concrete slabs are already cracked, your starting position is made a little easier. Find an intersection where slab edges and/or cracks come together.

Step 3: Begin Prying the Concrete Slab
Place the pointed tip of your pry bar at the intersection, then start spearing the tip into that spot. Use some muscle to make headway down into the concrete.

You’ll start to notice a little hole in the concrete intersection, as though you’ve taken a drill to it.

Continue spearing the pry bar into your spot. When you remove it, use the pry bar’s leverage to remove a little of the concrete slab. Push down on the bar with the tip in place as though you’re trying to lift the slab.

Step 4: Start Removing Bits of the Concrete
When the hole gets large enough for the pry bar tip to fit in and work its way under (even if slightly), have someone hold the pry bar in place with the concrete slab lifted. Use the sledgehammer near the pry bar tip to break off more of the concrete.
Remove rubble, and continue these steps with the pry bar tip moving with the removable concrete slab edge.

Progress at this point will feel slow but stick with it. Keep removing the rubble and using the pry bar and sledgehammer in tandem.

Tip for Using the Sledgehammer to Remove the Concrete Slab
It works best to aim your sledgehammer about 6”-10” away from the edge of your concrete slab, somewhat near the leveraged pry bar tip. Doing so creates fracture lines in the concrete, which will be your best friend in this concrete slab removal process.

Use the sledgehammer on or near these fracture lines to make them spread.

Along with the sledgehammer, use the tip of your pry bar on the fractures.

Strongly spear the tip of the pry bar into the fracture line until you can get some leverage. Then separate the smaller concrete block from the main one.

You can jab the tip into the fracture and wiggle it a bit; sometimes, that’s enough to start separating off the chunk.

Step 5: Remove Smaller Rubble
Until you start breaking off larger chunks of concrete, we recommend using buckets to haul the smaller rubble to your trailer.

Step 6: Use the Lift Jack to Remove the Concrete Slab
You’ll want to clear a spot of concrete that’s about a square foot and a half. Here is where things get fun.

This is your high lift jack. It’s going to become your new best friend. A best friend named Jack.

Step 7: Get the Lift Jack Under the Concrete Slab
Use a shovel to dig a small hole about 6” below the bottom of your concrete slab and about 4” underneath the edge of the slab itself. Place your high lift jack in this hole, with the lift ledge underneath the concrete slab.

Step 8: Start Jacking It Up
Raise and lower the jack lever, making sure it clicks before you change directions (up/down). If your soil is very soft, you’ll notice the jack foot will sink down into the dirt, so you’ll want to take it out and place a 2×4 or a piece of concrete slab underneath to keep it in place.

Raise and lower the jack lever until you notice the concrete slab lifting.

Tip #2 for Removing Concrete Slabs from Your Patio
If there is one tip you should know about removing concrete slabs, it’s this: the minute you get a little air gap under the concrete, you will be able to split it. In contrast, with the concrete resting against the ground, you could swing the sledgehammer all day and never make a dent. It’s all about getting air space underneath your concrete, which is why the high lift jack is key.

Notice this fracture that appears after sledgehammering in that spot a couple of times.

Step 9: Breaking the Concrete Slabs with the Sledgehammer
If your slab breaks a chunk off, but the jack is still holding up the rest, keep swinging the sledgehammer until more breaks off and/or more fracture lines appear. Maximize the jack’s placement every time since it takes a little effort to dig it down and get it lifted.

Sometimes the concrete slabs will be very heavy. You can use two people pumping the lifting lever to make things easier.

Tip #3 for Removing Concrete Slabs
Another tip, which is genius, is to slide your pry bar into the jack lifting lever and use the pry bar as an extended lever for the jack.

The lever-length extender makes it so that one person can lift an extraordinary amount of weight. And concrete slabs weigh an extraordinary amount.

Here’s another leverage tip: If you’re using the pry bar for your concrete lifter, you’ll need something firm to leverage it against. We used broken-off chunks of concrete behind the pry bar to keep it in place as we used the pry bar to lift another larger concrete slab. Doing this was useful in sections that were too large to carry but too small to make it worth digging in and placing the high lift jack.

Step 10: Move from Section to Section
Depending on your patio and the state of your concrete, you might find obvious “sections” in which to work. This was the case for us, with cracked concrete slabs, each about 4’x6’ being the norm. So we focused on one section at a time, removing all the concrete from that area, before moving on to the next.

Step 11: Removing the Concrete from the Property
Pile up the concrete chunks into the back of a truck, onto a trailer, or into a pile while you’re focused on removing the concrete.

Keep in mind that your truck bed will have space for more slabs than the truck can handle weight-wise. This photo shows more than three tons of concrete, and while we could have piled more into the bed, doing so would’ve damaged the truck.

With a little muscle and motivation, you can remove an entire concrete patio in less than a day. Here’s a pic of what your now-clean-slated patio space might look like.

And here is the exposed culprit for flooding – a large hole in the soil under the previous concrete that funneled water down and into our window well, flooding the basement. Very satisfying to be able to see these issues outright so we can address them in our next design plans.

You’ve moved tons of concrete, and you’ve done it in the best way we’ve found. At this point, the exposed soil will not be completely flat or smooth. Depending on what your plans are for the ground, you may want to rake the dirt flat and remove most/all of the concrete slab rubble. Since we’ll be building a low deck and pergola over this space, we aren’t going to worry too much about how the exposed ground looks.