How to Build a Pergola

You can build a freestanding pergola or a modern version wall-mounted to your home’s exterior. Here’s how to build a pergola – step by step.
Pergolas provide the perfect amount of shade on hot summer days. They also create a focal point that can add value to your home. And best of all, they are customizable.

Choose Your Design and Location
Before you build a pergola, choose the location and the look you’re after. Since we’re working in a small backyard, we opted for a wall-mounted pergola to save space. For the design, we built a modern two-tone version with floating rafters and placed the pergola over our deck.
You can adapt the steps we took based on the design you want.
How to Install Pergola Post Brackets
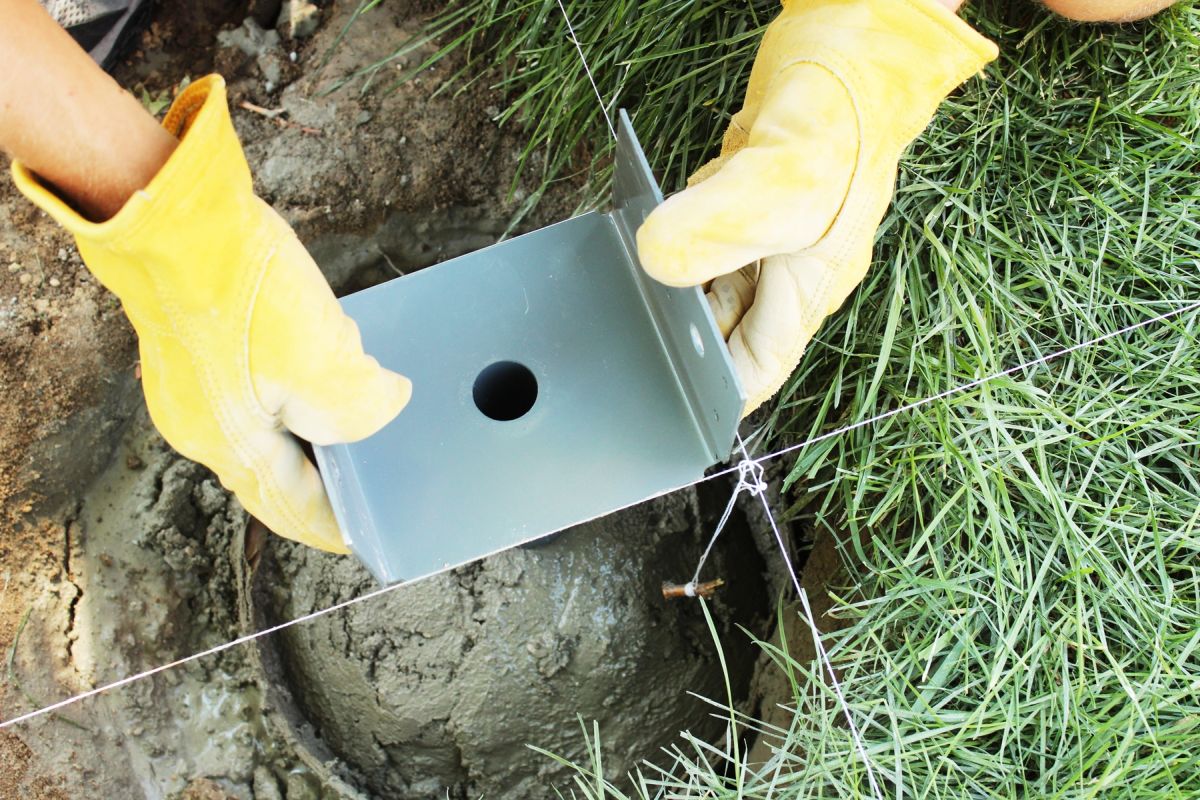
For many people, installing a wood post into a hole with post-formulated quick-set concrete is the way to go. However, we recommend installing steel brackets for pergola posts.
When you install steel brackets, you aren’t “wasting” multiple feet of expensive lumber by shoving it 4’-6’ into the ground. You also get better height options. Second, installing steel brackets makes the installation of the pergola posts easier and more accurate.
To install Pergola post brackets, you’ll need the following materials:
- Concrete forms (12″ for a 6×6 pergola post)
- Pry bar and shovel
- Pergola post brackets
- Fast-setting concrete and water
- Strings to use as a guide
To install the pergola post brackets, first, determine the freeze depth for your area, so you know how far down to dig. Then run strings to get a bird’s eye alignment of your posts.
After digging your holes, insert the concrete forms and check for post-alignment. When everything is aligned, fill the concrete form with quick-set concrete made for posts, add water and mix until you arrive at the correct consistency.
Place your bracket in it its intended spot. You’ll need to work quickly, so the concrete mixture doesn’t set. Follow this full tutorial on how to install pergola post brackets for step-by-step guidance.
We highly recommend this method, although if you’re bent on putting your posts in concrete, you can check that out here, where we talk about installing deck footings.
How to Stain and Seal a Pergola

While this step might seem out of order, placed before the actual installation of your pergola posts, it’s not. And here’s why: Staining a pergola you’ve already built is difficult. You’re suspended on a ladder, trying to reach all four sides of each board. It’s possible, but it’s a pain.
Much easier is this method: stain (and, if you’ve chosen the correct stain, you’ll be sealing in this step as well) all lumber prior to building the pergola. You’ll need to do small touch-ups at the very end.
Materials needed to stain and seal your pergola:
- Stain + sealer in one
- Medium-grit sandpaper (we used 180-grit)
- Natural bristle brush (we used a 4″ brush)
Start by giving all boards a light sanding with medium grit sandpaper. Wipe off the boards and place them on an elevated surface.
Stain one side of the board using light, even strokes. Allow the stain to dry for at least 24 hours, or as recommended, before flipping the board over and doing another side. Repeat on all four sides. Allow the stain to fully dry before moving on to the next step.
As long as you use a high-quality stain and sealer, you only need to give each board one coat. Follow full directions for staining a pergola here.
How to Install Pergola Posts

Most pergola posts are 4×4 beams, but in this article, we show you how to install 6×6 pergola posts. Depending on the size and height of your pergola, the proportions of 6×6 posts will look more substantial and pleasing than the smaller 4x4s.
To install your pergola posts, you’ll need to take the following steps:
- If the posts are rough or don’t fit in your brackets, plane them until smooth and the correct size. You can then stain them if you’d like.
- Mount the posts to their bracket, checking for levelness.
- Attach the posts on the bracket edges with 2 1/2 inch exterior grade screws
- Predrill for lag bolts and then install the lag bolts.
Repeat these steps for each post.
How to Wall-Mount a Pergola Frame

In some backyards (often smaller ones), it makes the most sense to place the pergola adjacent to the house. In this instance, we recommend mounting one side of your pergola frame to the exterior house wall.
Wall mounting allows you to use your home’s exterior for framing, so you don’t have to dig post holes next to the house and cut in on the footprint of your pergola.
There are several steps in wall-mounting your pergola frame, which include removing a small portion of your siding. Here’s a basic rundown of what to do:
- Determine the size of your frame and its placement. Use chalk lines to mark the placement and width of your lumber on the siding, and then check for levelness.
- Use a circular saw to remove the siding where the upper frame goes.
- Prepare the surface by ensuring it’s clean and flat.
- Find and mark the studs on your cutout.
- Mark, measure, and cut your frame wood to size. We doubled up two 2×6 pieces of redwood.
- Attach the upper frame to the house with lag bolts.
Because this step is very important, we recommend checking out our tutorial here, which will walk you through every step, showing specific measurements and tools to complete the job.
How to Build a Pergola Frame

Once your pergola posts are installed (and/or your wall-mounted pergola frame is in place), it’s time to build your elevated pergola frame.
Materials needed for framing a pergola:
- Lumber (we use 2×6 redwood)
- Miter saw
- Lag bolts with washers
- Wood screws
- Drill
- Ratchet bit
- Tape measure
- Ladder
Building a frame includes a solid perimeter of doubled-up 2x6s, although each 2×6 board is placed individually, so the support is multi-directional.
The outer frame boards are attached to the wall-mounted frame and/or the pergola posts (with mitered corners where possible), while the inner frame boards are attached to the outer frame as well as the inside corners of everything (90-degree angles only).
How to Install Pergola Rafters

While the posts and frame are vital to the pergola’s existence, it is the rafters (slats) that make the pergola what it is.
There are two basic ways to install the pergola rafters: with brackets and without. Since we aimed for a modern, floating look, our pergola build uses pocket holes instead of brackets.
Here’s how to install rafters without brackets:
- Use a ratchet strap to straighten your center beam (if you have one and if it’s not straight.)
- Mark the center on the inside edge of your frame and your center board.
- Measure your center marks to get your rafter length, and then cut your rafter board to size with a miter saw.
- Drill pocket holes at the end of each rafter.
- Attach your rafter to the frame with wood screws.
- Release the ratchet strap after you install both center rafters.
- Attach all rafters until complete.
For more precise measurements and tips on keeping your boards straight, follow this tutorial on installing pergola rafters.
How to Install Pergola Post Caps

With your pergola complete, it’s easy to move on without putting this finishing touch on the posts. But if you don’t, weather and harsh sunlight will bear down on the post tops causing damage.
Installing caps on your pergola posts is so easy you can do it in minutes. Here’s how:
- Measure your posts and purchase a cap to fit
- Cut the posts to the height you’d like (if needed)
- Place the cap on the post
As long as the cap fits snugly, you don’t need to glue or screw it on.
How to Build a Pergola: Finishing Up

With your pergola built, you can go back and touch up the stain where needed. We had to add stain where we drilled the pocket holes on the rafter. After that, you’re finished.
Learning how to build a pergola isn’t difficult but is time-consuming. For the best results, plan on spending several days on the project, so you aren’t rushing through it.