Hide Unsightly Toilet Items with this DIY Side Vanity Storage Unit

This is a tutorial for building your own custom storage shelving to attach to the side of your bathroom vanity. The idea is to contain toilet paper and other items people like to have near the toilet (e.g., plunger, additional t.p. rolls, books, ets.) in an orderly and thoughtful way. The size and configuration of your shelving unit will likely change based upon your space, needs, and preferences, but this will give you a general guideline of how to go about putting one together. It’s highly satisfying and, at the end, quite an attractive feature.


DIY Level: Intermediate

Materials Needed:
- 1×8 common (or pine) boards cut to size and sanded; example includes 2×17” (width), 3×25” (height), and 1×7.5” (single shelf) boards
- 120-grit sandpaper
- Kreg jig + screws
- Stain or paint of your choice
- Furniture legs (optional but recommended for vanities with thin, weaker walls)

Begin by setting up your Kreg jig. Set the drill guide to the thickness of the piece of wood you’ll be working with, and lock it into place. (Pieces of wood marked as 1” thick, such as a 1×8 board, are actually 3/4″ thick.)

Position the stop block on the jig base, then slide the step (drill) bit into the hole that corresponds with the length of screw you’ll be using. (Your jig guide has screw length recommendations; 1-1/4” screws are recommended for attaching 1×8 boards to 1×8 boards.)

Slide the stop collar onto the top end of the bit until it touches the drill guide.

Use the hex wrench to tighten the stop collar to the step (drill) bit. This is what will keep your bit from going too far when you’re drilling your holes into the wood.

Determine which board you want to screw to what holes. In this case, I chose the insides of the side boards for my screw hole placements.

Remove the step (drill) bit and the stop block from your jig so you can position your board.

Press down on the black button (ratchet release) on top of the black clamp assembly, and pull the clamp back away from the drill holes (toward the left). Position the board to be drilled so the inside (hole side) is facing the step (drill) bit holes on the jig, in this case toward the right. Keep in mind that you’ll likely want at least two screw holes on each end of your boards, so position the board so the drill holes will be evenly spaced from the sides.

Push the handle down until it is fully clamped; you’ll hear some clicking. Slide the clamp toward your board until it touches the wood.

Hold the clamp against your board, then lift the handle until you hear two distinct clicks. These clicks mean the clamp has tightened perfectly against your wood piece. Then push the handle all the way back down into the locked position. Your board should be locked in place; if it’s not, try lifting the handle again, listening for a click, then lowering it again to secure the board.

Attach the step (drill) bit to your drill. Without turning the drill on yet, slide the bit into your drill hole until it just touches the wood, then withdraw it about 1/4″ to 1/2″.

Holding your bit out that 1/4″ to 1/2”, turn your drill on to full speed and drill into the wood piece. If you’re not using the vacuum port, you might need to pull your bit in and out a bit to remove the drilled-out wood bits. I didn’t find this necessary with a 1” board.

Turn off and set down your drill. Unclamp your board and check out the newly created screw hole. It’s beautiful! This will enable you to create a professional-looking storage unit for your bathroom vanity by allowing “invisible” seamless joints.

Repeat all the steps for as many holes in your board(s) as necessary. I drilled four holes at the ends (two per end) of my three side/vertical boards.

I also drilled four holes into my smaller shelf board. The two top boards remained undrilled, as they will be attached to the top ends of the side/vertical boards.

With your holes all drilled from your kreg jig, it’s now time to assemble your storage unit. Grab a screw of the pre-determined length (in this case, 1-1/4”), place the screw head’s corresponding drill bit into your drill, and attach the boards together. Begin with a side (25”) board attached to a top or bottom (17”) board. You may need an extra hand for this step, to ensure flush alignment and perfect 90-degree angles.

Check out your work to make sure the screws aren’t seen and edges align. If it looks good, let’s continue.

If you’re including a shelf, measure on another vertical board how far down you want the shelf to rest. Mark this spot on both sides of your vertical board so the shelf will sit level. Attach the shelf to the vertical board through two of your screw holes. Then measure, mark, and attach the top of this vertical board to the underside of your top board at the same distance away as your shelf length (in this case, 7-1/2”).

Measure and mark the same distance on the vertical board you’ve already attached to the top board. However, depending on the size of your shelf, your drill may not fit in between the vertical boards to attach the shelf here. Holding the shelf in place, use a short screwdriver to do this by hand instead.

Continue screwing your storage unit together.

I recommend this order of attaching the pieces for maximum accuracy and drill accommodation, moving from number 1 in the photo through number 8.

With your storage unit entirely assembled, it’s time to work on the finish. Use a fine-to-medium grit sandpaper, such as 120.

Carefully sand the boards and joints so they are seamless and smooth.

At this point, with your unit sanded and smooth, choose the finish of your choice. This could include stain, paint, or any number of finishes that make your heart happy. Due to the clean-vintage style of the bathroom that this storage shelving unit will go in, this example uses a bit of antiquing glaze for a subtle finish.

Brush a bit of glaze onto the wood, following the wood grain.

Quickly dip brush into water.

Pull brush out of water container and begin brushing the water over the space where the glaze is. This will dilute and mute the full-strength glaze into a softer, subtler finish.

Work in a small area at a time, adding water as needed until you reach the finish you like.

Before the glaze dries, use a clean rag to wipe off any excess. Repeat everywhere on your unit.

Take care to brush the watery glaze into your screw holes as well, but wipe wiping out any excess, as it will be dark if left unwiped.

Leave your unit out to dry completely. You can hang out and admire it for a bit if you’d like. It’s looking great.

When your side vanity shelving unit is completely dry, it’s time to attach furniture legs. This is optional, of course. I recommend it for any vanity that has sides that would not be strong or sturdy enough to attach a wooden piece to. The vanity in this example has thin, laminate sides, and I don’t want to take the chance that this wooden piece would rip out the sides. Legs don’t have to be fancy – the short capita legs from IKEA will work great.

Line up the leg bases to the corners of your storage unit’s bottom wood piece. Screw into place.

Slide black rings onto the threads.

Screw on the legs. Viola! Done.
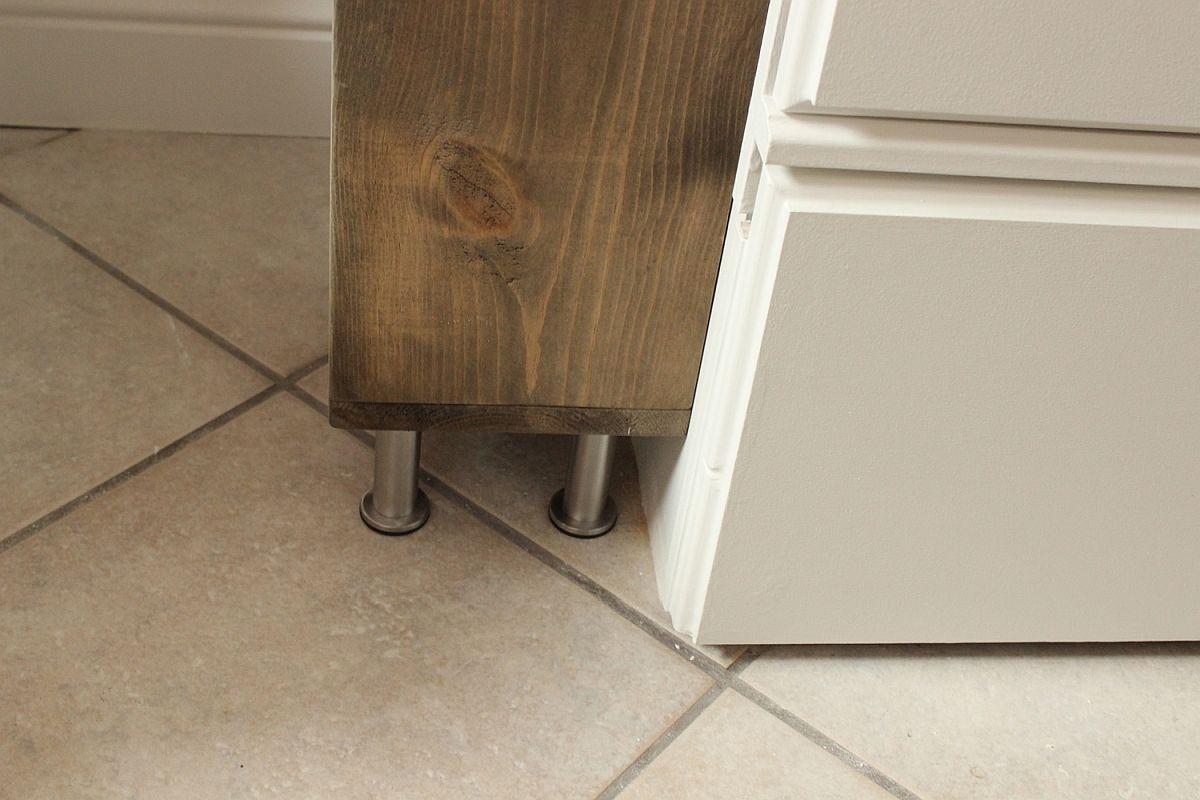
While the storage unit will still be attached to the side of the vanity, all the weight will be on these legs. The attachment will simply be to keep the unit from moving away from the vanity, appearing built-in.
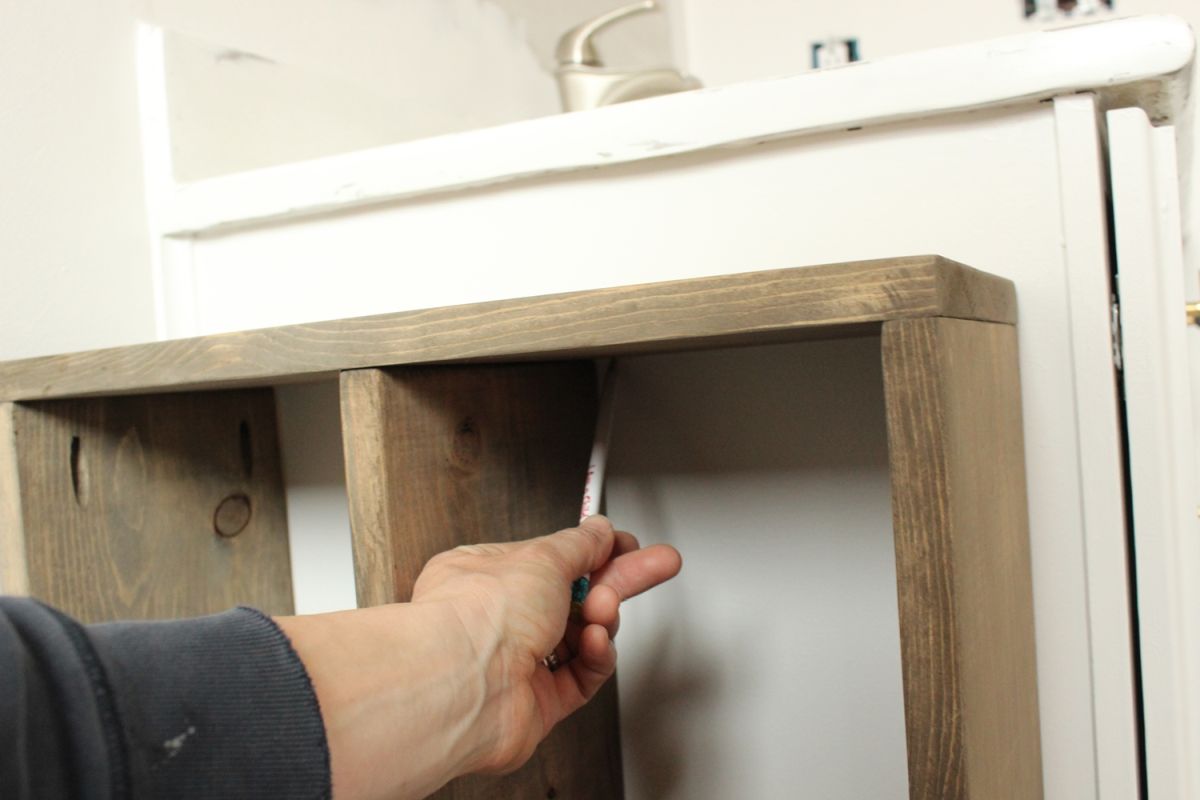
Place your storage unit next to the vanity where you want it to go. Inside and underneath the appropriate boards, mark with a pencil the areas you will want to attach it to the vanity. I marked four spots under the top board (two per vertical space) and two spots under the shelf board.

Set the storage unit aside and, using a drill bit appropriately sized for the attachment screws you’ll use, drill holes about 1/2″ above each of your markings. Drill all the way through the side of the vanity.

This is what the outside of my vanity looked like after drilling all six holes.

Carefully replace your storage unit against the side of the vanity, ensuring that all drill holes are covered up by its positioning. Holding the storage unit in place, move your drill to the inside of the vanity and begin screwing attachment screws through your drill holes.

Here, you can see the six screw heads that align with the drilled holes.

The six screws are now holding the storage unit securely against the side of the vanity, and the unit’s legs are holding the weight of the unit itself.

Step back.

Congratulations! You’ve done it.

Now fill in the blank spaces with functional items, such as a chic DIY toilet paper dispenser in the top shelf, additional toilet paper rolls on the bottom shelf, and a plunger on the side shelf.

Those items are now perfectly accessible, but their unsightliness is hidden by a beautiful, simple, and completely functional side vanity storage unit.
Note: The author is an experienced, although not professional, DIYer. Neither the author nor Homedit is responsible for any injury or damage that may be a result of following this tutorial.