She painted the lower cherry cabinets Hunter Green, and the ’80s kitchen now feels brand-new


The kitchen had everything going for it on paper. A 1912 house, a layout that worked, a stained glass window above the sink, several windows and overhead lights. And still, every time Morgan Pinch walked in, the room felt dim. Beige tile, granite and a full run of cherry-stained cabinets, most of it from an ’80s-style update by previous owners, swallowed the light before it reached the counters.
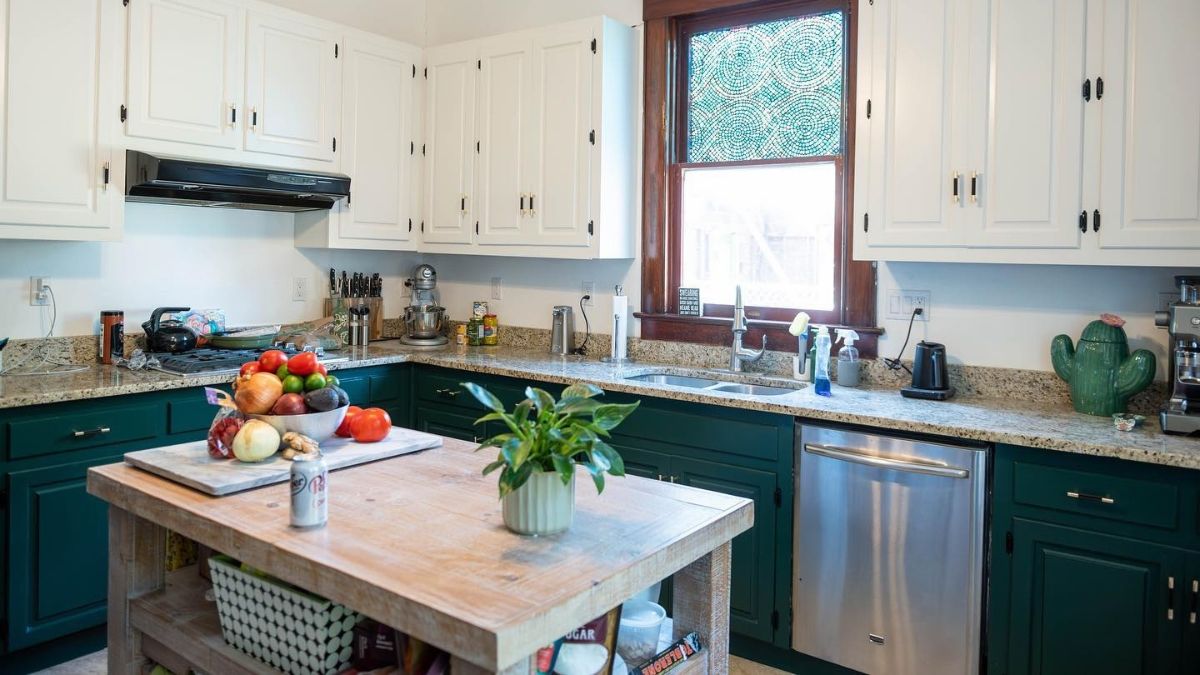
“I didn’t love how dark the kitchen felt, even with multiple windows and overhead lights,” Morgan says. The layout was never the problem, and neither were the cabinet boxes. It was the finish. When nearly every vertical surface in a room is reddish-brown wood, the light that comes in has very little to bounce off, so the kitchen reads darker than its windows suggest.
Why she split the kitchen into two colors
Voir cette publication sur Instagram
Morgan didn’t want to tear anything out. She wanted brighter colors on the same cabinets, in the same layout. So she divided the job by height: Benjamin Moore Swiss Coffee, a soft white, on the upper cabinets, and Benjamin
Moore Hunter Green on the lowers. The green was partly inspired by the stained glass windows she loved.
Before committing, she used peel-and-stick paint samples to see each color against the actual profile of her cabinet doors. She calls the service a “game-changer” and recommends it “so you don’t have to go through a re-sanding and priming process if you don’t like the color you chose.”
The split does two jobs at once. The pale uppers sit at eye level, where they bounce the most light around the room. The deep green lowers keep the kitchen from feeling washed out and give the room the color she wanted without darkening it again.
How a dark cherry kitchen became a two-tone one for $300
Her parents, Vicki and Clayton Pinch, pitched in. Here is the order she followed:
- Take off every door, drawer front and piece of hardware, and label where each one goes.
- Deep-clean all the cabinet surfaces, since kitchen cabinets collect cooking grease.
- De-gloss and prime, so the new paint has something to grip.
- Sand thoroughly. Morgan says this step took “infinitely longer” than she expected, so plan for it.
- Spray the paint. She bought a handheld paint sprayer: “There was little to no learning curve, and it was fast!” If you don’t want to buy one, a brush and a small foam roller work too, just slower.
- Install new hardware. She chose gold and black handles and pulls online for a fraction of what similar pieces cost in stores.
The total came to about $300, covering the paint, hardware and pulls. That figure is for those materials, not for any other change in the room.
Cherry is not the only dark wood that can take a bold color without losing the rest of the kitchen. In another kitchen, reddish-brown cherry cabinets that clashed with speckled granite, tan tile and dark floors were sprayed satin black with gold pulls, and every one of those brown surfaces stayed in place.
Before you spray paint inside a kitchen
A sprayer is fast, but it puts fine paint mist in the air. Mask off everything that stays, from counters to the window glass, and keep the room ventilated. Paints are a common source of indoor VOCs, and the Minnesota Department of Health recommends bringing in fresh air with open doors, windows and fans, ideally while nobody is living in the space.
Sanding is the step people rush, and it shows later as peeling at edges and corners. Give it the time Morgan wishes she had budgeted. And let the doors dry fully before you rehang them, since fresh paint marks easily against hinges and frames.
Two colors also mean twice the decisions. Test both side by side in your own light before you open a gallon.
“What was originally a functional eyesore of my home is now a stunning space that feels brand-new,” Morgan says. “It’s still functional, but it’s so much brighter.” That’s the trick.