Deck Framing – Step By Step Guide

After you install your deck posts, it’s time to build the deck frame.
Our tutorial will walk you through building the frame your deck needs – the perimeter and a few beams running through the center to support the middle deck floor.
The process is easy and straightforward.

How to Frame a Deck
After you install your frame, you can prepare your deck for joists and a deck floor. Here’s how to frame a deck.

Step 1: Measure for Your First Piece of Framing
Begin installing your deck frame at the sturdiest point on your deck. If you’re mounting to your house, that point is where the deck begins to leave the house.
Measure from one corner to the farthest corner of your outer post. (Optional: Depending on the lengths of lumber that you’re dealing with, it may make sense to add 3” to this measurement and have your outer frame extend 3” past the corner on this side. This connection will be explained later.)

Step 2: Double-Up Your Boards
Cut two pieces of 2×6 pretreated lumber to this length.

Clamp the two pieces of lumber together in two directions: (1) to keep the boards pressed together and (2) to keep the sides of the boards flush with each other.

Use 2-1/2” exterior wood screws to attach the boards. A couple of screws every 2’ or so is plenty.

Step 3: Attach Your Boards
If your outer deck frame abuts a wall-mounted deck frame, a hanging bracket won’t work because one side has nothing to attach to.

Use a heavy-duty Kreg jig to drill four pocket holes into your doubled-up 2×6, two on each side at one end.

Have your 2-1/2” heavy-duty pocket screws handy.

Prop up the doubled-up 2x6s so the tops of the lumber are flush with the connection lumber (in this case, the wall-mounted lumber). Use 2-1/2” heavy-duty pocket screws to attach the boards.

Install pocket screws into all four pocket holes, two per side. The outside edges of your corner should now be flush.

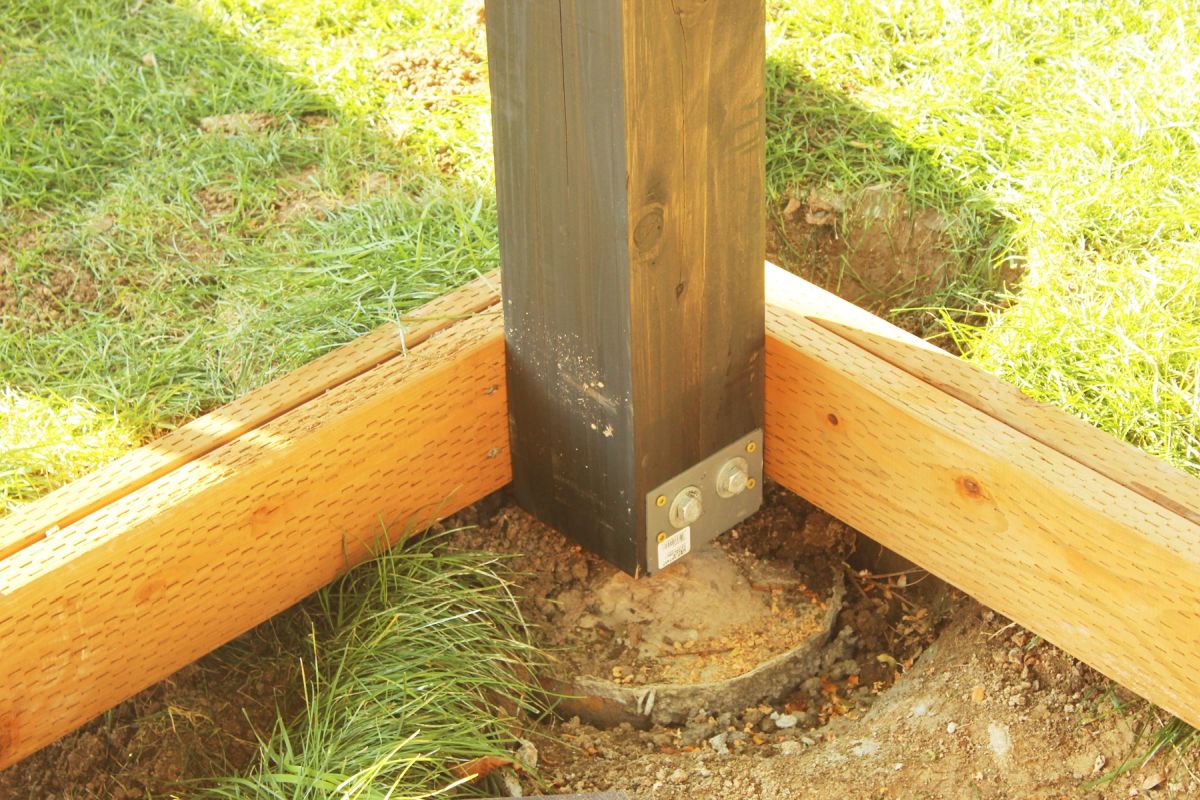
Place a level on your doubled-up deck frame boards to see where it will attach to the corner post.

If you’re attaching this doubled-up 2×6 to a bracketed 2×6 cedar pergola post, you’ll notice the heads of your lag bolts and washers extend outward. Because of this, your deck frame won’t be able to lie flush onto your posts.

Use a hammer and chisel to remove the portion of your deck frame that will go over the bolt heads.

Measure how far out the bolt heads and washers extend, and measure the size of the bracket rectangle, then chisel out that much.

Set a level on the doubled-up boards, and make sure they’re level as you align the floating end with the post.

Keeping the level and your doubled-up deck frame boards in place, predrill holes for your lag bolts (try to reach the drill bit into the corner post if you can). Drill out about 1/2” deep with a removal bit that is slightly bigger than your washers.

Doing this will allow the bolt heads to go into the lumber rather than stick out, which will help when you install your exterior deck boards.

Use a ratchet drill bit to install your lag bolts WITH WASHERS. Don’t ever forget the washers on these. (These are 3/8” diameter 4” long lag bolts, which is long enough due to the countersinking.)

As you can see, the face of your deck frame is flush, with the lag bolts countersunk into the pretreated lumber.

Install a full lag bolt and washer to hold the board in place while you do the other lag bolt. Repeat the process for a second lag bolt. You can install a third and/or fourth if you’d like, but it’s not necessary.

Now that the two corners are installed use the same lag bolt process for attaching the doubled-up deck frame to any center 4×4 posts.

Step 4: Install the Second Section of Framing
Now that the first doubled-up deck frame perimeter piece is installed, you’ll use its end to begin your second section. You’ll install the next section much like the first, with a few things to keep in mind.

When you measure this second stretch of outer deck framing, measure to a mountable point. In this case, it was halfway through our second pergola post. You may find yours to hit a 4×4 post; measure to the halfway point so both ends can attach.

Important note: you’ll need to measure from the OUTER corner of your frame. In this case, now that we’ve added a doubled-up lumber frame, you’ll measure to the outside corner of these boards instead of the corner of the post. The corner of the post means nothing to you anymore in relation to frame board length.
(However, if you chose at the beginning to add 3” to your original board length and now have a 3” overhang of the doubled-up deck framing, you’ll measure to the inside of these boards.)
You only have to deal with the pergola post bracket on one side, so at least one of your deck frame installations won’t require chiseling.

Begin the next section of the deck frame install at the end point of the last section, which should be at the center of a deck frame post. Two lag bolts will provide plenty of support if you’ve spaced the boards according to recommended spatial-weight ratios.

Troubleshooting Tips
When you come to a point on your deck that doesn’t allow you to mount a bracket or install pocket screws onto both sides of your doubled-up framing boards, you have to get creative.

In this instance, we drilled pocket holes on one side of the doubled-up boards as well as on the top.

We installed a 6” corner bracket with #8 nails to add additional support.

Our setup will provide plenty of support in this corner.

Note: Consider which side of a corner can accommodate the additional 3” length of your boards. You can’t simply measure to the corner of the post on both sides because that would leave you with a 3” blank square on the very outer corner of your deck.

In some instances, you must install lag screws from the post side out to the doubled-up deck frame. That happens when there’s a permanent obstacle on the outer edge that won’t allow access to that side of the deck frame.
When this is the case, countersink about 1” into your 4×4 post so that a 4” lag screw will hit into the second (outer) 2×6 pretreated lumber of your deck frame.

Some sections of your deck frame might incorporate a variety of these deck framing methods, and that’s fine as long as each is installed with sufficient support.

Step 5: Complete the Frame Perimeter
At this point, following this routine procedure, you should have completed the outer perimeter of your deck frame.

It can’t be stressed enough to check and double-check for level and flush at every point. Being precise and accurate at this stage will not only make it easier as you begin working on the deck floor, but it will also make the end result turn out much better.

Step 5: Install Your Center Beams
Depending on the size of your deck, you may need to add more framing for support. Our deck will be 14’ by about 25’ at the longest point, so we will need two additional framing beams running across the deck.
Note: Install these support beams in the same direction you want your deck floor boards to run.

With your tape aligned on the sides of the posts you’ll be using for these support boards, measure from the inside edges of your deck frame. Mark this length on two 2×6 pretreated lumber boards, and cut them one at a time. Stack the boards and give them a two-directional clamping all the way down.

Once again, you’ll want to screw these boards together.

These beams will be in the center of your deck and carry the bulk of your deck support responsibilities. 5” lag screws will be used for these.

Holding the doubled-up boards in place, flush against the two posts they will be using for support, place a double 2×6 bracket against the wall-mounted framing board.

Mark the position of the bracket, including the inner sides and the top. Have a helper hold the other end of the beam flush and in line on the other side of your deck frame, so your markings are accurate.
The bracket won’t be flush with the top of the 2×6 frame. Instead, you will install it lower so that the beam it holds is flush.

Use #8 nails to install the bracket, using your pencil marks as guidelines.

Place the beam into the bracket.

Pound the additional nails into the beam lumber. There should be two diagonal nails in each of the 2x6s on your doubled-up beam.

Clamp the other end of your beam in place, keeping all edges flush and paying attention to the tops of your framing boards. These need to be even.

Install the other end of your post using the same steps for deck frame installation: predrill, drill countersinking hole, ratchet in lag screw, and washer. Repeat.

Next, move on to mounting your beam to the middle post.

Clamp the beam to the post while you’re predrilling and ratcheting in the lag screws. Even if it’s flush to begin with, the beam has a tendency to push away from the post as you’re screwing it in.

Repeat for the other center beams.

Deck Framing Wrap-Up
You’ve completed installing the main support beams for your deck.

Next will come joists, installed perpendicular to the beams.

But, for a minute, sit back and enjoy what you’ve created.