Stucco Repair: Instructions, Tips and Tricks For a Professional Finish

Stucco repair is a task all homeowners with a stucco house will face at one point or another. The good news is, it’s a manageable task for even a novice to the DIY world.

From simple hairline cracks to repairing full sections, you can get the job done with tools you may already have in your toolkit. If you’ve got a stucco repair to make, don’t delay.
What is stucco?
Stucco is a type of cement-based construction material used as siding on the exterior of buildings. This mixture of cement, water, sand and lime has been used for centuries due to its durability and attractive finish.
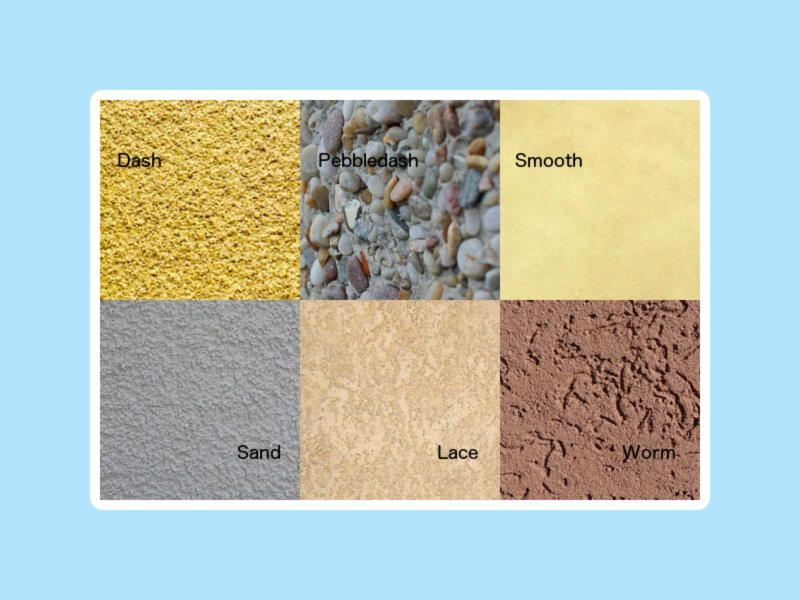
A low maintenance option, its resistance to fire and weather are an added bonus. With limitless customization both in color and design, stucco meets the needs of an array of styles.
What causes stucco damage?
While there are some obvious causes to stucco damage like severe weather events or overexposure to moisture, there’s also some lesser known causes. One major cause is rooted in its application.
Rushed jobs and improper timing between coats can create failure from the start. Likewise, stucco that’s not mixed right or that doesn’t contain the correct amounts of each ingredient will fail, ending in damage.
Though some of these repairs can be prevented, all cannot. For example, a home’s natural settling process can cause cracking that’s unavoidable over time.
Tools for the Job
Depending on the size of the job, different tools will be needed. For small repairs you’ll need:
- Eye protection
- Gloves
- Hammer
- Chisel
- Bucket
- Drill Mixer or hoe
- Caulk gun
- Float
- Wire Brush
For larger repairs, you may also need:
- Wheelbarrow
- Drywall hawk
- Trowel
- Metal snips
- Spray bottle
- Scoop
Repairs to Cracks and Holes

A small stucco repair makes for an easy DIY. While some of these repairs such as hairline cracks can be mended with caulking alone, that’s not the solution for every situation. If the crack exceeds ¼ of an inch, you’ll need to follow the steps below.
- Stucco Removal: Scrape or chisel away the old stucco, ensuring you’ve rid the area of loose pieces that aren’t secured to the lath (strips of wood that help support the stucco).
- Mix Concrete: Prepare your concrete for application by mixing according to the exact specifications of the material chosen and manufacturers directives.
- Application: Use a float to apply a thin layer of concrete to the cracks or holes. Let the first layer cure, then continue to apply coats until the new concrete is even with the surrounding, undamaged area. Continue letting each coat dry before the next.
- Finish Coat: Apply a stucco finish coat over the dried base coat, using a float, wire brush or another finishing tool that can help mimic the texture of the original stucco.
- Paint: If the stucco is painted, wait for the repaired section to dry and paint to match. If stucco isn’t painted, be sure to use a mix with the same hue for a seamless finish.
Repairs to Larger Areas or Full Walls
Repairing larger portions of stucco might seem intimidating but it’s not much different than the small repair process described above. With a few extra steps, you can repair large portions of stucco with ease.
- Follow steps 1 and 2 from above.
- Remove Support Layers: Examine the metal sheeting uncovered and determine if it’s salvageable. If it’s in good shape, it can be reused. If there’s visible damage or rusting, cut away the metal mesh. Nail down a layer of building paper and then replace the metal mesh, securing it with nails on top of the building paper.
- First Application: Using a trowel, apply the first coat (scratch coat) to the metal mesh, pressing in, covering the mesh. Now use the trowel to score this layer for best adhesion of subsequent layers.
- Second Application: Allow the first coat to cure for at least two days, misting it with water a few times a day to keep it from drying out. Now, apply the second coat (brown coat), giving it a smooth finish.
- Follow steps 4 and 5 from above.
Please note that the instructions for all types of repairs above are general guidelines of the process. Application timing and dry times vary by product and should be followed according to the directions on your specific product for best results.
Stucco Repair Tips
Keep these tips in mind for a successful stucco project:
- If it’s a larger project, mix concrete in smaller batches. It can dry out fast, so smaller batches will equal less waste in the end.
- Check the weather as it plays a huge role in the success of stucco repairs. Extreme temperatures can cause stucco to dry too fast or prevent adhesion.
- When it comes time to paint, the more detailed the finish, the thicker napped roller you’ll need. Several coats are the best bet to ensure all grooves have been filled.
Frequently Asked Questions (FAQ)FAQ
What’s the advantage of stucco patch kits?
The biggest advantage of stucco patching kits is in both convenience and size. These kits are very easy to use, containing a pre-mixed ready to use mixture. This takes away the steps of mixing your own stucco, along with the mess. It also acts as a great option for smaller projects as they’re offered in sizes as little as a quart. Less waste, money and time.
How can cracks and holes be prevented?
The best way to prevent cracks and holes comes through proper maintenance, but that starts with installation. A sealant needs to be used on new stucco to guarantee its lifespan. Afterward, be sure your stucco is cleaned each year, clearing away brush and debris from the side. Repainting every 5 to 10 years will also aid in prevention. Using a paint formulated for the exterior is a critical step here.
What type of caulk should I use to fill cracks?
There’s a few types of caulk used for stucco crack repair and which you choose hinges on the type of damage. For example, you’ll find that acrylic caulks are most common for smaller jobs like hairline cracks. Polyurethane caulking on the other hand is used for deep holes or cracks due to its sealing properties. Brands like DAP and Quikrete are common choices with reviews to back their performance.
How are stucco stains repaired?
Stains can appear on a stucco exterior for several reasons including moisture, dirt, mold, rust and the like. The good news is, most are a simple fix. For stains like dirt and rust, you’ll want to prep the surface, cleaning the stained area as much as possible. Then you’ll add a fresh coat of exterior paint to the affected spots. For more serious issues like moisture and mold, you’ll want to be sure there’s no intrusion below the surface before moving forward.
What is the cost to repair stucco?
The industry average for stucco repair is around $1,400, though the final cost will depend on the size of your project and the extent of the damage. If hiring a professional, the coast can range from $60 to $120 per square foot. Material costs will vary but applying a traditional stucco ranges from $0.05 to $0.10 per square foot.
Conclusion
Stucco repair doesn’t have to be a laborious project. With the right prep work and tools for the job, it’s far more manageable than some may think. Also, knowing what causes the damage and some steps to prevention will make these projects few and far between. Regardless, when the time comes for repairing stucco big or small, you’ve got the knowledge above to get the job done right.