How to Build a Lattice Fence: DIY Lattice Fence or Bamboo Plant Support Fence


Learn how to build a lattice fence with this informative, easy step-by-step guide.

Instead of spending hundreds of dollars on lattice fencing to support your plants, consider building your own DIY lattice fence using bamboo poles. These bamboo lattice fencing panels are as attractive as they are functional. Scroll through below for a complete guide on how to build your own lattice fence.
DIY Lattice Fence for Beginners


Materials Needed (for a three-tiered, 12.5’ long lattice fence panels):
- Thirteen (13) 6’ bamboo poles
- Waxed cord
- Chop saw (optional but recommended)
- Scissors

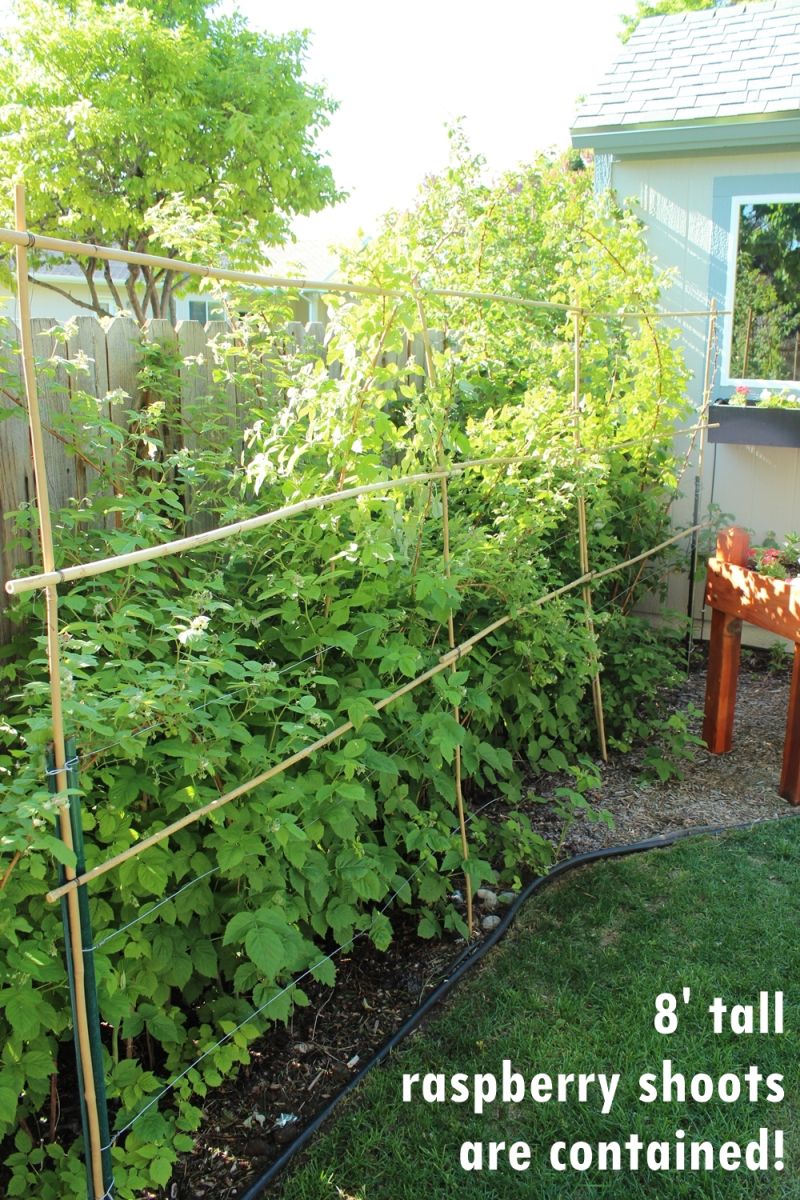
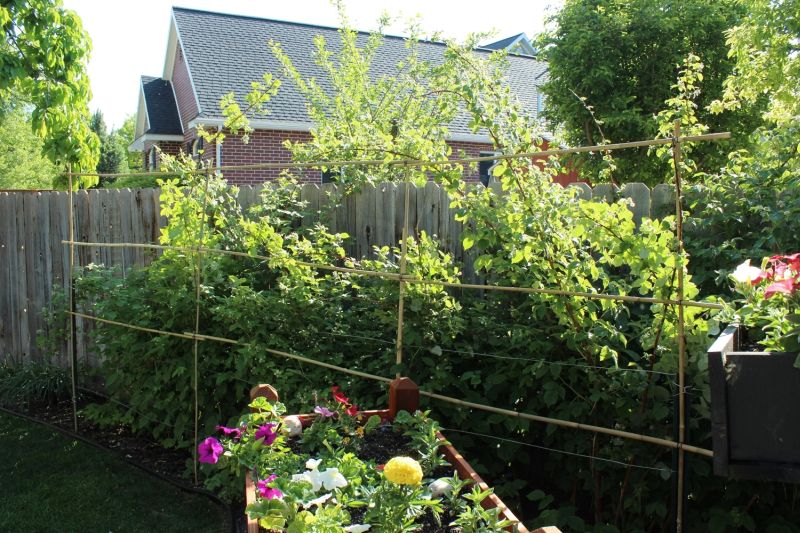
This diy lattice fence is perfect for those who have a raspberry patch that looks something like this. Wood lattice fencing works best for this type of plant as it keeps the stalks from overhanging and blocking out the sunlight for other plants or grass in the garden.


As those vines keep on growing, a taller fence, like a bamboo lattice fence, would be a much better option. Not only does it work better than the shorter metal ones, but it will look much more natural as well.

Step 1. Measure and determine bamboo lattice fence placement and spacing.

Begin by determining the size of the bamboo lattice fencing needed.
Measure with tape, and then eyeball with actual bamboo poles to get a feel of your spacing preferences.
Note: For this DIY lattice fence project, a 12-1/2’ long fence with three horizontal bamboo tiers were used.
Step 2. Plan the structure of the lattice fence.

Lay a measuring tape out on the ground, equal to your desired length of the fence lattice.
Then lay your 6’ bamboo poles perpendicular to the measuring tape; these will be the vertical posts for your lattice fence.
This example shows a fence with four evenly spaced vertical posts, creating three 4’2” lattice fence panels.

When your vertical posts are spaced and laid out, loosely lay your horizontal bamboo poles across them to determine how much of a space you want between the horizontal rows.
Note: Just eyeball it at this point; there’s no need to get precise just yet.
Step 3. Determine overlap.

Decide how much, if any, overhang you want from each horizontal pole over the vertical posts.
This example shows a 3” overhang, which means we’ll need to trim every horizontal bamboo pole to an equal length.
To determine how long each horizontal pole should be, add the spacing between vertical posts (in this case 4’2”) with twice the overhang amount (in this case 2×3”, or 6”).
4’2” + 6” = 4’8” (or 50” = 6” = 56”)
So each horizontal bamboo pole (there are nine) needs to be trimmed to be 4’8”, or 56”, long.
Step 4. Measure and cut the horizontal bamboo poles for your wood lattice fence.

Take note of the measurement obtained from the computation in the previous step. Note, for this particular project, the horizontal bamboo poles should be 4’8” long.
Using a tape measure, mark your cutting point for each of the horizontal poles.

Cut the mark with a chop saw, aka miter saw.

Set your pile of trimmed bamboo poles away from your full-length (6’) posts to keep things organized.
Step 5. Assemble your DIY lattice fence using the Japanese square lashing technique.

Now that your spacing is determined and your poles are trimmed, it’s time to lash your first joint using the Japanese square lashing technique.
To start, cut a piece of the waxed cord into about 3’ to 4’ long (longer for thicker cording, shorter for thinner cording).
In this project, a fairly thin cord was used so it was cut to about 3’ long per piece.

Fold the cord in half and pinch the halfway point.

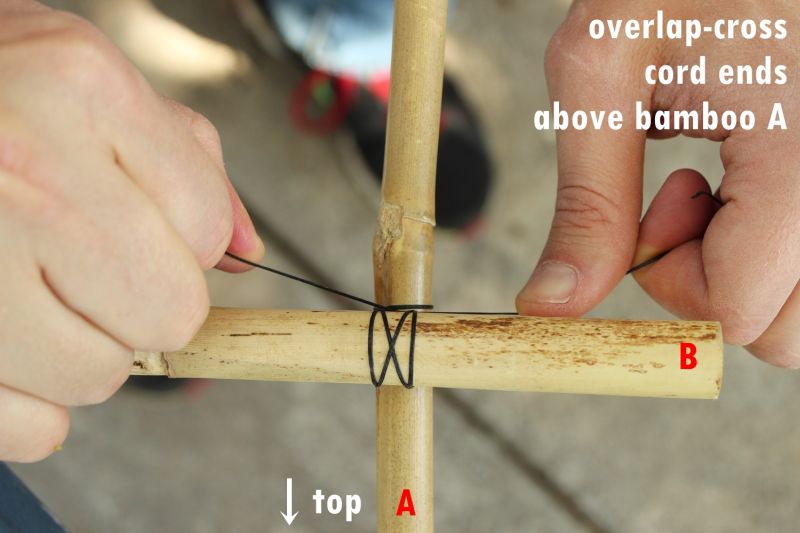
Use a table or your lap or some other support surface, and arrange your first two bamboo pieces – one vertical bamboo post (shown in photos as bamboo A), and one trimmed horizontal bamboo pole (bamboo B).
Position bamboo B with the appropriate amount of overlap/overhang, in this case 3”.
Drape the center of your cord over bamboo A directly above the joint site, and pull the cord ends downward toward the ground.

Overlap-cross the cord ends behind bamboo A, pull taut.

Bring both cord ends straight up, just above bamboo A and directly next to the top edge of bamboo B.

Loop the cord ends backward over bamboo B and downward past bamboo A’s sides then pull the cords downward.

Overlap-cross the cord ends on the underside of bamboo A, pull taut.
Bring the cord ends upward next to bamboo A’s sides.

Overlap-cross the cord ends above bamboo A, pull taut. Bring the cord ends downward (toward the ground) along the sides of bamboo A.

Cross the cords to form an X shape below bamboo A. (The X will appear between the two parallel lashings if viewed from below.) Bring the cord ends upward.

Pull the cord ends taut.

Cross the cords to form an X shape above bamboo B. (The X will appear between the lashed “square.”) Pull the cord ends downward.

Instead of bringing the cord ends all the way below bamboo A, you will instead pull them toward (what will be) the top of your bamboo post (it will feel like you’re wrapping the cord ends all the way around bamboo B, in a way).
The cord will lie in the space where A and B touch. Cross the cord ends on the top side of the joint.

Pull the cord ends backward directly on top of themselves, in that same space where A and B touch.
Note: In other words, the cord ends will hinge backward below B but will stay above A. Pull taut.
Overlap-cross the ends of the cord above bamboo A but still below bamboo B. Pull cord ends downward along the sides of bamboo A.

Overlap-cross the cord ends below bamboo A, pull taut.

Tie a square knot.
Congrats! Your first Japanese square lash is complete.

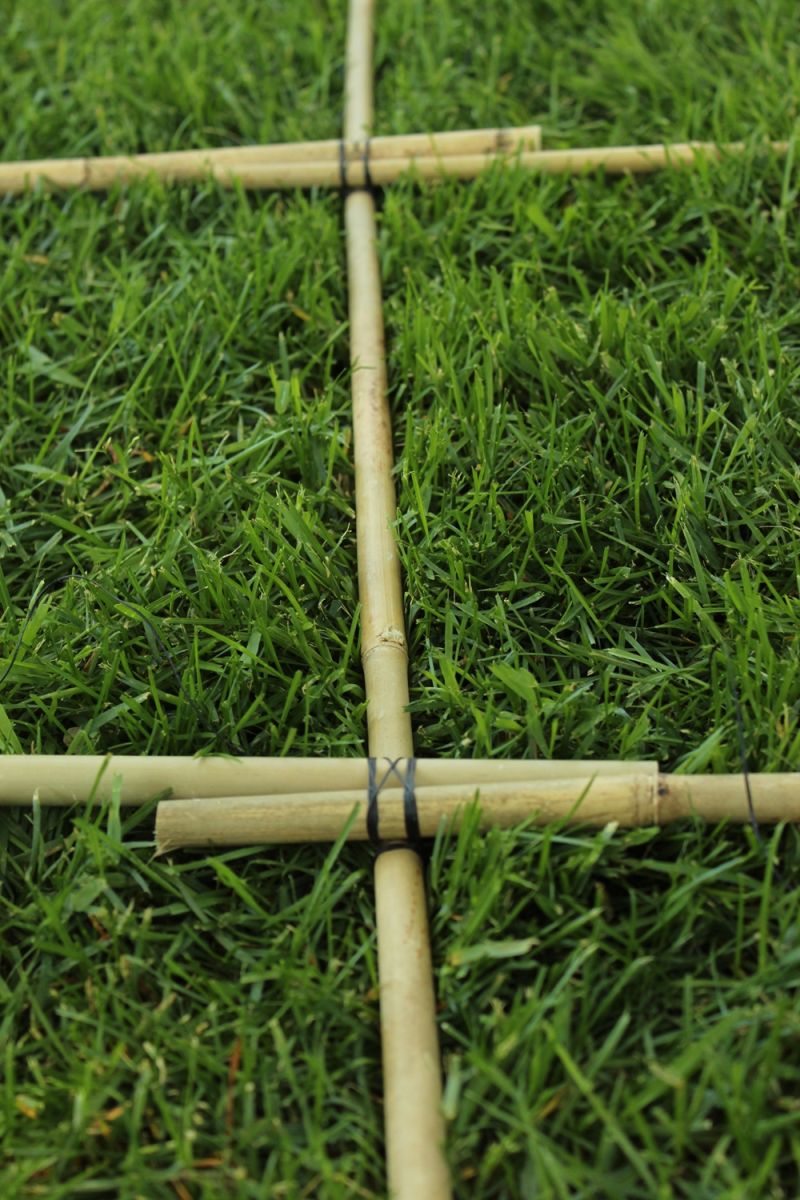
Repeat this process for every joint along this horizontal row. Make sure that the overhang distances are accurate and consistent all-throughout the process.
When you have two horizontal bamboo poles meeting up with the bamboo post (which is probably every joint that’s not directly on the fence ends), you’ll want to join both bamboo poles at the same time.
Pro Tip: We recommend doubling up the wrapping steps (right before the Xs are lashed) in this case, to add extra holding power for an extra bamboo pole.
Step 6. Measure and mark the vertical spacing of your lattice fencing.

With your first horizontal row completed, you’ll want to be a little more precise with the vertical spacing between horizontal rows.
Measure and mark the spacing on each vertical post.
This example uses an 18” gap between horizontal rows, which means the lower half of the fence will have no horizontal rows.
Adjust this measurement, or the total number of rows, to suit your needs and preferences.

Here’s the fence, all lashed and ready to be installed vertically.

Step 7. Install your garden lattice fence.
Depending on your current setup, installation could require a few more steps, or it could be easy.
If you have existing support posts, simply wire your bamboo posts to those.
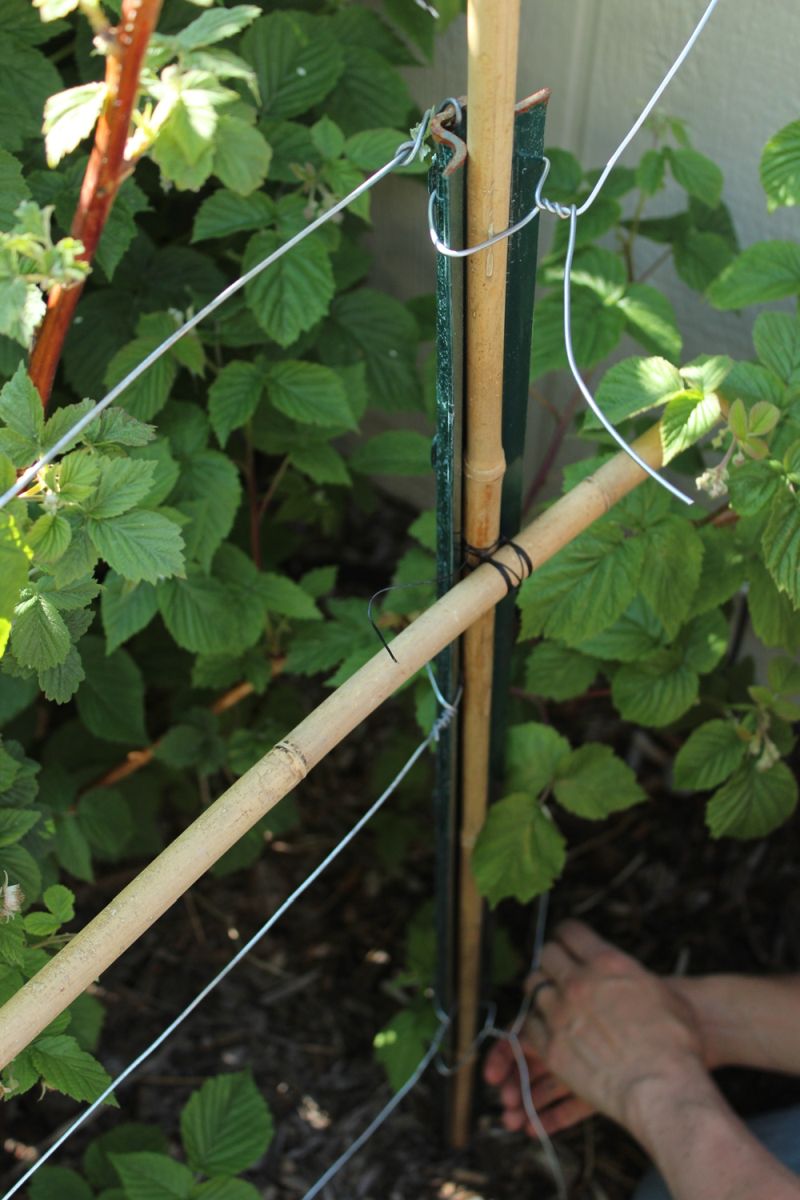
If you don’t already have metal stakes in place, you could pound some in for support at the distance/length of your bamboo fence.

Alternatively, you could use rebar to hold the lower portion of your bamboo fence in place.

This example uses rebar for the internal vertical posts’ support.


Frequently Asked Questions (FAQ)FAQ
How to add lattice to top of existing fence?
Lattice top privacy fence is often added on top of existing fence for additional privacy from the outside. Privacy lattice fence topper often comes in different variations- there are plastic or vinyl ones and also the wood type lattice fence.
The following are the steps in adding lattice to top of existing fence:
1. Before buying your privacy fence lattice top, you need to measure the space you intend to attach it to.
2. Decide on how high you want your privacy lattice fence to be.
3. Screw in and secure extension posts to your existing fence.
4. Securely attach your privacy lattice fence topper to the extension posts.
How to build a vinyl lattice fence?
Unlike the DIY lattice fence we built in this step-by-step guide on how to build a lattice fence, you can readily purchase vinyl lattice fencing from any home improvement store. Installing it is pretty much the same as how any other lattice fence is installed.
First thing you need to do is to set and install the posts for your vinyl lattice fence. Position and install the fence rail brackets after you’re done installing the posts. And for the final step, you just need to screw the vinyl lattice fence panels onto the rails.
How to replace lattice on fence?
Just like any other replacement projects, the first thing you need to do if you’re planning to replace the lattice on a fence is to measure the space you need to attach the lattice fence onto.
Doing so will give you an idea on the exact measurement of the replacement lattice fence tops you need to purchase.
Remove the existing lattice depending on how the old fence lattice topper was installed. Use a pry bar to remove the existing lattice fence toppers if they were nailed onto the fence. If screwed together, all you need to do is to unscrew the lattice on top of existing fence.
The steps in installing the replacement lattice top fence is just the same as the steps outlined under ‘How to add lattice to top of existing fence?’.
Does lattice count as fence height?
Yes. Anything added on top of a fence, whether a lattice fence topper or a mesh, is counted towards the final fence height.
How to install lattice fence under deck?
The following are the basic steps on how to install lattice fence under deck:
1. Build the frame for the enclosure under the deck.
2. Make sure to leave a space for the frame of the access door.
3. Install the cedar lattice fence panels onto the enclosure frame.
Can you use lattice as a fence?
Yes, of course. Lattice is a great decorative fence to amp up your front and backyard. Lattice fence is also functional so you can definitely use it as a fence. Some of the type of lattice fencing you can choose from include:
– Lattice wooden fence
– Lattice garden fence
– Lattice weave fence
– Plastic lattice fence
– Metal lattice fence
– Square lattice fence
How to paint a lattice fence?
The best way to paint a lattice fence is through spray painting. Just like any other painting jobs, you need to sand the lattice fence and prime it before painting. Make sure that the paint you’re using is an exterior latex paint.
Can I put lattice on my fence?
Definitely yes! Adding a lattice on top of your existing fence can make it more appealing and also gives you an added sense of privacy. Lattice fence extensions like lattice fence tops are also a great addition on top of any existing fence if you’re aiming for a higher fence.
Lattice Fence: Conclusion
Building a lattice fence doesn’t have to be difficult or flashy. You can use the directions that we outlined here to create your next DIY lattice fence in no time.
Just make sure that you plan ahead and make any necessary adjustments before you begin construction. (Also shown in photo: DIY raised flower box and DIY window box.)