How To Create Your Own Instagallery Full Of Memories

If you’re the type of person that enjoys taking photos and immortalizing every significant moment they come across, then you’d probably enjoy displaying all those memories on the walls of your home. The idea we suggest is creating an instagallery which is basically a collection of small square photos (Instagram-style) arranged in a grid. There are many ways in which you can achieve that look.


For example, you could use a magnet board and a bunch of small magnets. It’s pretty simple actually. Take the magnetic board and mount it on one of your walls and any other surface you want to decorate. Then take a bunch of photos and attach them to the board with magnets. These should be small but strong enough to hold the photos. To make things even better, you could frame the board. {found on myhomesweethomeonline}.

If you want to give your instagallery a cool effect, check out the idea offered on poppytalk. There are eight rows of Polaroid photos here and they’re color-themed. Blue, green, yellow and red were the colors used here but you can choose others if you want. You can edit the pictures to give them the desired color effects or you can actually pick images that have the colors you want. Once you’ve decided which ones you want to use, cut them to size and tape them to the wall.

And if you’re looking for a cute and fun way to display your selected photos on the wall, consider washi tape. The idea comes from sandyalamode. Basically you can just go through your collection of photos and select the ones you want to use. If they’re already printed out you can just cut them to make them square. Then frame them with washi tape and have fun creating your gallery.

A really interesting and chic idea is to glue photos to wood blocks. Check out thecraftedlife for some inspiration with such a project. You’ll need square (4×4) photo prints, wood blocks, some paint, glue and brushes. Paint the edges of the wooden blocks and then apply glue to one of the flat sides. Attach a photo and smooth it out. You can then display all your photos in a grid using velcro hangers or nails.

Another possibility is to make a hanger for your Instagram photos. You’ll need a wood dowel, some acrylic paint, a foam brush, yarn, glue, cardstock, clay, a paint pen, parchment paper and washi tape. The project is described on homeyohmy. First you need to paint the dowel and then tie yarn to the ends so you can hang it. Tie three more pieces of yarn to the dowel, evenly spaced. You’ll be taping photos to them. At the ends, hand medallions made of clay.

A very simple alternative is to have a bunch of photos organized in a collage and displayed inside a frame with chicken wire backing. You can build the frame from scratch or use an existing one. Secure the wire with a staple gun or with small nails. You can then make a collage and display your pictures using regular paper clips. Check out modishhandmain for more details on this project.
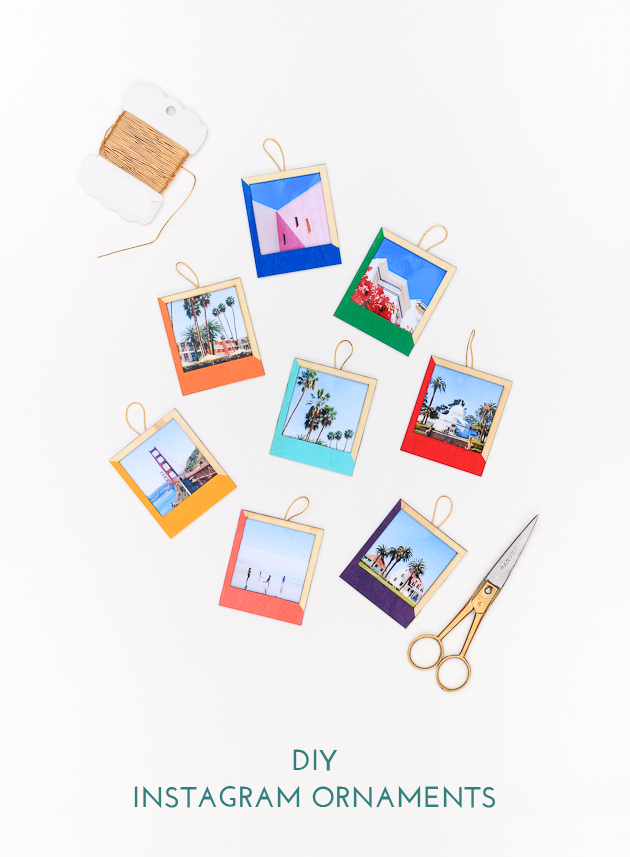
To make a gallery with framed photos similar to the ones featured on thecraftedlife you’re going to need a few things. This includes wood Polaroid frames, photos, gloss paint in different colors, sealer, tape, glue, hot glue, gold cord and a brush. Paint hald of each frame using the colors you’ve selected. Then hot glue a piece of cord to each one, making a loop. Apply sealer. You can then display all these images on the wall.

Not a fan of having photos displayed on the walls of your home? Perhaps something more casual would interest you. For example, you could have the images displayed on your fridge. For that you’d first need to make some magnetic frames. You’ll need wood Polaroid frames, glue, white cardstock, magnets, printed Instagram pictures and scissors. You can see the final result on happinessiscreating.

If you don’t want to frame your Instagram photos you can choose to glue them to wood blocks or canvas panels. You can find out all about it on hellolittlehome. The supplies needed for the project include a color printer, paper, scissors, mini canvas panels, mod podge, a foam paint brush, mounting squares, magnets and, of course, your favorite Instagram photos. It should all be over in around 30 minutes.

A large photo frame could be used for either a large photo or a bunch of small ones. If you choose the second option, you can have a lot of fun displaying Polaroid images. You can use some twine, tape, a staple gun and mini clothes pegs for this. Tape twine rows to the back of the frame. Then secure the twine to staples just to be sure. The final step is to clip the photos onto the twine. You can then display the frame anywhere you want. {found on lingyeungb}.

Another fun thing you can do with Polaroid or Instagram photos is a banner. It could be a letter photo print banner like the one featured on postalpix. You can use an app to make the letters or you can just cut them out using handmade stencils and then glue them onto square pieces of cardboard. Either way, you’ll also need some twine and tiny clothes pins.

Obviously, displaying a bunch of photos in a grid to make a wall gallery is not your only option. You could also choose a more compact option, such as the one suggested on themerrythrought. You’re going to require air dry clay, a knife, some 4”x4” prints, a piece of plywood (5” x 9”), a drill, a hole punch, book rings and glue. Cut out a 3” wide circle from air dry clay and then cut out a slot in it big enough for the plywood piece to fit in. let it dry and in the meantime drill two holes in the plywood and attach the photos with book rings. Glue the plywood piece to the clay base.

Individual Instagram photo holders are also a cute option. You can make these out of some wooden blocks and using gold spray paint, wire cutters, a drill, a glue gun, some wire, white acrylic paint and a sponge brush. The project is described on theblondielocks. First you need to paint the wood blocks. Then drill holes in them making sure not to pierce through. Spray paint the wire gold. Wrap wire around something cylindrical and then trim it to the desired length. Glue it into the drilled hole. Then display your photo.