How To Build A Grape Arbor Step by Step

If you love the taste of grapes and the look of a well-built grape arbor/trellis, this DIY instructional plan guide is for you. Read on to learn how to build your own beautiful arbor structure to enhance your home’s exterior aesthetic.
*Note: The author is an experienced but not professional builder. The following article offers insight and instruction on merely one way to build a grape arbor; glean from this article what you will.
Materials to build a Grape Arbor:
- 8 60# bags quick-set concrete
- 8 4×4 treated 10’ posts
- 4 10’ redwood 2×6
- 2 8’ redwood 2×6
- 12 10’ redwood 2×4
- 14 8’ redwood 2×2 (optional)
- 3” exterior decking screws
Basic Information about Grape Arbor project:
These are instructions on building a grape arbor that measures 28’ long from trellis end to end (24’ long from end post to end post, with 8’ spacing between posts) and 5’ deep on the trellis (3’ deep at posts). Modify measurements as appropriate for your space and needs. Recommend using redwood due to its fantastic outdoor durability and longevity. (Cedar is also a good option for outdoors.)

Measure and mark the eight dig spots 8’ apart length and 3’ apart width. Then dig eight holes 2’ deep, to install eight 4×4 treated posts.

Install each 4×4 post by placing the post in the hole and filling with a 60# bag of quick-set concrete and water, ensuring plumb on all sides during mixing and before concrete sets fully. Allow to cure per bag instructions.

Install 2×6 boards along one side of the 4×4 post line (inside or outside). An 8’ board will go between the center two 4×4 posts, and two 10’ boards will go on either side of this. Note that your 4×4 posts will likely sit at slightly different heights, so make sure your 2×6 boards are aligned to attach to every 4×4.
TIP: Predrill every time you are screwing into the end of a board (such as the 2×6 board ends that attach to the 4×4 posts), to minimize splitting.

This configuration allows for a 2’ extension of your arbor trellis past the end posts on both sides of your arbor.

Install the second 2×6 support line on the front four 4×4 posts in the same way, checking for level alignment with the first 2×6 support line. (We laid a board across the two with a level on it.) Tip: Check for plumb often.

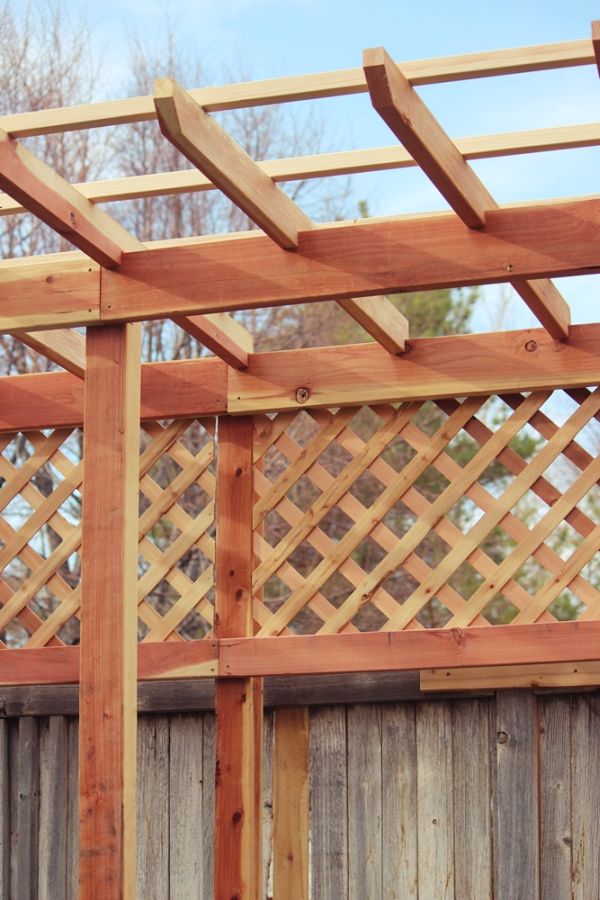
Add metal brackets on both sides of each 4×4 post to strengthen the 2×6 attachment. Congratulations! Your basic support system is in place.

Chop off the tops of the 4×4 posts as needed. We used a Sawzall for this step (and tried not to jiggle our brains loose with the vibrations).Next, you’ll want to prepare your first cross-piece for the trellis.

TIP: To save time and keep a high level of consistency, create one trellis piece that fits exactly how you want, then use that one as a template for all others.

Take a 10’ 2×4 redwood board and cut in half, for two 5’ trellis pieces. Measure the distance between the two 2×6 support lines to determine the distance between notches on your 2×4 trellis pieces. To notch these (so they will sit down and secure nicely to your 2×6 support system), measure notches that are wide enough to sit on the 2x6s and the depth of your preference (those shown are 1.5” deep). Mark the outline for each notch. Use a miter saw to cut the depth of each marking.
While you’re at the miter saw, you can use a 45-degree angle to cut the board’s end for a decorative trellis.
*Note: Most arbors have symmetrical sides, with angled cross-pieces on both ends. Due to the proximity of our property line, we opted to keep the back side of the trellis flush with our 4×4 post line. If both sides of your arbor are visible, we recommend centering the cross-pieces on the trellis and angling both sides (45 degrees) with the miter saw.

Use a hammer and chisel to complete the notch. Tip: Score both sides (top and bottom) of the board with the chisel before using more force to complete the notch. This will improve accuracy.

In less time than you’d think, you’ll have a stack of identical, notched boards.

Beginning at one end, mark every 15” along both 2×6 support systems. These marks are where your trellis pieces will go.Using 3” exterior decking screws, attach each trellis piece onto both 2×6 support systems. Predrill as needed. (Note: If your trellis has one flush side like this example shows, put a screw from the outside of the 2×6 into each 2×4 trellis piece to provide additional stability.)

You will notice that some of your trellis cross-pieces fall directly above the 4×4 beams.

Simply measure the width you’ll need and create wider notches for these boards, following the notching technique described above.

Install these trellis pieces in the same way as other trellis pieces. You can use more screws into the top of the 4×4 as well as the 2×6 for these pieces.

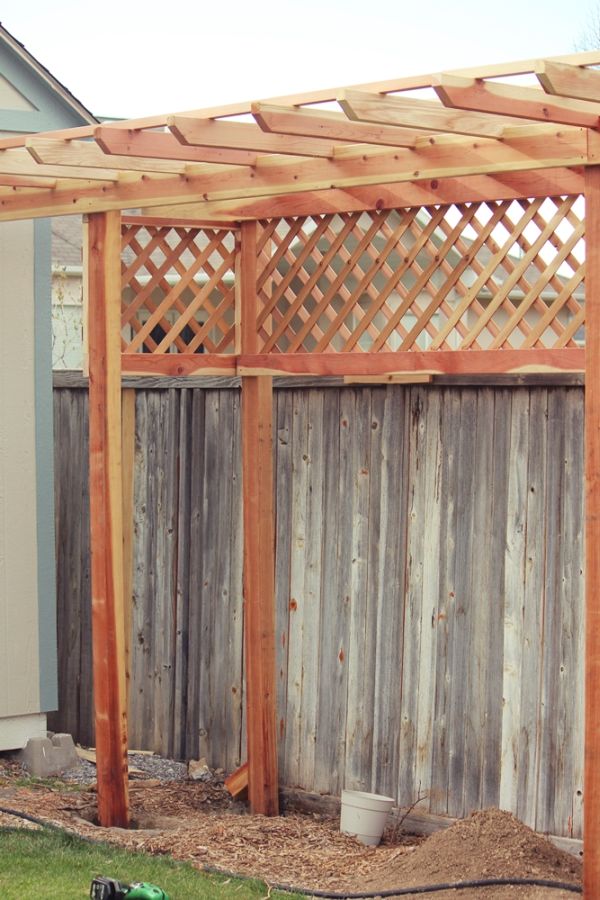
Congratulations! Your primary trellis system is in place.

You could actually stop here and have a wonderfully functional, beautiful grape arbor. If you want to further stabilize the arbor and add additional trellis capacity for your grapes, however, you might want to follow these next (easy!) steps.

Measure four 15” spaces on each trellis piece (set the first mark in about 5” or to whatever spacing you prefer). Install 2×2 redwood cross-pieces on top of your primary 2×4 trellis cross-pieces by screwing them into each 2×4 trellis piece with 3” exterior decking screws. Predrill the ends, because these pieces are very prone to splitting.

Stagger the length of the 2x2s from each end of your trellis so the ends of the 2×2 pieces don’t all fall on the same plane.

When all’s said and done, your grape arbor will look amazing.

*Note: We had privacy needs, so we installed a 2’ cedar lattice to the top of our trellis. You could also do this if you want.

Now we sit back and relax…and hope our little grapelings grow!

Good luck to you in building your very own grape arbor. It takes time and effort to build, but it will add beauty and functionality to your backyard space.