DIY Floating Shelves

DIY floating shelves are an easy and affordable way to add storage and style to any space. Whether you’re upgrading a blank wall, organizing a bathroom, or enhancing a living room, this project is simpler than it looks. With just a few basic tools and no need for bulky brackets, you can create sleek, sturdy shelves that look professionally made.

This step-by-step guide breaks down the process with clear instructions and photos, making it accessible even for beginners.
Materials:
The list below shows what you will need to build two 28” floating shelves.
- Two (2) 1×10 boards cut 28” long
- Two (2) 1/4″ plywood boards cut to size (28”x9-1/4”)
- Two (2) 2×3 boards cut 28” long
- Six (6) 2×3 boards cut 7-3/4” long
- Two (2) 1×4 boards cut 29-1/2” long
- Four (4) 1×4 boards cut 9-1/4” long
- Twelve (12) 2-1/2” screws
- Eight (8) 3-1/2” screws
- Brad nails, wood glue, level
- Kreg jig, power drill, brad nailer, clamps
- Whatever you want for finishing (e.g., sandpaper, stain, paint, etc.)
Step 1: Pocket holes

Begin by using your kreg jig to drill two pocket holes (for 2-1/2” screws) into one end of each of your six short (7-3/4”) boards. The two holes should be about 1/2” to 3/4″ from the sides of your board.

Step 2: Clamp & Screw

Next step is to attach three of the short boards to the 28” long 2×3 board. Whenever I’m attaching one piece of wood to another using the pocket holes, I’ve found I get the best results when I clamp the pieces together so that edges and sides and ends align. In this case, I clamped the long board to my work table, then clamped the short board in place, with the clamp lining up over the joint between both boards.
Grab 2-1/2” wood screws (or kreg or torx screws).
Holding the short board firmly into place with one hand (yes, even though it’s clamped), screw in the 2-1/2” screws to attach the board. Repeat for another short board on the other end of the long board, then one more in the middle.
Your 2×3 boards should look like this, and they now form the frame for one of your floating shelves. Repeat for the second floating shelf.
Step 3: Stud finder

Believe it or not, it’s now time to attach the floating shelves frames to your wall. Use a stud finder, if applicable, to find where your wall studs are located.
Step 4: Mark the holes

Hold the shelf against the wall at your desired height and mark the stud locations. Predrill holes in the frame at these marks. For a 28” shelf (finishing at 29-1/2”), you’ll likely hit two studs. Secure the frame with 3-1/2” screws.
Step 5: Attach the shelf

Use a level to ensure the shelf frame is straight, adjusting by lightly tapping the long board up or down if needed. Start by attaching the 2×3 board shelf frame to the wall with a single 3-1/2” screw. Once level, secure the frame by driving in the remaining screws, beginning with the second set of predrilled holes.
Before mounting the second shelf, check vertical alignment by holding a level against the side of the first shelf and marking the placement for the second. Adjust as needed—moving this shelf about 1/4″ to the right in this case.
Step 6: Installing the Bottom Plywood

With the shelf frames securely mounted, it’s time to attach the bottom panels. Take a 1/4″ thick plywood piece, cut to size, and hold it (rough side up) against the underside of the frame. Use a pencil to mark the frame lines for precise placement.
Before securing, ensure the second shelf is properly positioned and level if you haven’t already. Once aligned, apply wood glue within the marked lines on the plywood, then press it firmly against the bottom of the shelf frame. In the next step, you’ll reinforce it with brad nails for a strong hold.
Step 7: Attaching the Top and Side Pieces
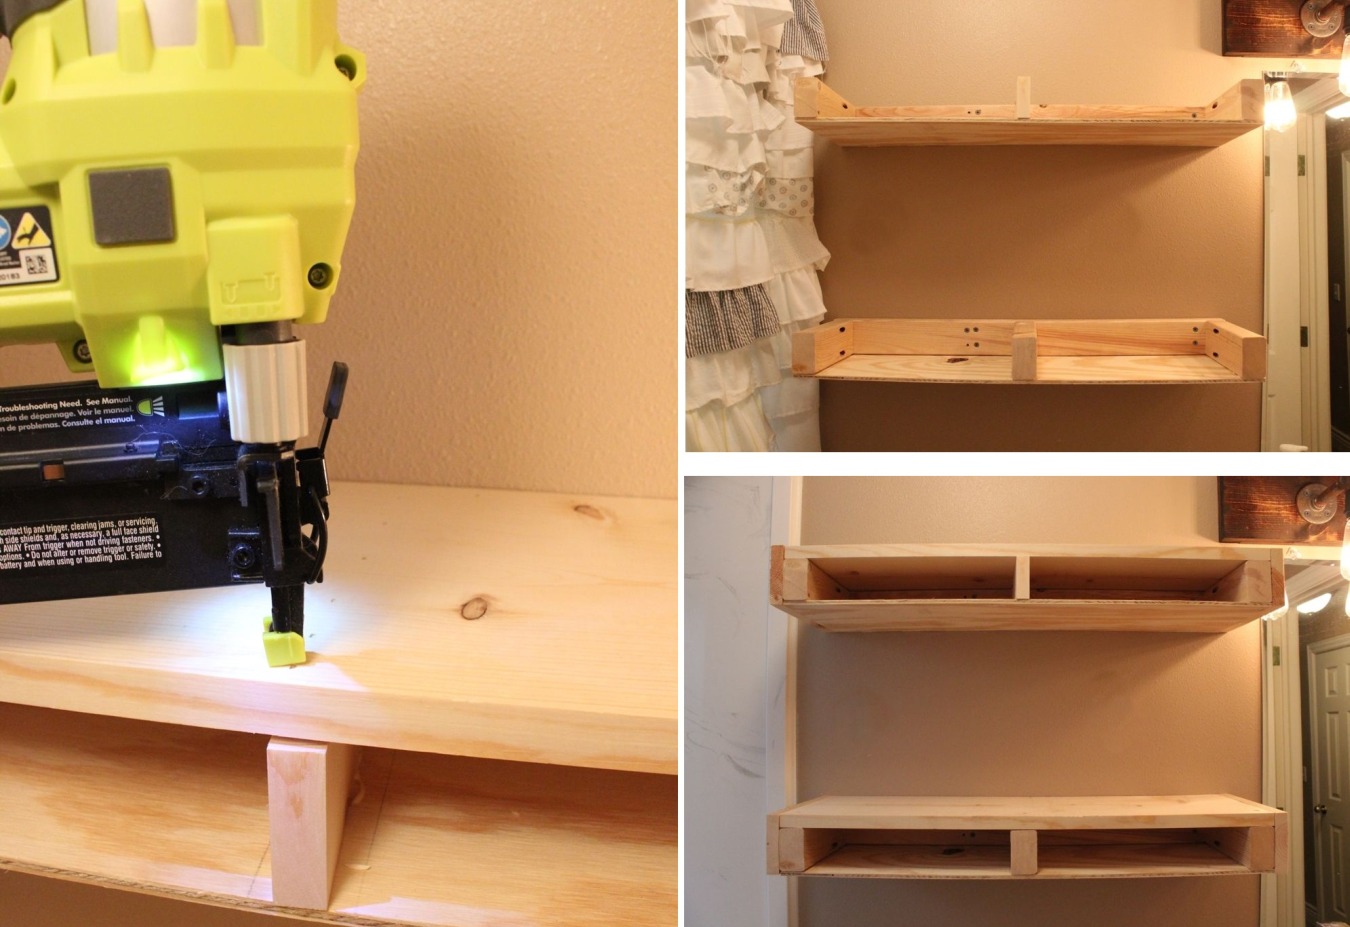
Secure the top of your floating shelves by attaching the 1×10 boards with wood glue and a brad nailer along the sides, back, and center. Next, install the 1×4 side pieces using the same method, fastening them to the top 1×10, back 2×3, and short 2×3. This step gives your shelves a clean, finished look and ensures stability.
Step 8: Add Fronts

With the top and sides in place, the final step is attaching the front 1x4s, cut 1-1/2” longer than the other long pieces (29-1/2”). Secure them neatly with a brad nailer, fastening them to as many shelf components as possible for a seamless finish.

Floating shelves are space-saving addition to any room, offering both style and function. They can be customized to match any décor, whether you prefer a stained wood look or a crisp painted finish.