How To Make Concrete Planter: DIY Concrete Planter

There’s something about simple, straightforward concrete planter boxes that appeals to many people regardless of their style preferences. You’ll be happy to learn that this simple DIY idea on how to make concrete planter is not only fast, but it’s quite cost-effective and easy. That’s a win-win-win.
Let’s get started, so you’re ready for the planting season.


DIY Concrete Planter for Beginners

Materials Needed:
- Four (4) equal-sized, straight-edged concrete pavers (12” squares were used in this project)
- Landscape adhesive
- Ardex feather finish (not shown)
- Concrete sealer
- Potting soil & plants
Step 1. Choose the right working space for your DIY concrete planter box project.

Begin your project on a clean, flat surface outside.
We recommend some concrete steps if possible, as the rise of the nearest step will provide some 90-degree angle support while the adhesive on your concrete planter box dries.
Set your first concrete paver (Paver A) on its side, propped next to the step for support.
Step 2. Properly apply the adhesive.

Apply landscape adhesive to the side edge of your second concrete paver (Paver B).
A zig-zag application is advised to solidify the adhesive bond strength.
Step 3. Glue the pavers together.

Bring the glued edge of Paver B close to the side face of Paver A.
Straighten their alignment to as close to a 90-degree angle as possible.

Attach the edge and face together, pushing them tightly into each other.

Try to keep a 90-degree angle here, but don’t stress about it yet.
You’ll finalize the angles a little later.
Note: One reason, however, why it’s helpful to utilize any nearby vertical faces – is it’ll help the planter stay upright solidly without having to worry about it falling over while the adhesive is still fresh.

Apply landscape adhesive to the side edge of your third concrete paver (Paver C), and push it firmly into the side face of Paver B.
Again, do your best to maintain 90-degree corners, but don’t be too precise quite yet.
Note: If you want to end up with a true square concrete planter, it’s important to pay attention to the attachment of the side edges to the side faces so all sides end up equal.
The same thing applies if you’re looking to build a perfect rectangle concrete planter.

Grab your fourth concrete paver (Paver D) and apply landscape adhesive to one side edge and also to the opposing side face.
Keep the zig-zag of adhesive on the side face about the same size/width as the adhesive you put on the side edge – this shouldn’t be hard, as you’ll likely have a feel for it by now.
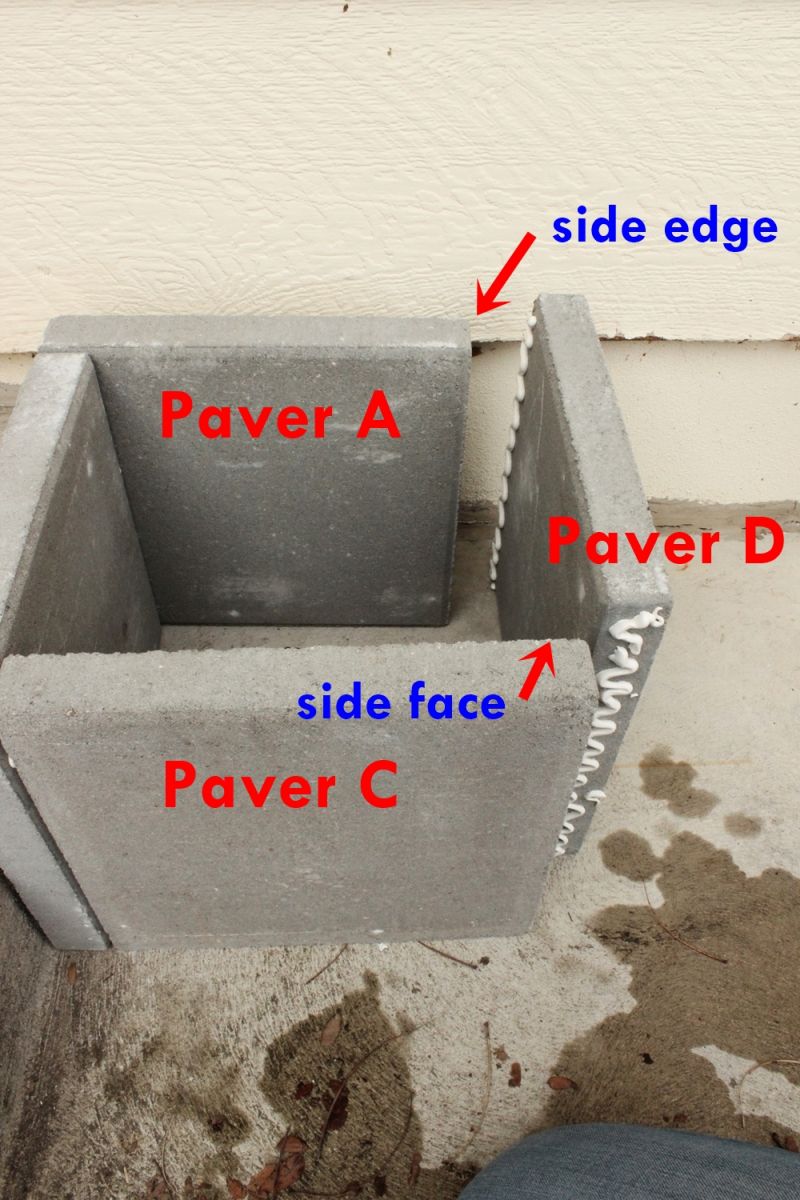
Line up Paver D so that (1) the glued side edge will press into the side face of Paver C, and (2) the glued side face will press into the side edge of Paver A.

When all sides are pressed firmly together, square off each corner to a perfect 90 degrees.
When the concrete planter box is squared off and secure, leave it alone for at least 24 hours, or until the landscape adhesive cures and dries completely.

Optional: Carefully transfer the concrete planter boxes to a gravel workspace so the Ardex feather finish won’t mar any existing concrete surfaces.
Step 4. Prepare the feather finish mixture.

Mix up the feather finish as per package instructions.


For each concrete planter box, I used a mixture of about 3 cups of powder with about 2 cups of water.


Stir it up.

There is slightly more water than the instructions call for; play around with your ratios to get a good peanut butter-like consistency.
Step 5. Apply the feather finish on your rough DIY concrete planter box.

Apply the feather finish freely to the exterior faces, tops, and upper half or third of the interior faces of your concrete planter box.
Step 6. Make sure to cover the inside corners of your DIY concrete planter for a seamless finish.

Start by slathering some feather finish on the inside corners. Your goal here is to cover the seam and the adhesive.


Load your spreader with a feather finish.

Apply to the inside wall’s top half (or top third).


Repeat for other inside corners and walls, then move onto the four top edges of the planter.
Step 7. Fill in the crack on the outside.

On the outside walls, fill the adhesive crack first.

To do this, work your loaded spreader horizontally over the crack, from top to bottom.
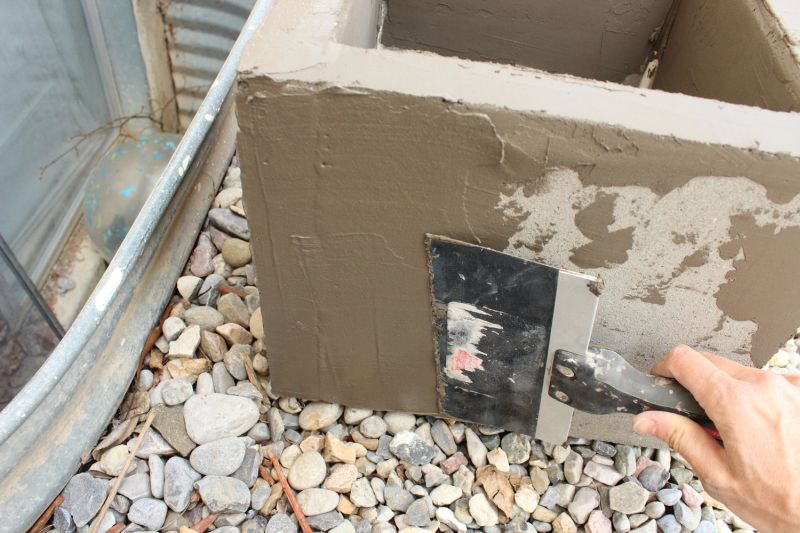
Work out excess toward the center of the wall.
Step 8. Cover the entire outside surface of your concrete plant pot with the feather finish mixture.

When the surfaces near the adhesive crack are covered, work your spreader vertically to make the adhesive crack smooth.
If you go horizontally over this, your spreader will always dip slightly into the crack.
Your last passes should be vertical to make the crack disappear.

Continue to work feather finish around the outside wall, adding more to your spreader as needed.

Add additional feather finish to the corners; you can always sand these down a little later.
It’s better to have more, with a solid covering on the corners, than less.
Step 9. Smooth the walls of your DIY concrete planter.

Smooth the entire wall to your taste. Some people prefer a really raw concrete finish (very industrial), while others prefer more subtle ones.

Run your spreader in multiple directions to decrease bubbles and increase interesting spreader lines.

Loosely check your corners and edges from multiple angles here; if you want to smooth them out a bit, go ahead.

Keep in mind, though, that too much messing around with the feather finish can make things look worse.
You’ll be able to sand away rough corners and edges after it dries, too.

You can even smooth out corners with your finger if you find that helpful.

Of course, it’s up to you and your preference, but I would recommend that you don’t be too careful about smoothness here.

Leaving in some of the trowel lines will give the concrete planter a little more character and that industrial aesthetic we tend to love.

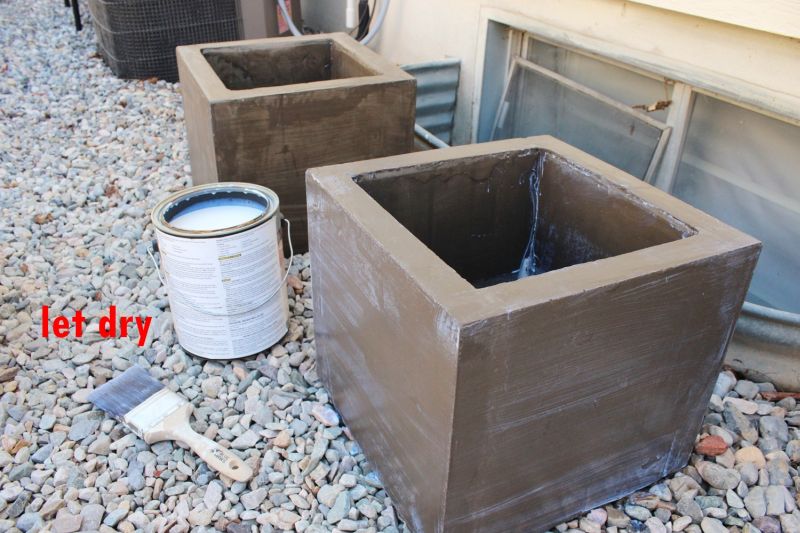
Let the feather finish dry thoroughly. Touch up as needed.
Step 10. Sand the entire surface for that perfect finish.

Sand with coarse to medium grit sandpaper if you want; this isn’t necessary, though.

It simply depends on your preferences for raw industrialism aesthetics – the rougher your concrete planter box is, the more industrial it will likely look.
Step 11. Apply concrete sealant.

Choose a concrete sealant that is designed for exterior use.

The sealant will probably have a bluish-white tinge to it, resembling skim milk or similar.
Although perhaps disconcerting, don’t worry about this; when it dries, the sealant will be completely clear and glossy.

Sealing is rather easy; however, this stuff tends to dry fairly quickly, so your application time might be limited.
We recommend a system that will allow you to seal the entire planter box strategically and eliminate, or at least minimize, unnecessary drips of sealant.
Start with a generous swipe across the top surface of one side. Ignore the dripping down the sides for a minute.

Seal the inside of the planter box on that side, beginning with the two affected corners and then covering the inside wall between them.

Then move to the outside wall on that same side of your planter box, and seal the entire thing.
Look briefly on both adjoining sides for noticeable drips and wipe them away before moving on to the next side.

Repeat this method for all four sides; then do a final once-over for any lingering drips of sealant.
Step 12. Let the sealant completely dry.
Let the whole thing dry thoroughly.
Then flip it over and seal the bottom edge – not for the concrete paver itself, but more for the very edge of the feather finish on the bottom edge that may not have been effectively sealed yet.
This will help to prevent moisture’s creeping up through the feather finish from the ground when it rains or whatever.

Place the concrete planter boxes where you want them.

In this instance, two concrete planter boxes flank the ramp-up to a backyard shed.

Fill with potting soil and add your plants, whatever they may be.
Example shows a single tidal wave petunia on each concrete planter box. In just a few weeks, the petunia will fill the top space beautifully, making it one of the best plants for concrete planters.
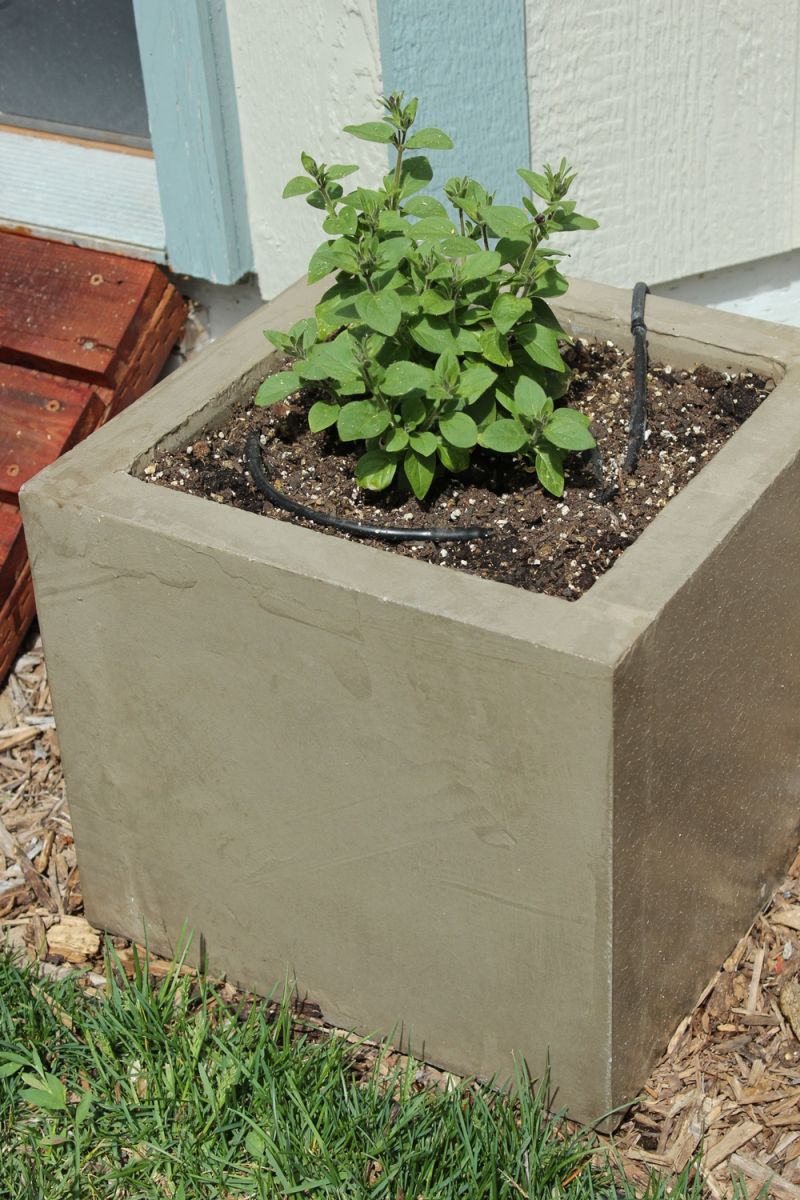
Be sure to add a water source, such as a sprinkler or drip system, or take care that you water your plants every day.
Any growing thing planted above ground will dry out faster than plants in the ground itself, due to increased wind and heat effects on the pot itself and, consequently, the soil.

It’s such a cool, crisply industrial look for such little cost and effort.

We love the contrast of a bright flowering plant with the gray concrete of the simple planter box. Beautiful.

And, if you’re making one, I highly recommend making at least two at the same time.
Frequently Asked Questions (FAQ)FAQ
Are concrete planters good for plants?
While planting in concrete blocks is usually done with succulents, concrete planter boxes are generally considered to be one of the best options for potting plants as they are to a moderate extent, porous.
This characteristic of concrete planter pots allows just enough moisture to get through.
Can I make my own concrete planter?
Absolutely yes! You can simply refer back to the quick and easy tutorial above on how to make concrete planter, all on your own.
Do concrete planters absorb water?
Technically speaking, concrete plant pots do not absorb water- them being somewhat porous only allows some moisture or water to get through.
Can I fill a planter with concrete?
Instead of filling a planter with concrete, the best thing to do is to just cover the sides of the planter with concrete to make it more sturdy.
Do concrete planter boxes need drainage?
It’s better to put a hole for decent drainage on your concrete planter pot since having proper drainage is ideal for potted plants.
Can I put concrete in a ceramic planter?
If you’re planning to use your ceramic planter as a concrete planter mold, then putting concrete in it is perfectly okay.
Can you put concrete in a plastic planter?
There are different items that you can use as concrete planter molds and a plastic planter is one of those.
If you’re looking to DIY your concrete plant pots, then filling a plastic planter with concrete for molding purposes will do.
How do you make a concrete planter at home?
The tutorial showcased in this article is one of the easiest guides to follow if you’re a beginner who wants to create your own outdoor concrete planter at home.
How do you make a decorative concrete planter?
There are a lot of ways to spruce up your regular concrete planter.
One of which is to paint a concrete planter with vibrant colors of concrete planter paint. Another idea is to create a concrete planter in various shapes like a round concrete planter using concrete planter molds.
You can also use an old piece of towel and dip it in a concrete mixture for a fun-shaped concrete planter. You just need to let the towel sit on top of an inverted pail and allow the concrete to dry completely.
Conclusion
A concrete planter is a great item for your home, especially if you like being creative and aren’t afraid to get your hands dirty. Be sure to follow this guide to make an awesome concrete planter box that will surely give your home a unique and beautiful new addition.