Update Your Staircase: How to Remove and Install Carpet on the Stairs

Wondering how to remove and install carpet on the stairs in your home? Many of us have lived with gross, tired out carpet on the stairs for far too long. Staircases can be a bit intimidating to tackle, which is probably why old carpeting tends to overstay its welcome. If you’re ready to make a change and upgrade your old carpeted staircase, you can read about how to remove and install carpet (or, in this case, a runner rug).
We hope you find this step-by-step tutorial helpful, with its details and many photographs to guide you along the way. I’ll show you how to safely remove old carpet from your staircase, prep and paint the stairs, and install a runner rug on the staircase.
Freshen Up Your Home with a New Carpet On Your Staircase


Of course, there are many types of staircases, and your staircase may be different than the one in this example, but I’ll do my best to give you pointers to solve any problems you might run into along the way. This project can save on carpet installation costs, and you can customize it to your liking. Are you ready? Let’s get to it.
DIY Level: Intermediate
Remove and Install Carpet on Your Staircase with These Materials
For removing the carpet
- flat screwdriver & pliers
- crowbar & hammer
- gloves
- muscles & patience
For prepping and painting the stairs
- medium (150-grit) sandpaper
- wood filler & putty knife
- caulk
- primer
- floor paint (or similar)
For installing carpet on the stairs
- non-slip rug pad
- runner rug(s), adequate length for your staircase
- measuring tape (optional but recommended)
- heavy duty scissors
- staple gun or electric stapler
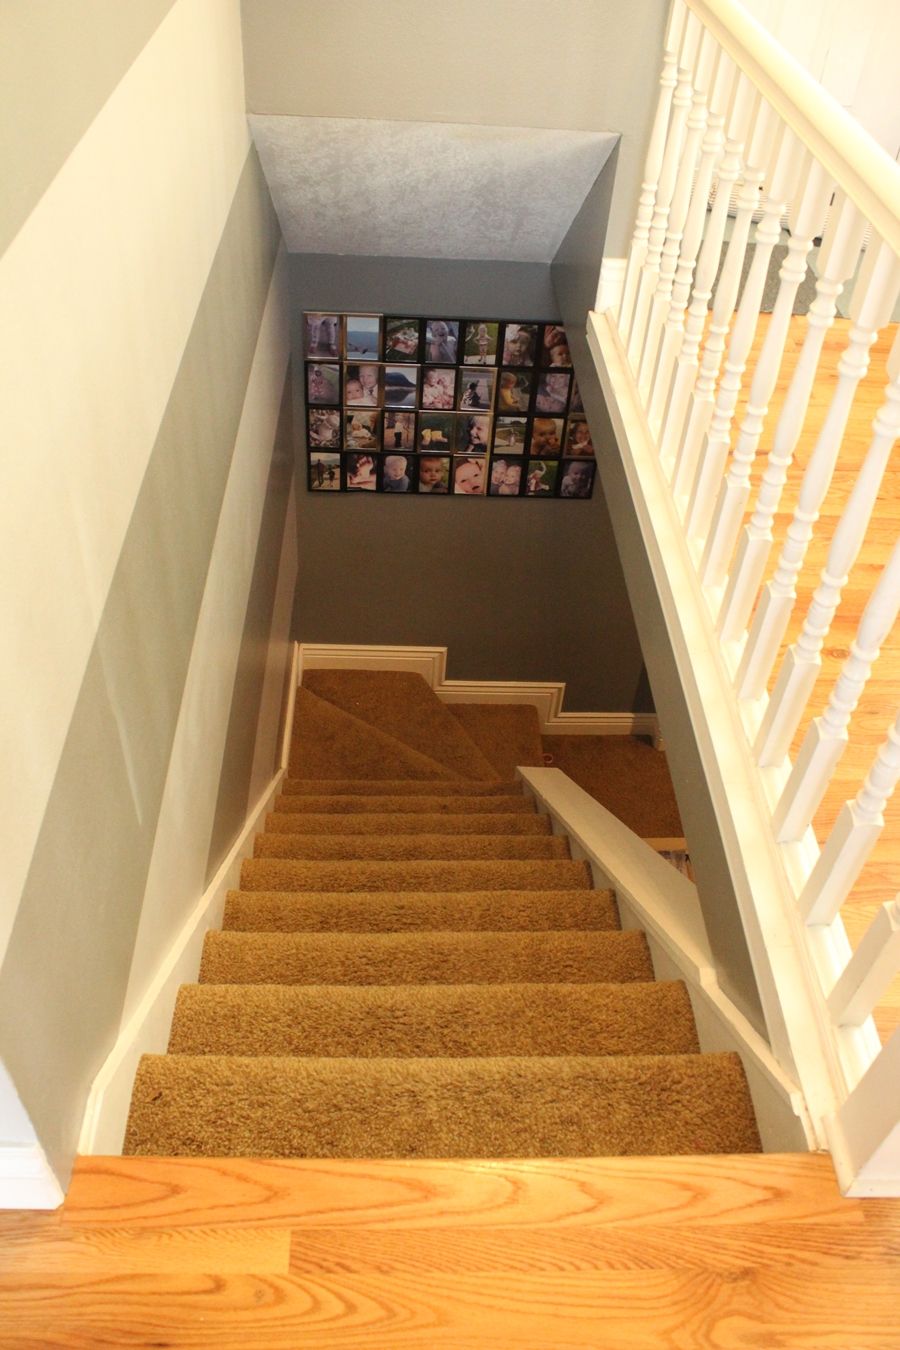
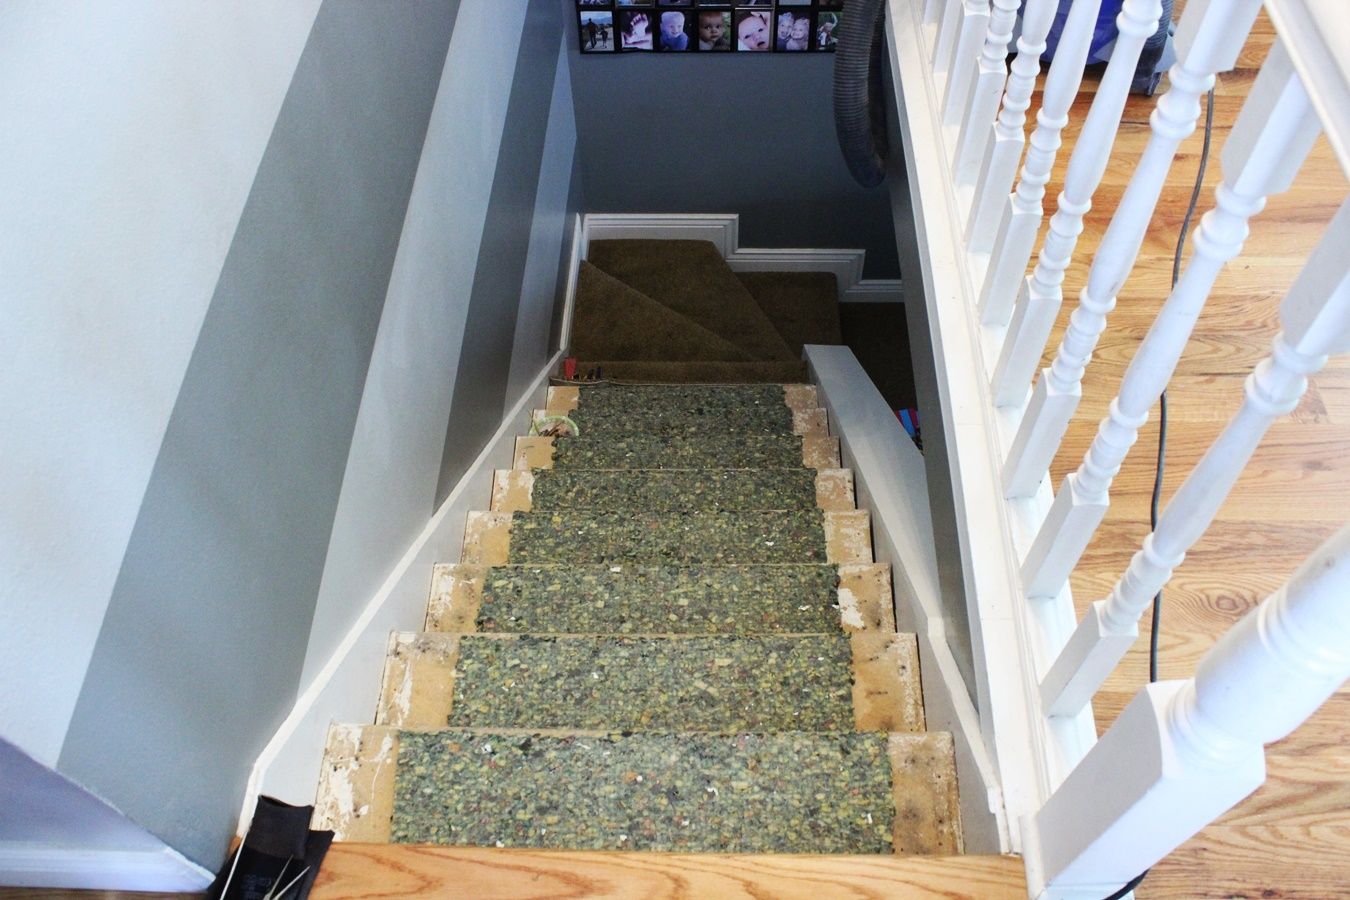
Photos of the Staircase Before Removing Carpet
These photos show the carpeted stairs before starting this staircase overhaul. The carpet is worn and dirty and needs a facelift. Of course, I didn’t bother vacuuming before carpet removal began.

For your reference, the parts of a staircase I’ll refer to in this tutorial are Tread (the “step” part of the stair), Riser (the vertical part between the actual treads), and Nosing (the edge of the tread that extends slightly past the riser).
How to Remove Carpet: Step-by-Step Instructions

Removing Carpet Step One: Begin Loosening the Carpet
Begin removing the carpet. Grasping a corner of the carpet, I began pulling until I had loosened carpet in one of the top staircase corners. I then pulled the carpet off the entire stair riser. I recommend working on one part at a time before moving on; for example, do one riser completely before pulling more carpet up off the adjoining tread.

TIP: Wear gloves (which I did just after snapping these first photos, thank goodness) and be extremely careful. Those staples are vicious and sneaky.

Removing Carpet Step Two: Loosen All Staples From The Riser
After removing the carpet, use your flat screwdriver to loosen all staples from the riser. Be careful not to damage the wood, particularly if your goal is to simply paint the stairs and not add a runner.

Removing Carpet Step Three: Use Pliers to Pull The Staples Out
Use pliers to pull staples out of the wood. When you think you’ve removed them all, lightly run your (gloved) hand across the riser surface before moving on. Chances are, you’ll find one or two staples that have been hiding. Remove these.

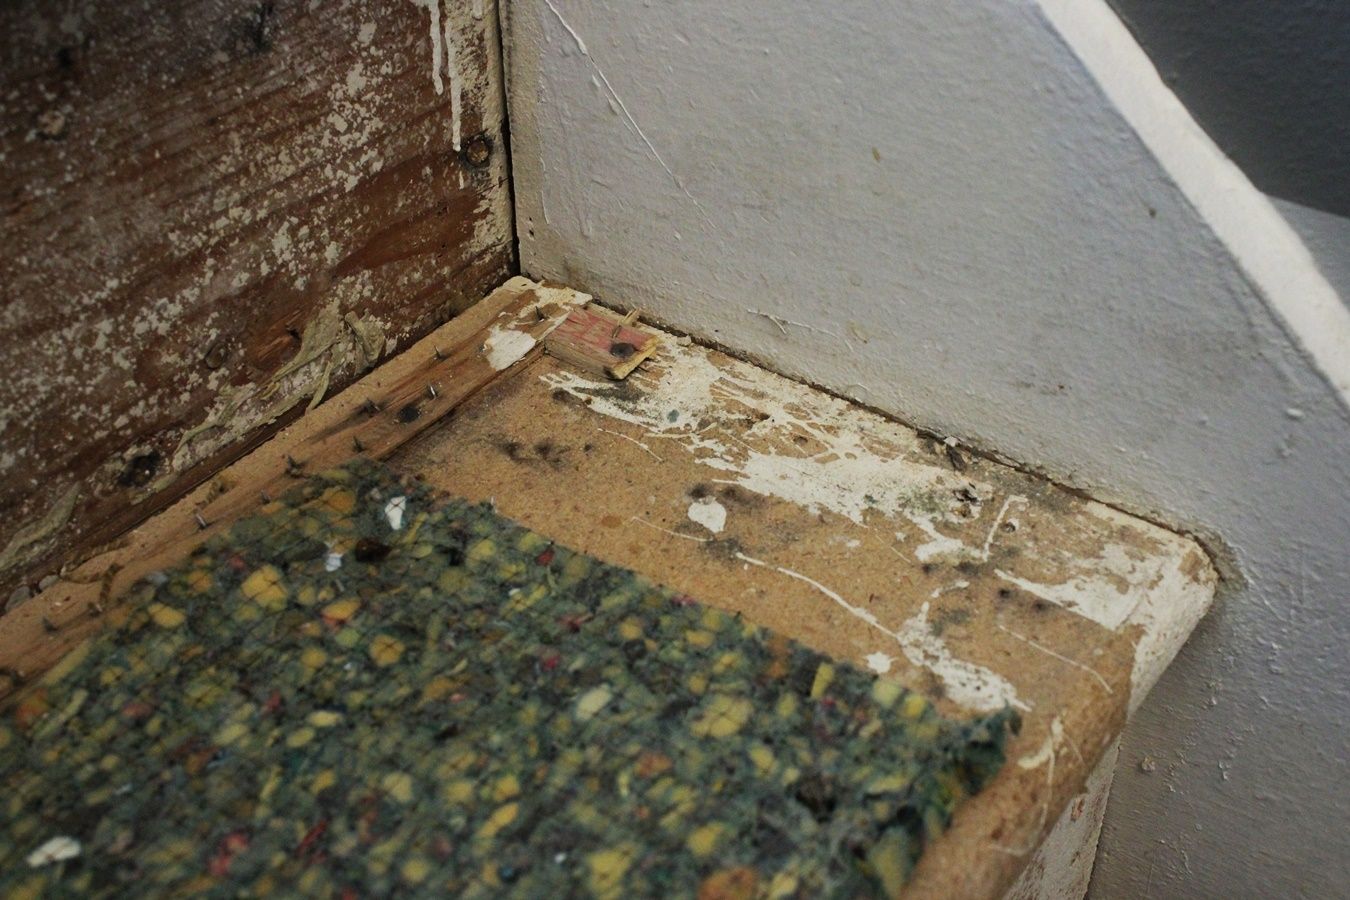
Removing Carpet Step Four: Remove Tack Strips and Carpet Pad on Treads
Remove tack strips and carpet pad on treads. Tack strips are typically strips of wood with small grippers (nails) facing upward that cling to carpeting and hold it in place securely. The tack strips are typically nailed to the tread, so use a crowbar and hammer to carefully remove these.

Tip #1 When Removing Carpet
If your carpet pad is in good shape, you could opt to leave a portion of it attached to the tread to provide cushioning beneath your runner rug. I simply removed the sides of the carpet pad on each tread and kept the rest intact.
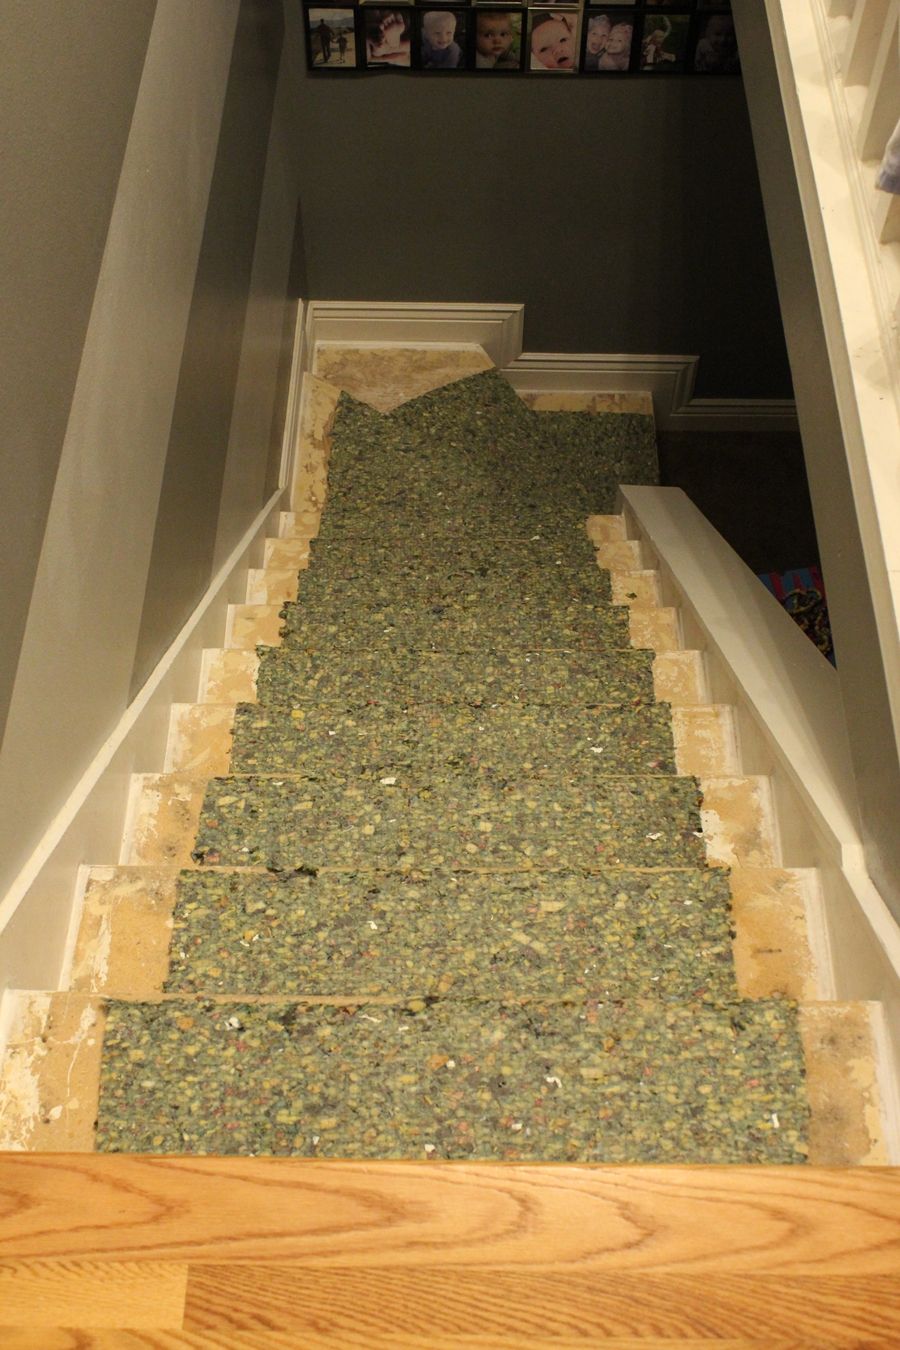
The carpet being removed here is at least the third carpeting job that these stairs have seen, judging by the remnants of shag I pulled up along the way. There’s no shortage of nail and staple holes, to be sure.
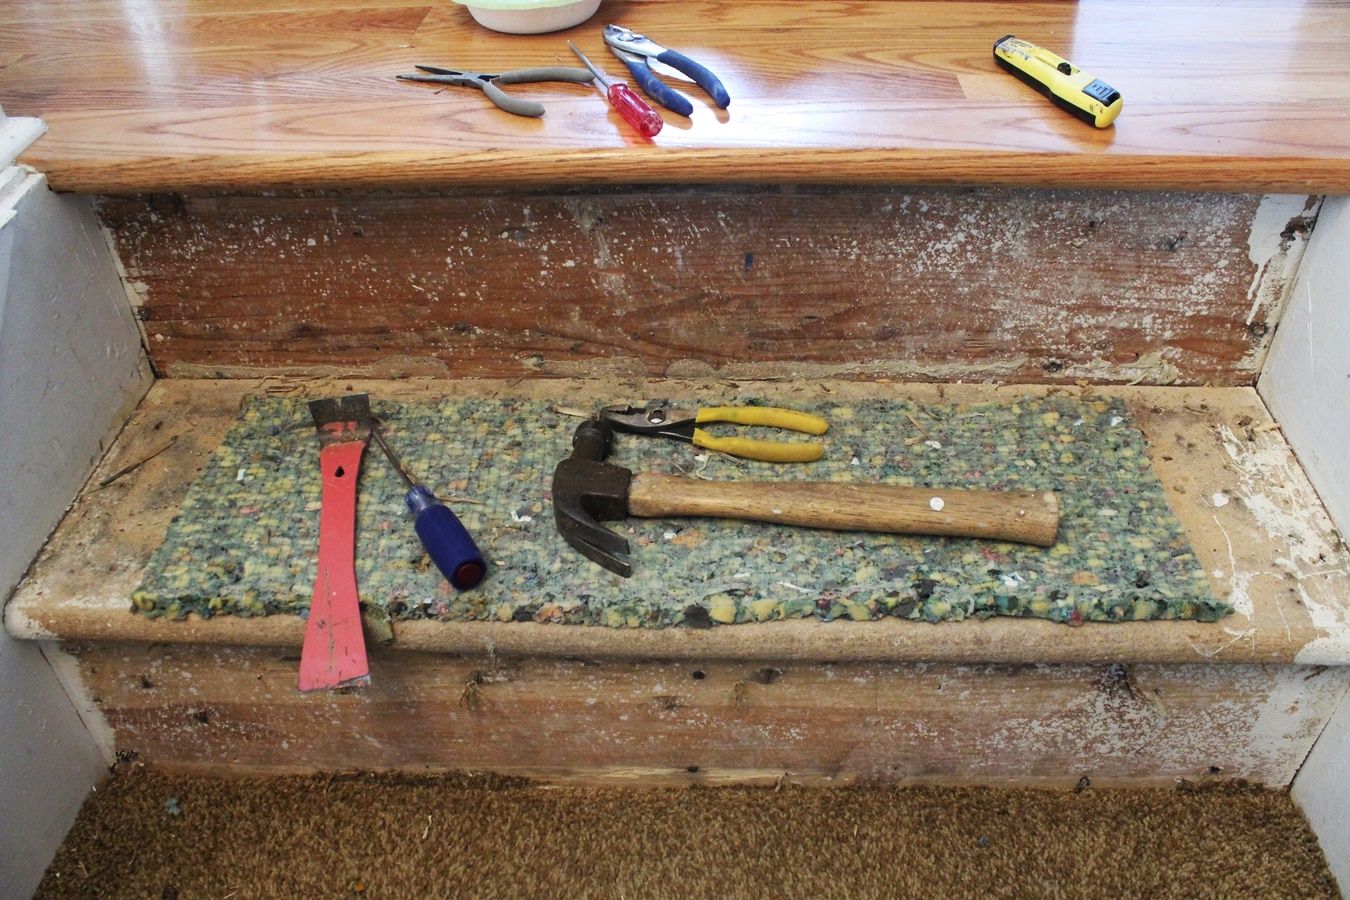
This is what each riser and tread looked like before I moved on to the next riser and tread – staples removed, carpet pad trimmed on sides, tack strips removed.

Removing Carpet Step 5: Continue Down the Staircase
Continue removing carpet components down the entire staircase. I typically pulled off the carpet of two or three stairs then cut it with a razor blade before removing staples.
Tip #2 for Removing Carpet
Keeping the carpet below you intact as you’re removing staples from the stairs above helps provide you with a safe place to sit or work from.
Here’s what the staircase looked like after the majority of carpet removal had happened on the straight stairs. There’s no magic in removing carpet from wedge-shaped treads. (Note: A staircase that turns, like what you see on the bottom three steps here, is called a “winder.”)

Prepping & Painting the Staircase Before Installing Carpet

Painting Staircase Step One: Use Wood Filler to Fill in the Holes
Fill in all holes with wood filler. You could sand prior to this step, which might help you see the holes better. I simply vacuumed and began, since the only nail and staple holes I cared about hiding were in the 4” on the sides of each riser and tread.

Wood filler recommendations include using a putty knife. This tool helps to create a smooth finish and is an inexpensive knife to help with this job.

In areas where there was wood damage, such as splintering or chipping, I found the putty knife application to be useful.

For filling small holes, though, I used my finger. This was much more efficient and effective. Allow the wood filler to dry thoroughly (recommended at least 2 hours).

Painting Staircase Step Two: Sand Everything Down
Use a medium-grit sandpaper, such as 150, and sand dried wood filler smooth. Sand every surface that will be exposed to be as smooth as possible, including the risers as well as treads. Repeat the wood filler step as needed until the surface is smooth. (Note: For your reference, I used two full tubes of wood filler for this example.)

Painting Staircase Step Three: Caulk
When surface smoothness is to your liking (and it may take a day or two to get it so), you may find that you’ll need to caulk along the edges of the stairs where it previously was covered by carpet.


Tip #1 for Prepping and Painting a Staircase
If you are installing a runner rug, you won’t need to caulk along the middle of the steps.

Caulk along the edges of the risers, treads, and nosings, and also in a little where the tread meets the bottom of the riser.
Here’s the prepped staircase, which has been wood-filled and sanded (multiple passes), and caulked. After the caulk dries, it will be ready for priming and painting.
Painting the Stairs

Painting Stairs Step One: Prime the Stairs
I used an angled brush and primed the caulk and stair wood. I was generous in my measurements on the sides, coming in further than the runner rug would.

Primer dries quickly, and almost by the time I had finished the edges, they were ready for paint. You could lightly sand at this point if you wanted.

Painting Stairs Step Two: Paint the Stairs
(Note: I am not affiliated with Benjamin Moore paints, but this new product – BM Advance – is phenomenal for stairs. It’s easy to spread, self-leveling, and low-VOC – a trifecta of paint perfection for a staircase in the middle of your home. Plus, when it dries, the stuff is comparable to oil paints in durability. I can’t recommend it enough for a project like this.)

Stir it up. TIP: If you prefer to tape off your edges when you paint, feel free to do so now.

Spread the paint in the areas you’ve designated (in this example, in the approximately 4” space on the sides of the stairs). I applied the paint fairly liberally so as to make the surface as even as possible. The brush strokes totally leveled themselves out, which was a major bonus for smoothness. Let paint dry. Lightly sand, if you notice any areas that need it, then repeat for as many coats as you feel comfortable with. I did three.
How to Install Carpet on the Stairs

Installing Carpet Step One: Take The Measurements
Calculate how much rug you’ll need. This will take some careful measuring, as the last thing you want is to come up short on your rug length. First, measure one tread, nosing, and riser. If you have a straight staircase, simply multiply this number (mine was 19”) by the number of stairs you have, then add in the height of one more riser. If you have a winder staircase, measure the longest distance (e.g., the outer edge) on the wedge-shaped tread, plus nosing and riser. Do this for all non-rectangular steps, then add the totals together.
For your reference, my calculated total for the staircase was 22.75’. I ordered three 8’ rugs, for a total length of 24’, and it was almost exactly enough. I think I had about 1’ left over. You’ll want to make sure you have a little extra length in your rugs for any necessary seaming.
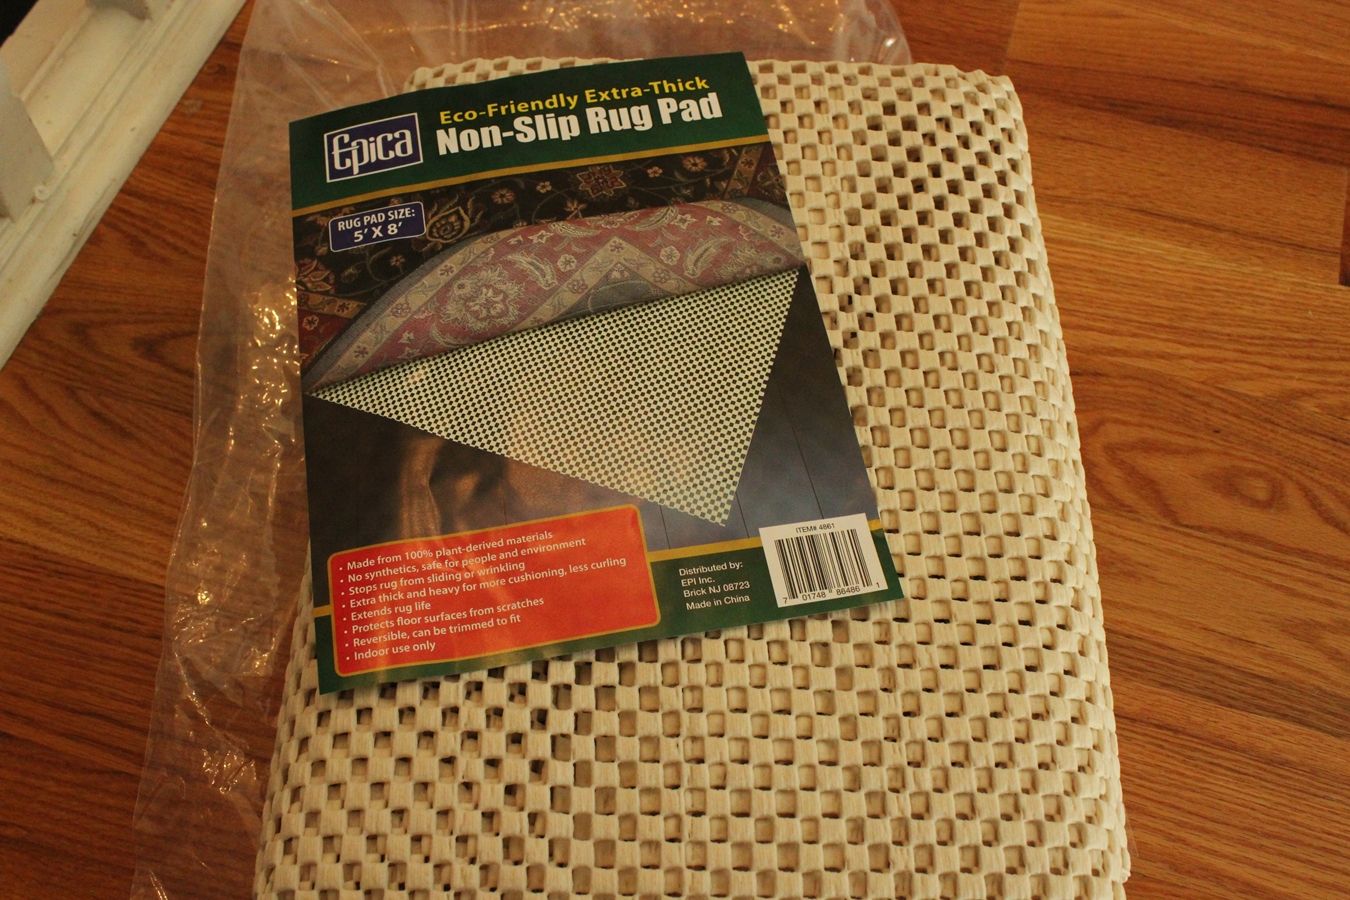
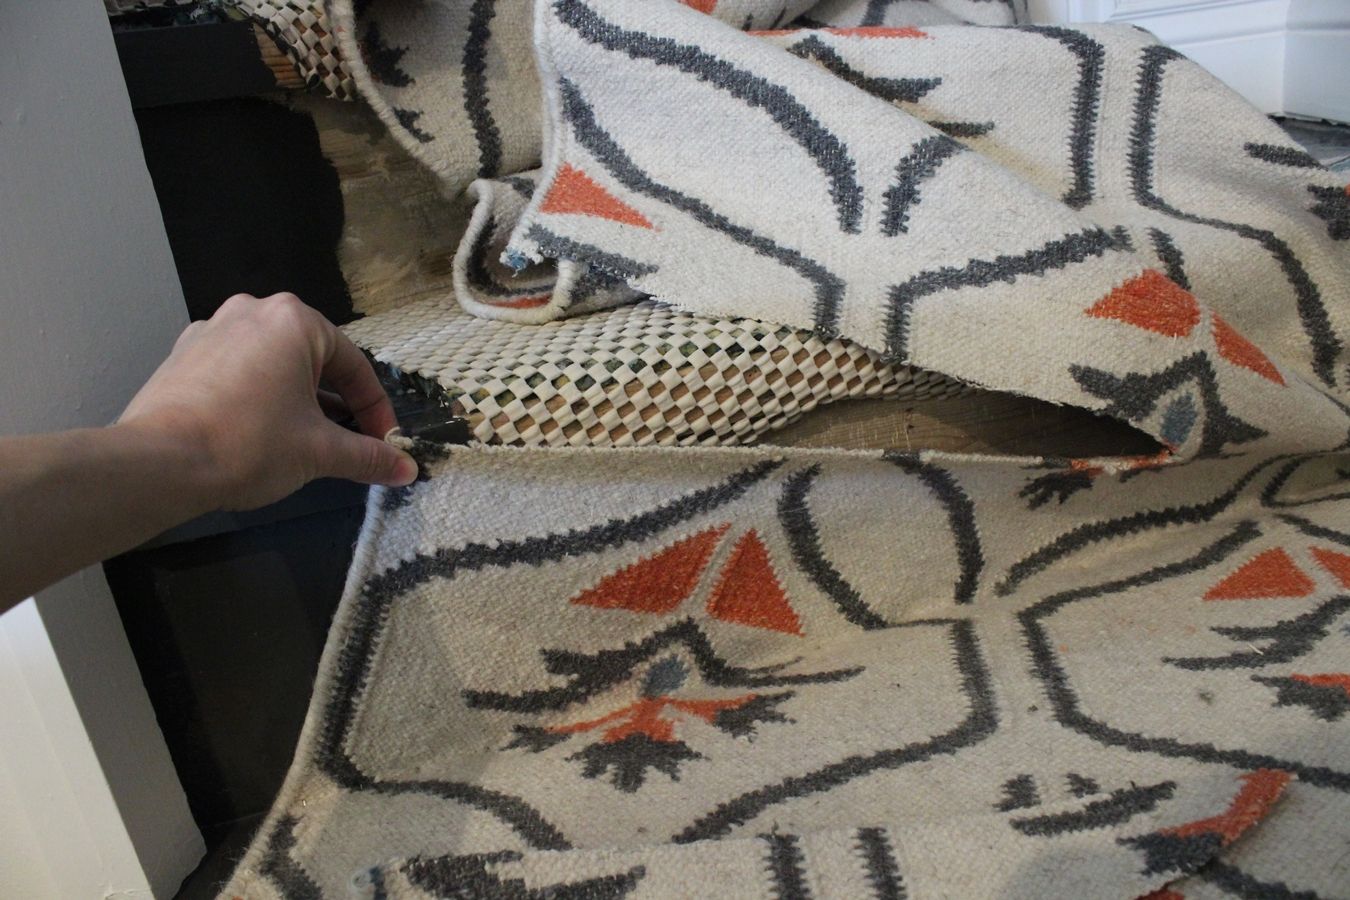
Installing Carpet Step Two: Prepare Your Non-Stick Rug Pad
Cut non-stick rug pad to fit each tread and nosing. To save on cost, knowing that I would be cutting the pad anyway, I ordered a 5’ x 8’ rug pad and cut it down accordingly.
TIP: You don’t need to pad the risers.

Take the tread plus nosing measurement; this will be the depth of your cut rug pads. Cut the width of the pad to be 2” less than the width of your runner rug (or, in other words, 1” spare on each side).

Installing Carpet Step Three: Install the Non-Stick Rug Pad
Loosely staple rug pad into place. Lay a measuring tape on the tread to position the rug pad in the center of your stair, then staple the pad into place.
TIP: You could eyeball this if you’re feeling confident.

Place two staples in the pad’s corners on the tread (just a couple of inches away from the actual edge of the rug pad) and three on the underside of the nosing – two on the sides and one in the middle.

Tip for Istalling Carpet
It’s not shown here, but the wedge-shaped steps received the same rug pad treatment; the only difference is that those rug pad pieces ended up being triangular.

Installing Carpet Step Four: Lay Down Your Runner Rug
Lay your runner rug loosely on the staircase. This will give you an idea of exactly what you’re working with – were your calculations right so you have enough rug? Just how much extra do you have to play with?
(Note: When they arrived, the runner rugs in this example were almost 2” wider than was advertised. Fortunately, this fact didn’t make or break the project for me; but make certain your runner rugs are the right size for your staircase before beginning.)

It’s helpful to know your rug situation before going in for the permanent placement, including where the seams will be. Here is a photo of the loosely positioned runner rug(s) on my stairs.

Installing Carpet Step Five: Start at the Bottom of the Staircase to Install Your Runner Rug
Begin installing the runner rug at the bottom of the staircase. If you have a straight staircase, skip ahead to Installing Runner Step 9; your experience will be easy and straightforward, and much quicker than those of us with tricky winder staircases.

Installing Carpet Step Six: Measuring
Lay your measuring tape out so you can be sure to center (and keep centered) your runner rug all the way up the staircase. Staple the very bottom of the rug to the bottom of the first riser.
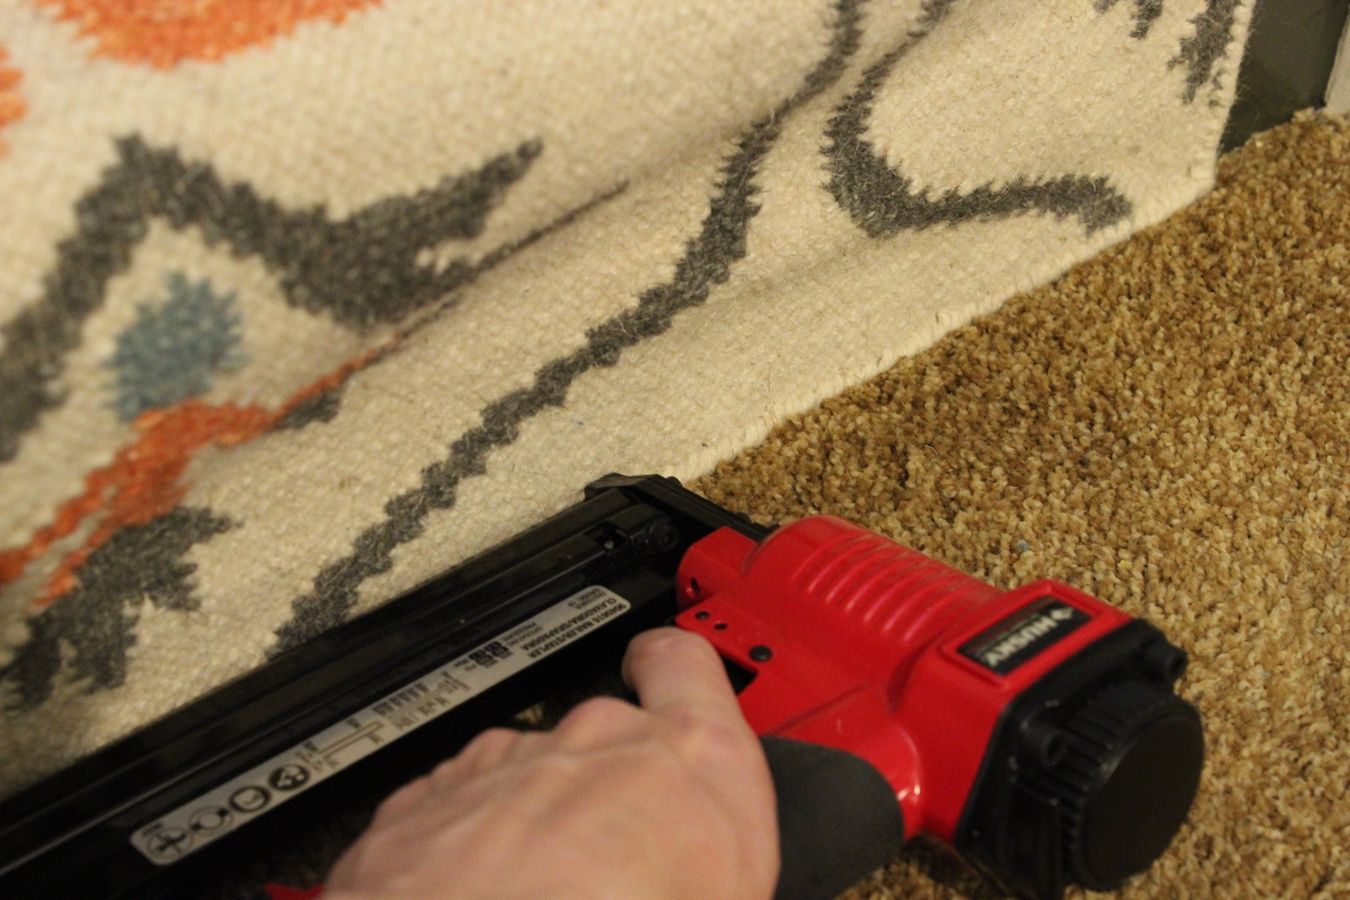
Keeping the runner rug straight and fairly taut, work your way all along the bottom edge, stapling every 2” to 3”.

TIP: Don’t be too alarmed about the staples’ being visible. They are visible if you look hard for them, of course, but overall are not noticeable enough to worry about.

Installing Carpet Step Seven: Attach the Rug to the Riser
Attach the rug to the riser, directly under the nosing. Making sure the runner rug is straight (e.g., exactly vertical on the sides), pull it gently but firmly taut and secure it to the top of the riser. Again, I recommend placing a staple every 2” to 3”, although this could vary based upon the type of rug you’ve chosen and your own comfort level. These staples will be hidden by the nosing.

There, that wasn’t so hard, right? It’s about to get a wee bit tricky, but you’ve already got some experience under your belt, so you’ll do fine.

Installing Carpet Step Eight: Work on the Wedge-Shaped Treads
Install runner rug to the wedge-shaped treads. Moving to the farthest corner on your wedge-shaped tread, measure the same distance from the wall that you’re aiming to keep along the entire staircase.

Pull the rug taut along this edge, then place one “holder” staple on the bottom of the riser in this corner.

Installing Carpet Step Nine: Working on the Corner
Pull the rug taut along the other, nearest corner of the wedge-shaped tread, making sure both sides of the runner rug are parallel to each other and the walls. Place a “holder” staple in this corner. Smooth the entire rug face over this wedge-shaped tread, pull the rug taut, then staple along the entire edge.
TIP: Place these staples on the bottom of the riser, as close as you can to the tread itself.

Measure your wall-edge distance up the riser and at the nosing of the far corner above your wedge-shaped tread. Place a “holder” staple under the nosing here.

Gently but firmly pull your rug along the widest part of the next wedge-shaped tread so that it ends up meeting up with the next riser at the same wall-distance measurement that you’ve been using all along.

Place a “holder” staple on the bottom of this riser to keep the rug in position.
Keep in Mind When Installing Carpet Runners on Your Stairs
You’ve likely noticed there’s a bit of a mess going on near the short end of the wedge-shaped stair’s riser. Don’t worry, you’ll be taking care of these extra rug inches shortly. Depending on the severity of the angle of your winder staircase, you may end up with far too much rug to secure sufficiently on the riser.
That was the case with this example. If this is the case, pull the edge of the runner rug up the riser near the wedge tread’s short corner.
(Note: This will NOT make a perpendicular rug line up the riser.) Carefully determine where you can cut the runner rug so as to omit some excess bulk. You will be folding the runner rug down over this rug flap, down over the riser, and securing a folded edge of the folded-over rug to the bottom of the riser.

TIP: It is imperative that you practice folding the runner rug lots of times, making certain of its placement and the required rug length BEFORE you cut anything. Once you cut, you can’t take it back.

Installing Carpet Step Ten: Cut a Triangle
Carefully (oh, so carefully!) cut out a narrow triangle of rug so that, with all of the folding, the bulk is thinned out a bit. In the photo above, the piece of the rug I’m holding will be folded under and secured to the bottom of the riser directly below the orange triangles so that the rug lies vertically perpendicular up the riser.

Secure the top of the first flap underneath the nosing.

Work with the hanging-over piece of runner rug so that it lies exactly perpendicular along the nosing.

Installing Carpet Step Eleven: Staple in Place
When the rug is perfectly perpendicular, staple the corner into place (directly over your loosely stapled first flap; staple into the underside of the nosing). You’re ignoring the bubbled-looking rug at the bottom of this riser right now.

Keeping the runner rug perpendicular and taut, staple every 2”-3” all along the underside of the nosing to secure it into place.

Installing Carpet Step Twelve: Fold Over and Staple
Then carefully but firmly fold the bottom edge of this rug so that the fold exactly touches the tread top; staple every 2”-3” into place.

Installing Carpet Step Thirteen: Repeat
Repeat this method for the ensuing wedge-shaped steps. In other words, you’ll first secure the proper alignment of the widest edge of the runner rug by stapling a “holder” underneath the nosing, then position the rug to be aligned with the next step and place a “holder” staple in the bottom of the next riser up at both the wide wedge-edge corner and in the narrow corner…

Installing Carpet Step Fourteen: Smooth Out
Work to smooth the rug on the tread itself by working backward to the previous nosing and then the bottom of the previous riser – which may require the very careful cutting out of some of the rug while leaving enough for folding under.

Installing Carpet Step Fifteen: Align the Runner Rug
Align the runner rug for the straight stairs with the end of the rug of the wedge-shaped stairs. (Note: It’s perfectly acceptable to do a little victory dance when the wedge-shaped stairs are completed. That was not easy.) The straight staircase will be a breeze after those.

Installing Carpet Step Sixteen: Install the Runner Rug Up the Straight Staircase
Install runner rug up the straight staircase. Staple the rug securely (every 2”-3”) across the bottom of the riser, keeping sure the rug is perpendicular and taut the whole way across. Then pull the rug upwards vertically and staple the center of the rug directly under the nosing.
Staple outward to one side, keeping the rug taut and vertical all the way to the edge. Then move back to the center and staple the other way, to the opposite edge. Pull and smooth rug up around nosing and onto next tread, then staple rug to the bottom of the next riser as close to the tread as possible, working from center to sides.
When a seam is necessary, cut and fold under the end of the used-up rug a few inches above its being stapled to the bottom of the riser. Staple the folded under edge to wherever it falls on the riser.
Place the next runner rug over top of this folded rug’s end so the new rug is lying along the riser and touching the top of the tread; staple this end down to the bottom of the riser every 2”-3” then continue on your way.

Installing Carpet Step Seventeen: Finish Off The Process
Finish off the top of the rug. When you reach the top riser in your staircase, cut the rug with 2”-4” of excess.

Fold the excess under to create a neat edge.

Pull the folded end of the runner rug directly under the “nosing” of your flooring.

… and staple it securely into place.

Installing Carpet Step Eighteen: Congratulations – Your Work is Done!
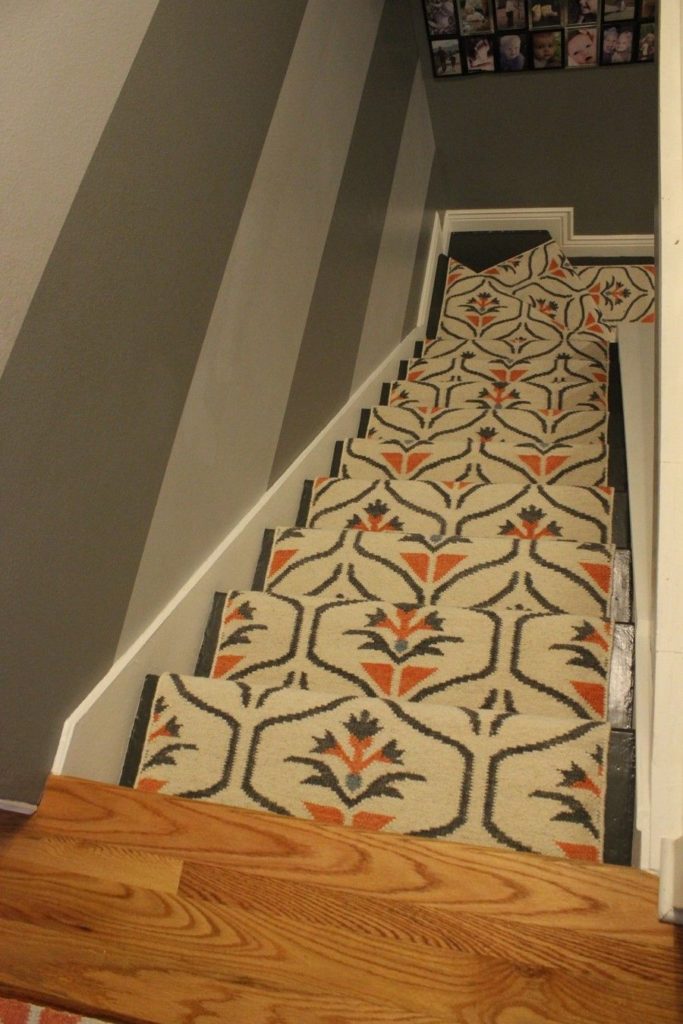
Stand back to admire your new and improved staircase.

I love the fresh feeling of this runner rug on the stairs, especially when compared to the tired, worn-out shag carpet that was here just a few days ago.

Remember that?

Frequently Asked Questions (FAQ)FAQ
How Do You Install Carpet?
If you are looking to save money on a home renovation, you may want to install your carpet by yourself. Alternatively, it’s generally a lot easier to hire a professional who will have all of the necessary tools for the project. The tools you need can either be purchased or rented, which can help to save more money.
You’ll need to use tackless strips to hold the carpet in place, which is laid against the walls if you are installing carpet in a full room. A knee-kicker is a great tool that helps to jam the carpet into the edges of a room or your stairs. To ensure your carpet is even, use a carpet stretcher so that it won’t move once it’s installed. Finally, you’ll want to use a steam roller to press down your new carpet to make it stick to the adhesive underneath it.
How Much Does It Cost to Install Carpet?
The cost for carpet installation will be highly dependent on the room you are having the carpet changed in. Expect to pay between $3.50 and $11 per square foot. These prices include carpet materials and the cost of labor, but of course, these will vary wildly depending on the company you use and the quality of the carpet. A large carpet fitting project will set you back thousands of dollars, but many homeowners still find this to be more convenient than doing it themselves.
Should You Tip Carpet Installers?
Tipping your carpet installers is a personal decision, and it’s believed that about 50% of homeowners do tip. If you have a whole team of installers working in your home, consider tipping them between $10 and $40 each. Obviously, if you are having your whole home refitted or the work is particularly challenging, you may want to increase the tip accordingly.
How Do You Install Carpet On Your Stairs?
To install carpet on your stairs, you’ll begin by laying the carpet down and then stretching it between the two walls or sides. It then needs to be hammered down onto the tackless strips, which should be placed on each wall. The carpet is then stretched to the stair riser and back wall and hammered down. To finish it off, you put the transition piece of carpet on the landing and then stretch it before hammering it into place.
Can I Install Carpet Alone?
Carpet can be very heavy and challenging to move, so depending on the size of the project, it’s best to have someone to assist you with the project and carrying the carpet into place. Most carpet fitters have a whole host of tools they use, such as a stretcher, which makes the process much easier to do alone or in a small team. While you may save money by installing the carpet alone, when it’s not done correctly, you may find that it wastes time and money in the long run.
How Long Should You Wait to Put Furniture on New Carpet?
Wait at least twenty-four hours to put your furniture back down after installing a new carpet. While you may want to settle into your room straight away, if you move heavy furniture in too soon, it will damage the carpet and may undo the good work of your carpet fitters.
Final Words
I hope you find success in removing carpet, prepping and painting, and installing a runner rug onto your staircase for a fresh, contemporary look and feel to your home. If you go back and compare the before and after photos, you won’t be able to believe what an incredible transformation this project made to the stairway.
While there are many steps involved in the process, most of them are reasonably easy to complete. We hope you enjoy renovating your home using this DIY project and that the upgrade to your staircase will bring a new lease of life into one of the most used parts of your house. And for more great DIY ideas for the home, check out our tutorial on how to remove and install a bathroom faucet!