How to Apply Grout Sealer


Grout sealer is a clear liquid that plugs tiny pores, repels future stains, and makes cleaning easier. Sealing your grout on a regular basis will prevent it from discoloring and developing a grimy look.

Do You Have to Seal Your Grout?
Tile and grout manufacturers recommend applying grout sealer to increase durability and longevity. Grout is porous, which means it absorbs water. In order for grout to repel water and stains, you must add a sealant.
How Often Should I Apply Grout Sealer?
Apply grout sealer after installation and at least once a year. Many grout sealers claim to last a year, but harsh cleaning agents (like vinegar) will erode the sealer, and you’ll need to apply it more frequently.
Materials You Need To Seal Grout
Before you seal your grout, you need a sealer and application brush. There are two grout sealer formulas, here’s the difference between them:
- Penetrating sealer – Best for bathrooms, high moisture, and high humidity areas. These sealers penetrate into the grout, filling gaps with small latex or silicone particles.
- Membrane forming sealer – Best for areas that don’t experience high humidity or constant water exposure – don’t use in a shower. These products form a membrane on top of the grout. They repel water and stains but don’t allow the grout to breathe or trapped water to escape, which can lead to mold or mildew in the bathroom.
You also need to look for a sealer that works with your tile. The product packaging will indicate the compatible tile types – this is especially important when sealing natural stone. Most grout sealer comes in a jug, but you can also find spray-on versions.
The applicator depends on your tile type and grout line. For thin grout lines, try a sponge or foam brush. For glazed tiles that won’t accept sealer, use a small paintbrush to paint the sealer on the grout lines only.
How To Apply Grout Sealer: Step by Step

Step 1: Repair Grout and Allow it To Cure
Clean the tile surface and inspect it for damage. Repair broken grout lines before sealing. When installing new tiles or making repairs, allow 48 hours for the grout to cure.
Step 2: Apply the Sealer and Wipe Away Excess
Apply the first coat of sealer to your grout lines. Wait five minutes and then wipe away excess with a clean cloth.
Step 3: Apply a Second Coat of Sealer
Apply a second coat of sealer. Wait five minutes and wipe away the excess with a clean cloth.
Step 4: Allow Sealer To Cure
It takes 24 to 48 hours for grout sealer to cure – check the product package for specifics. You need to let the sealer cure naturally. If you use a heater to speed up the process, cracking can occur.
Step 5: Perform a Water Bead Test
Once the sealer is cured, test the surface by applying a few drops of water to the grout. If the water beads and puddles, your job is finished. If the water absorbs, apply a third coat of grout sealer.
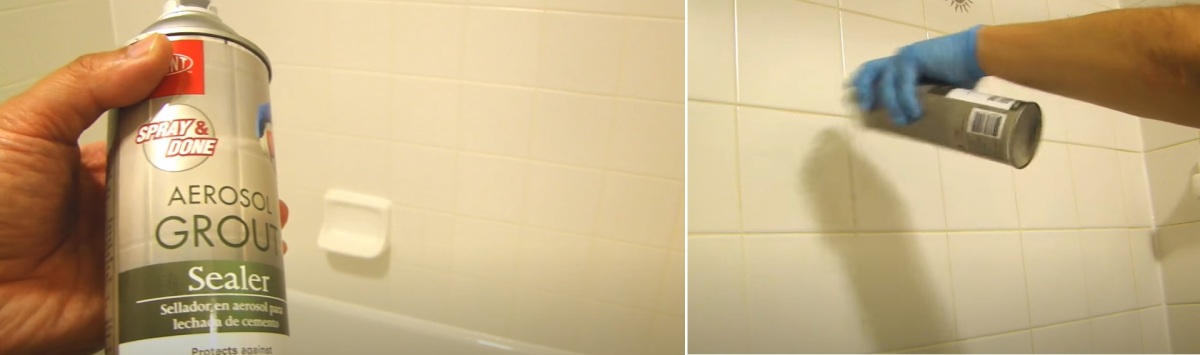
How to Apply Spray-on Grout Sealers

Step 1: Start with Clean and Dry Grout
Using spray-on grout sealer is similar to using a liquid sealer. Clean your tile and grout and make any necessary grout repairs. For new grout lines and repairs, wait 48 hours or until the grout is cured before sealing.
Step 2: Apply the First Coat
Shake the can thoroughly before applying. Hold the can at least 6-10 inches away from the grout line and spray. Wipe away excess sealer before it has a chance to dry.
Step 3: Perform a Water Bead Test
Wait two hours for the first coat to dry, and perform a water bead test. Apply a couple of drops of water to the grout. If the water beads, you’re good to go. If the water absorbs into the grout, you need to apply a second coat.
Step 4: Apply a Second Coat if Needed
If your grout didn’t pass the test, apply a second coat wiping away excess before it dries. Wait two hours and perform another moisture test.
Step 5: Wait 72 Hours Before Getting the Grout Wet
Most spray-on sealers are foot-traffic ready within a few hours, but you’ll need to wait 72 hours before cleaning the tile or getting your grout wet.

Grout Sealer Safety
When working with grout sealers, safety is a priority. Grout sealers contain hazardous chemicals like propane, polymers, butyl acetate, and hydrocarbons. To safeguard against harmful vapor exposure, the space you’re working in needs proper ventilation.
Grout sealer reactive airways dysfunction syndrome (RADS) is characterized by a sudden attack of asthma complications or other breathing problems. RADS occurs due to exposure to corrosive gas, vapor, or fumes in grout sealers.
Grout sealer pulmonary toxicity is a medical condition for when the lungs are impacted after using toxic materials like grout sealer. Again, wear a face mask and make sure the area where you’re working has proper ventilation.
Frequently Asked Questions (FAQ)FAQ
Can grout be permanently sealed?
There are several one-time application options that will permanently seal grout. The application process is similar to those described in this article and is a great option for new grout, not yet stained or discolored.
When exactly do I seal grout?
Ideally, you want to seal grout when it’s newly curated. This gives no opportunity for stains and dirt to penetrate your pristine grout, allowing you to keep the grout’s original color.
Does epoxy grout need to be sealed?
Since epoxy-based grout is non porous grout, it does not need to be sealed. It’s extremely resistant to issues normal cement-based grout encounters like erosion from chemicals, cracks and discoloration.
How do I know if my grout is already sealed?
You can try the water drop test described in the application process above. Another simple way to tell is just by looking at it. If you can tell it’s lighter in some areas and darker in high traffic areas, it’s likely that it was never sealed.