Sponge Painting Basics and Ideas for Styling Your Walls


Sometimes a little paint is all you need to transform a space. And sponge painting is a fast and easy way to freshen up your space.

This patchy coating provides a high aesthetic appeal and provides a very unique pattern compared to other coating techniques. Check out these sponge painting ideas to add texture to your home.
What is Sponge Painting?

If you’re looking for an interesting texture for any wall in your home, sponge painting is the way to go.
It’s an application technique used for texturing, depth, and complexity.
A sponge, some paint, and a few colors can dramatically transform a room.
Sponge Painting Color Combinations
Some of the best color combinations for a sponged finish are different tones of the same color.
You can make other great color combinations with colors from the same family and shade to nicely complement each other.
It’s best to avoid combining unrelated colors like red and green. It gives off a dated and gaudy result.
How to Sponge Paint a Wall
Before you dive into painting your walls, you’ll need to prepare them. While the sponged effect works well at hiding minor blemishes and irregularities, it won’t hide any significant wall damage.

Like you would for any painting project, prepare your walls by making necessary repairs, washing them, and taping the areas you aren’t painting.
And it’s a good idea to test your sponging technique on a piece of cardboard or paper before taking it to your walls.
Step-by-Step Process to Sponge Paint Your Wall
- Apply the base coat if you’re using one.
- Mix the glaze.
- Wet your sponge.
- Then dip it into the glaze and dab the first color to the wall with even pressure.
- After the first color, dab your second color while the paint is wet for an even blend.
- Make sure to dab the corners and edges of the wall.
- Once all the colors are on, use the sponge OFF technique for adjustments.
What Kind of Paint to Use for Sponge Painting
You’ll want to use paint that doesn’t dry too fast so you can properly blend the colors as you add them.
In this case, latex paint isn’t recommended because of its quick-drying properties.
On the other hand, acrylic paint works best for sponge painting your walls because it dries slowly and allows for proper blending.
Another type of paint to consider is alkyd. Alkyd paint had a similar consistency to oil paint, and because of this, you’ll probably have to add paint thinner. Be advised that you should wear a mask and gloves when handling paint thinner to avoid coming into contact or inhaling fumes.
Sponge Paint Brush

There are several sponges and sponge paint brushes to choose from for painting.
You can find these at any of your local home improvement stores or supermarkets.
It’s recommended to use a sea sponge for painting the desired texture.
Sea sponges are natural sponges with irregular sized pores but consistent in texture.
You can also use other sponge paint brushes like circular brushes or foam paint brushes. But these might not give you the effect you’re looking for.
You can also use a sponge paint roller.
Sponge rollers are convenient and can create a different texture than a sea sponge.
You can save time with a sponge paint roller and it works for any size project.
Sponge Painting Techniques
There are two primary techniques for sponging your paint on the wall.
The first is sponging ON the wall. And with this technique, you simply dab your paint on the wall, not too thick and too thin.
The second is sponging OFF the wall. And here, you’re using a clean, wet sponge to pull wet paint off the wall.
These techniques provide different textures but are excellent finishes.
Sponge Painting Ideas
There are a variety of sponge painting ideas you can draw inspiration from, like sponged bricks and ceilings to sponge texture bathrooms and kitchens.
Sponge Texture

Sponging is a quick and easy way to add texture to your bathroom. It’s also an excellent way to camouflage an unsightly or uneven surface, such as old plaster or similar (or emphasize its imperfections).
Faux Brick Sponge Wall

You don’t need real bricks when you can apply this painting texture to your wall! Or, if you have real bricks, this painting technique adds dimension and style to the surface.
Ombre Wall Sponge Painting
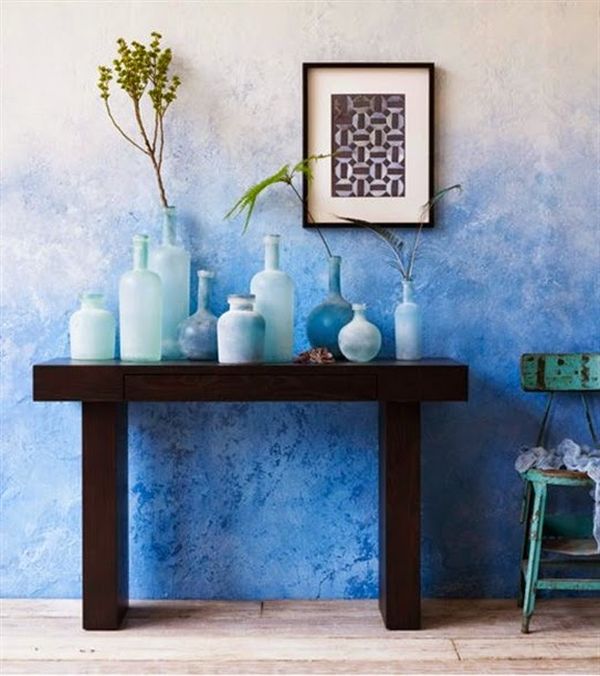
An ombre wall is a stunning blend of colors, like a sunset. It’s an easy technique to apply if you want to add this style to a wall.
Simple Sponging

Painting is a very inexpensive way to add an expensive textural look. When you consider the cost of other design methods to add texture to a wall, sponge painting comes out by far an inexpensive option.
Blue Sponge Painted Walls

Paint can produce highly versatile results. With this technique, you can easily recreate the delicate aesthetic of antique porcelain or replicate the rustic drama of stone. {found on revistaad}
Sponge Painted Ceiling
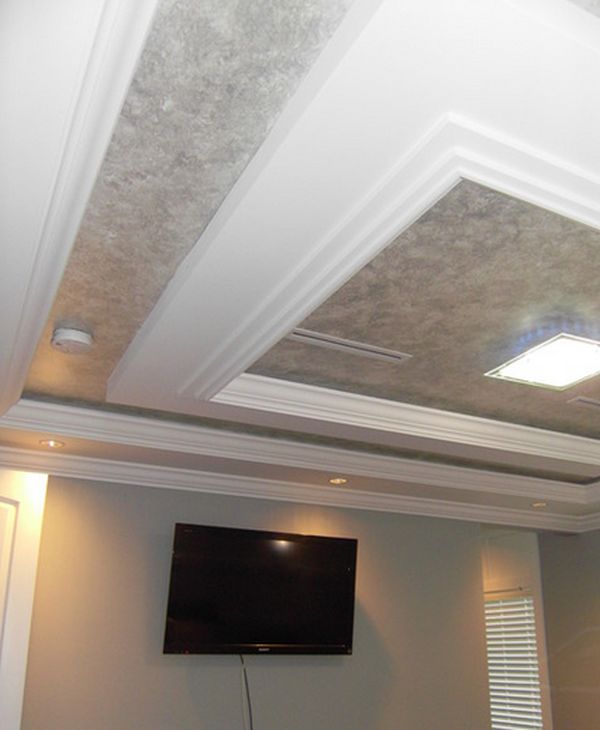
The technique can be applied to virtually any surface – doors, furniture, floors, and… Ceilings. Sponge painting the ceiling is a versatile décor technique.
Easy Sponge Wall

The texture on this wall is simple and quickly done. This technique is brilliant for hallways or behind simple decorations.
Dreamy Sponge Painted Bedroom

This sponge painted room is blue and dreamy. There’s a lot of texture and form here with the sloped walls and ceiling.
Modern Sponge Bathroom
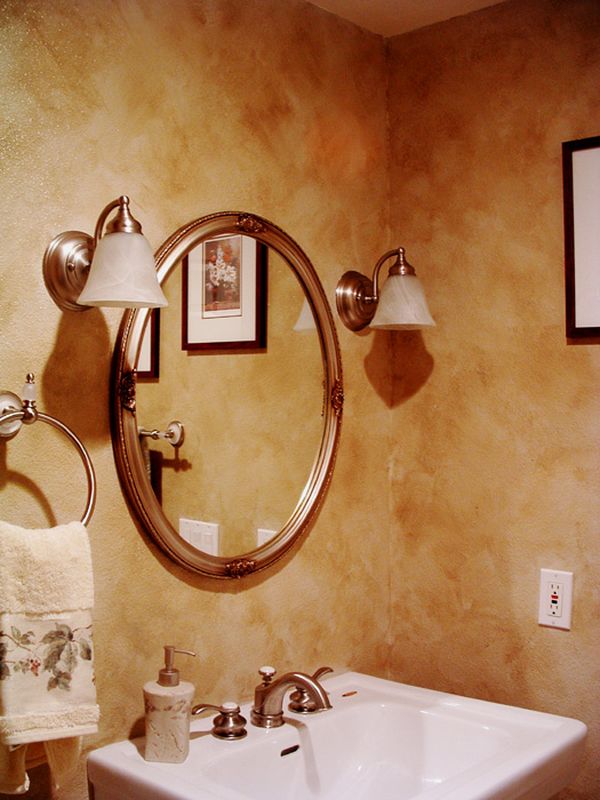
Sponging puts off such a delicate and exciting texture, as you see here. The tone nicely compliments the white in this unique bathroom space.
Vintage

Sponge painting can give you a sense of timelessness with a classic style like this. The dark colors and floor pattern make this area feel old and vintage.
What Are The Benefits of Sponge Painting?

There are benefits to painting with a sponge. It doesn’t require an exuberant amount of skill, so as soon as your walls are ready, you can start dabbing away with your sponge.
It’s easy and doesn’t take much longer than painting your walls the regular way.
Also, this is a perfect way to get your kids involved if you’re painting their room!
Sponge Painting Tips
Here are some helpful tips if it’s your first time using this painting technique.
- Larger sponges can be unmanageable. Use a sponge the size of your hand or smaller.
- Always dip your sponge in water before applying or removing glaze (never use a dry sponge).
- If you don’t need a base coat, save yourself some time by not applying one.
- Maintain the same pressure throughout sponging your walls.
- Avoid jumping around while sponging. It makes for an uneven effect.
Use these sponge painting tips to save time and a more pleasant painting experience.
Sponge Painting Furniture

You can easily make your furniture stand out with the sponge painting technique.
Here are a few steps to consider for sponging your furniture.
- First, choose a well-ventilated area.
- Then, prepare your workspace by laying down plastic, cardboard, or newspapers.
- Next, remove any hardware on the furniture like handles.
- Tape over any glass of mirrors.
- If you’re painting wood, you’ll want to sand it.
- Then, apply your base coat and leave it to dry for two hours.
- Sponge paint the surface and allow to dry for four hours.
- Evenly add the finish topcoat and let it dry completely.
And finally, you’ve got yourself a unique piece of sponge textured furniture.
Sponge Painting FAQ
How to Paint Ombre Wall With a Sponge
Similar to layers of the sunset, an ombre wall has colors that gently transition into each other.
This happens by using shades of colors to blend them together effectively.
To paint an ombre wall with a sponge, you’ll need to apply the colors and blend them while the paint is still wet.
You’ll want to blend from the bottom or top of a color to the middle of the following color, creating a seamless transition.
How to Sponge Paint with 3 Colors
You can easily sponge paint with three colors as one of these colors will be the base.
Typically, the lightest color serves as the base. And the darker colors will get sponged over the top.
Keep in mind, all the colors should nicely complement each other.
First, you’ll apply the base layer and wait for it to dry. Then, you’ll sponge the darkest color over it. And you’ll dab the third color over that.
How to Paint Clouds With a Sponge
To paint clouds with a sponge, you’ll need to mix one part white paint with four parts glaze.
Get your sea sponge damp and dip the sponge into the mixture. Then dab the sponge onto the wall in a cloud-like shape.
At this point, it’s best to use cheesecloth for smoothing and blending out the cloud. Get the cheesecloth wet and wring it out. Wad it up and gently dab to soften and blur the cloud.
How to Make Sponge Shapes for Painting
If you plan to add shapes or need a small piece of sponge for painting, gather the sponges you plan to use.
Use a marker to draw the shapes on the sponge. Then, cut out the forms and get ready to paint.
Dip the dry sponge into the paint and press onto the surface. Then, lift the sponge and repeat the process until you are satisfied with the results.
Do You Wet The Sponge Before Painting?
The sponge needs to be damp, not wet.
You can rinse the sponge in the sink and squeeze out the excess water. The sponge should always be clean and damp to use it for your painting projects.
Where to Buy a Sea Sponge for Painting
Many of the supermarkets and home improvement stores carry them. However, if you can’t get to a store or find them, you can order them online through Amazon or other online retailers.
Add Style and Texture to Your Home With Sponge Painting
It’s one of the easiest ways to add texture, depth, and complexity. It’s inexpensive and an option for touch-ups or covering imperfections. Creatively add style to the look of your home with this simple but effective painting technique.