How Install Concrete Deck Footings

Our tutorial outlines a step-by-step method for installing concrete deck footings for a low deck or wood patio.
While there are a variety of ways to install footings, we use a fast and simple technique. We’ve used this method several times with excellent results. Here’s how to install concrete deck footings.

How to Install Concrete Deck Footings
The key to successful footings is accurate measurement and alignment prior to post-placement.

Step 1: Measure Your Deck Area and Determine Footing Placements
Start by measuring your deck area and then determine where you want/need support.
Our deck’s dimensions are about 14’ x 25’ (with a portion of that cut out for concrete steps). Along the long side, we will use five support posts, spaced roughly every 7’.
(Note: Because we are building a pergola above the deck, two of the support posts will be larger beams than these 4×4 posts. Here’s how we installed the pergola posts.)
There is one middle support post along the shorter side and then two posts placed in the center of the deck.

Step 2: Dig Your Holes
Dig holes to the depth required for your deck height. Because this will be a low deck, the holes are about 18.” For a 4×4 post, a diameter of 12” is sufficient; try not to go much wider than this since it makes for extra digging work.

It’s helpful, depending on your soil type, to use a pry bar to loosen soil that’s deeper than a shovel can go.

Alternate using the pry bar with scooping out the loosened dirt with a small shovel until you reach your desired depth.

Step 3: Install a String to Determine Straight Lines
One of the best ways to determine a straight line is via string. You want your post holes in a precise line so you can install your framing without issue.

Measure two sides of where your string will run (e.g., in this instance, the center string is exactly 7’ from the foundation of the house; the outer string is 14’ out), then attach the string at those points. Doing this ensures a straight line. It’s a good way to mark level, too, if you add in a level check and adjustment to the stringing.

Step 4: Fit the Holes with Concrete Forms
Once your holes are dug, it’s time to fit them with concrete forms. For installing 4×4 post footings, a 10” diameter concrete form works well. Measure, then cut the forms to your desired height.

Note: Concrete forms are excellent for holding the concrete in place for footings that extend above ground. In this example, however, the concrete support needs to reach only to ground level, not above. Use a hand saw to cut the concrete forms at your desired height.

Step 5: Prepare Your 4×4 Posts
Cut your 4×4 posts a bit higher than what you’ll need. In this example, 8’ long 4×4 posts were cut into thirds because they need to extend only about 8” above ground, and we wanted to have a bit extra.
You always want a few inches more than you think you’ll need. The extra post will be sawed off later, so you don’t need to worry about making them exact at this point.

Step 6: Determine the Exact Post Placement
Before you set your posts into the concrete, determine where the post should hit. Once they are set, there’s no changing them.
You used string to determine the position of your holes, but now you need to run string to determine the exact placement of your posts.
In this example, part of the deck frame is mounted to the foundation of the house, so we made measurements off of the endpoint of that frame. Two 2x6s will serve as the outer frame, and we will mount an additional 2×8 on the outside of those boards for the finishing side piece. In total, 4-1/2” is required outside the 4×4 post to make the frame work.

Pound a nail in at the point where your post must align, then run string to the post-install corner. Use a square to determine 90 degrees.

Pound in a stake that corresponds to your 90-degree string, and tie the string taut onto the stake.

You now have a straight, 90-degree line from one definite corner of your deck to the future position of a corner of your deck.

Do the same thing with a string running perpendicular to create the full and precise corner position. Check for 90 degrees.

Step 7: Align Your Concrete Forms
Place your concrete forms into all the holes along both strings. The string should run to the side of the center above your form. Aim to have your post placement as close to the center of your concrete forms as possible. However, if they’re a little off-center, it’s okay as long as there’s enough room for the concrete to form all the way around the post.

Step 8: Mix Your Concrete and Set Your Post
Once your concrete form is positioned and ready, use a hose to run about 2” of water into the bottom of it.

Make sure you have fast-setting concrete that states it doesn’t need to be pre-mixed. The process is so quick and easy if you get the right concrete mix.

Pour about 1/5 or 1/4 of a 50# bag of concrete mix into the water at the bottom of your concrete form.

Place the post down into the concrete, and immediately check for level against the string. Be sure the side of the post next to the string only grazes it and doesn’t push it out of place in order to touch. If it’s not quite right, pull the post out and wiggle it down into the concrete or slide it until you’re level, barely touching the string.

Once you’re level (remember, this might take a minute or two to get right, but be sure you get it right), pour about half the bag of concrete into the hole while someone holds the post in place. Add a little water, then pour the remainder of your concrete mix in. Add more water until it’s a couple of inches above your concrete mix.

Use the pointy end of your pry bar to make holes in your concrete. These won’t actually be holes, of course. Instead, the up-and-down pry bar poking is “mixing” the concrete, finding pockets of air, and giving them a place to escape before the concrete sets.

Check for level on perpendicular sides of your post. Your post may have moved, so make adjustments before the concrete starts to set. Remember, it’s fast-setting, so you have a few minutes but not a ton of time.
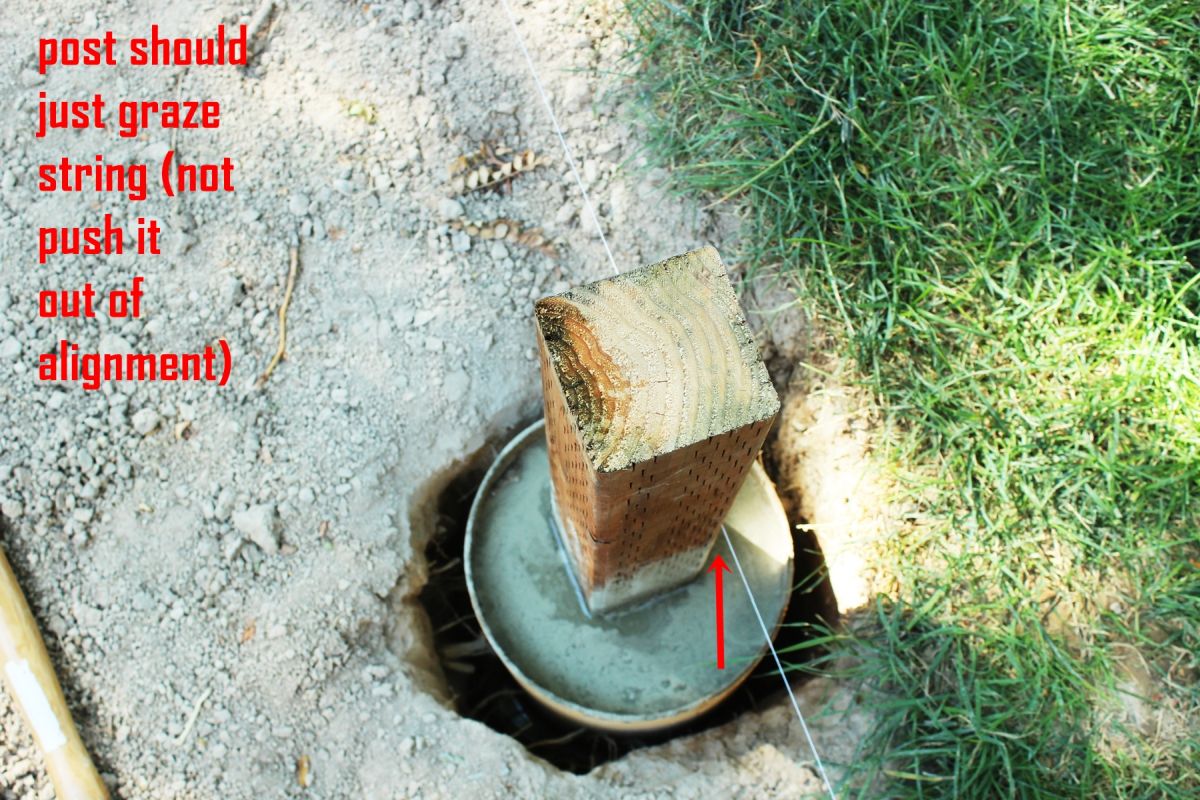
At the end of the day, the side of your post should just graze the placement string without bending it or pushing it out of the way.

Step 9: Repeat on All Footings
Repeat this process for all of your footings holes, being sure to check for level in multiple directions multiple times on each post while the concrete is fresh. Allow the concrete to cure according to weather and package instructions.

You’re well on your way to completing your deck frame. Note that two of the holes here are for pergola posts, which we will install using brackets in the concrete.